Table of Contents
Advertisement
Available languages
Available languages
Quick Links
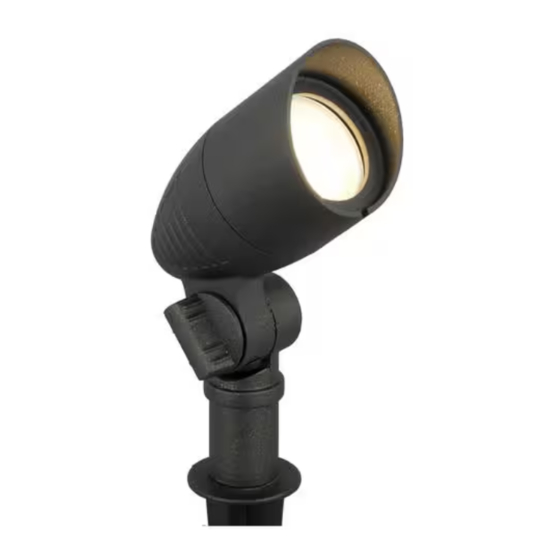
PACKAGE CONTENTS
A – Lamp Body x1
Assembly and Installation
1
Attaching and installing the light
WARNING: Never push the fixture into the ground by the lamp
body (A) or use a hammer to insert the ground stake (C) into the
ground.
Insert the fixture wire on the wire connector (B) into the groove
□
located on the top of the ground stake (C).
Screw the lamp body (A) onto the top of the ground stake (C). Ensure
□
the fixture wire on the wire connector (B) stays in the center of the
groove of the ground stake (C) to avoid damage to the fixture wire.
Prepare a hole in the installation location. Use a tool such as a
□
screwdriver (not included) to prepare the installation hole to ensure
the hole is not larger than the ground stake (C).
Install the ground stake (C) in the ground by pushing on the lamp body
□
(A).
The lamp body (A) can rotate up and down 130 degrees.
□
B – Wire Connector x1
(with 12 in. wire attached to lamp body)
1
LOW VOLTAGE LED FLOOD LIGHT
C–Ground Stake (6.535 in.) x1
2
Connecting the wires
WARNING: The wire connector (B) contacts have sharp edges for
piercing the main low voltage cable. To avoid injury, do not touch
the metal contacts.
CAUTION: The wire from low voltage power unit should be 12-16
AWG type underground low Energy Circuit Cable.
IMPORTANT:
Protect the wiring by routing it in close proximity to the light
□
fitting, or next to a building structure such as a house or a
deck.
The landscape wire and connector can also be hidden under
□
stone or buried under grass at a maximum depth of 6 in.
(15.24 cm).
Do not install the fixture within 10 ft. of a pool, spa, or fountain.
□
Do not submerge the fixture in water.
□
Place the wire connector (B) on opposite sides of the low voltage
□
cable (not included) from the transformer (not included) where
the fixture will be located.
Align and fit the main low voltage cable vertically to the slot of
□
the wire connector (B).
Press the wire connector (B) together until it is locked around the
□
main low voltage cable. The pre-set prongs will pierce the cable
insulation and establish contact with the electrical wire inside.
Once the wire connector (B) is in place, it is recommended to
□
wrap it with electrical tape (not included).
After all fixtures are installed, turn on the transformer.
□
Item # 1008 242 986
Model # KIF2301LS-01
Use and Care Guide
Advertisement
Table of Contents

Related Manuals for HAMPTON BAY KIF2301LS-01


Summary of Contents for HAMPTON BAY KIF2301LS-01
- Page 1 Item # 1008 242 986 Model # KIF2301LS-01 Use and Care Guide LOW VOLTAGE LED FLOOD LIGHT PACKAGE CONTENTS B – Wire Connector x1 A – Lamp Body x1 (with 12 in. wire attached to lamp body) C–Ground Stake (6.535 in.) x1...
- Page 2 Care and Cleaning □ □ Clean the fixture with a soft dry cloth. Do not use any cleaners with chemicals, solvents or harsh abrasives. Troubleshooting Problem Possible Cause Solution □ □ Check the outlet and ensure that a breaker or GFCI circuit has not been tripped. The fixture will There is no power.
- Page 3 Artículo # 1008 242 986 Modelo # KIF2301LS-01 GUÍA DE USO Y MANTENIMIENTO REFLECTOR LED DE BAJO VOLTAJE CONTENIDO DEL PAQUETE B –Conector de Cables (con cable de 12 pulgadas A –Estructura de la Lámpara x1 fijado a la estructura de la lámpara) x1 C –Estaca de Tierra ( 6.535 pulgadas) x1...
- Page 4 Mantenimiento y Limpieza □ □ Limpia la lámpara con un paño suave y seco. No uses limpiadores con químicos, solvents, o productos abrasivos. Solición de Problemas Problema Causa Posible Solución □ □ Verifique el tomacorriente y asegúrese que no esté apagado el interruptor o circuito El accesorio no No hay corriente.
- Page 5 FCC Warning Warning: Changes or modifications to this unit not expressly approved by the party responsible for compliance could void the user’s authority to operate the equipment. NOTE: This equipment has been tested and found to comply with the limits for a Class B digital device, pursuant to Part 15 of the FCC Rules.
Need help?
Do you have a question about the KIF2301LS-01 and is the answer not in the manual?
Questions and answers
What transformer is used
The HAMPTON BAY KIF2301LS-01 uses a low voltage transformer. The manual provides cable selection guidelines for 12V and 15V systems, indicating compatibility with transformers up to 900W.
This answer is automatically generated