Advertisement
Product includes
- (1) #14 Round Head Screw
![]()
- (1) 7 1/4 in. Support Rod


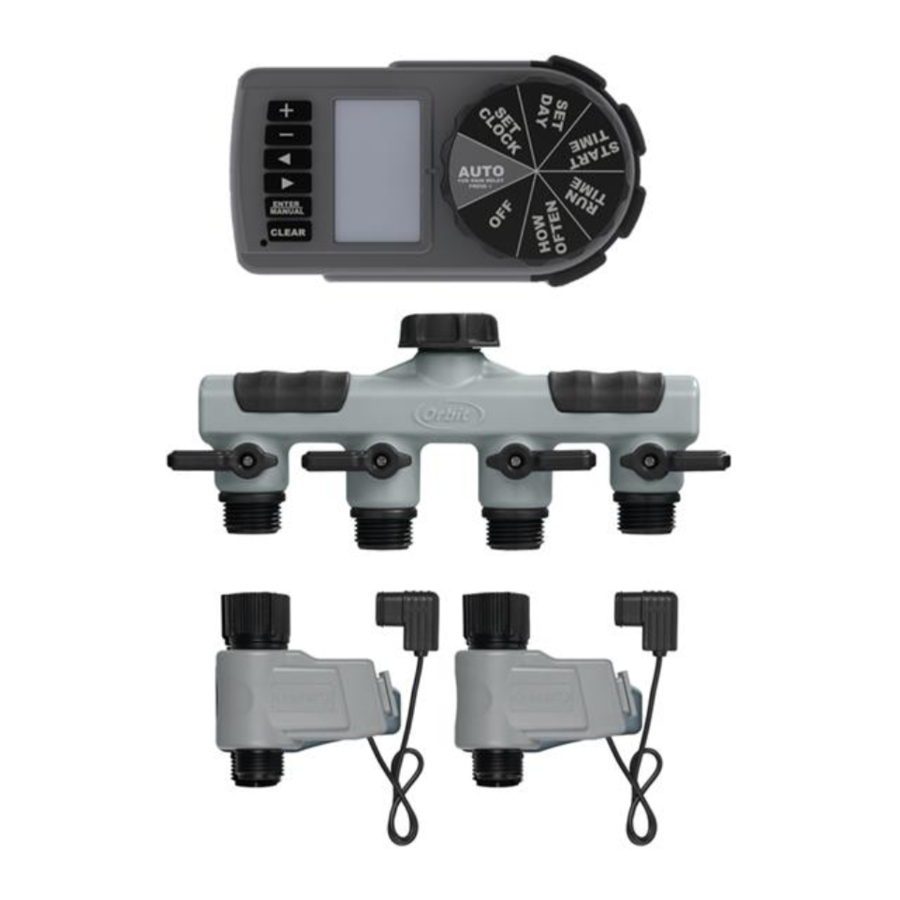
Overview

- Watering stations
- Indicates when next watering cycle will start
- Manual watering is on
- How often timer will water in interval mode
- Cycle start times
- Timer is in set mode
- Rain delay is on
- Timer is watering
- Clock, start time, and watering duration
- AM or PM for clock and start time
- Low battery
- Indicates numbers in clock section as hours, minutes, or days
- Days of the week
- Interval watering mode

- Battery tray
- LCD screen—displays setting and watering program for timer
- Function dial—turns to set watering program
- CLEAR button—clears individual settings of program
- + – buttons—advance or reverse settings
- < > buttons—move cursor to different settings
- ENTER/MANUAL button—selects setting or turns on rain delay when in AUTO
- RESET—clears all programmed settings
InstallatIon
- Attach manifold to an outdoor hose faucet.
- Secure manifold to wall using the mounting hardware and instructions provided.
- Attach up to 4 valves to the manifold outlets (the valves are electronically operated and must be attached to the timer for proper operation). Open fully each of the shut-offs with a valve attached.
- Connect the wire from each valve to one of the numbered ports on the back of the timer. The numbers 1 through 4 are the "STATIONS" used while programming your timer.
- Install two AA alkaline batteries into the battery tray (battery tray may be removed by pulling out to the left).
Please ensure that the valves are attached to the timer before installing batteries. Once the batteries are installed the timer will immediately begin a start-up sequence. A countdown from 150 down to 0 will begin on the display and will take a few minutes. Your timer can be programmed during the countdown, but the valves cannot be actuated until it is completed.
- Create your timer program.
- Slide timer onto a valve mounting bracket.
- Turn on hose faucet.
Mounting the Manifold to the Wall
- Attach support rod to manifold by inserting it into the two mounting holes on the back of the manifold.
![]()
- Mark where support rod touches the wall.
![]()
- Drill a pilot hole using a 1/4 in. drill bit.
![]()
- Attach the support rod using the screw provided.
![]()


Installing The Batteries
- Remove the tray on the side of the timer by sliding it out.
- Insert two AA (1.5V) alkaline batteries (not included) and replace the tray. Low battery icon will appear when batteries need replacing. Replace batteries within 30 seconds or timer programming will be lost.
Tip: Remove batteries when timer is not in use for extended periods.
PROGRAMMING
Rotate the dial to positions indicated for setup.
- Turn Dial to Set Clock
- Press the + button to advance clock time (hold button for quick advance). Press the – button to reverse clock time (hold button for quick advance). *Keep in mind am/pm.
- Press ENTER or turn the knob to accept clock time.
- Turn Dial to Set Day
- Use the < and > buttons to move cursor (blinking line) over current day.
- Press ENTER or turn dial to accept the day.
- Turn Dial to Start Time
Each start time cycles through all watering stations (1, 2, 3, and 4). Cycle A is for if you want to water once a day. Add Cycle B if you want to water two times a day (2 different start times). Add Cycle C if you want to water three times a day (3 different start times).
- Use < and > buttons to select start time A, B, or C.
- Press ENTER to edit start time.
- Use the + and – buttons to set desired start time. * Keep in mind am/pm.
- Press ENTER to accept the setting.
- Repeat steps 1 through 4 for B and C if you want to water more than once a day.
To clear a start time:
- Use the < and > buttons to move the cursor over cycle letter (A, B, C).
- Press ENTER to select.
- Press CLEAR.
EXAMPLE: If cycle A is set for 6:00 am, then at 6:00 am your first valve will turn on and run for its duration, then it will turn off and the second station will automatically turn on and run for its duration.
Turn Dial to Run Time
Set watering duration from 1 to 240 minutes for up to 4 stations.
- Use the < and > buttons to select the run time for valves stations 1, 2, 3, or 4.
- Press ENTER after each selected Station. [ ] will appear around the Stations selected to water.
- Press CLEAR to deselect a Station.
Or
- Use the + and – buttons to increase or decrease the number of minutes to water.
- Press ENTER to accept the setting.
- Repeat steps 1 and 2 for each station you would like to water.
Turn Dial to How Often
Select which days to water or every 1 to 14 days. All stations and cycles will water on selected days.
- Use the < and > buttons to select which days to water Sunday through Saturday.
- Press ENTER after each selected day. [_] will appear around days selected to water.
- Press CLEAR to deselect a day.
Or select INTERVAL. 1 is every day, 2 is every other day etc. up to 14 days.
- Use the + and – buttons to increase and decrease the number of days.
- Press ENTER to accept the setting.
Turn Dial to Auto
Timer waters according to programmed start time(s), run time(s), on the programmed days or interval; this is where you want the dial to have your program run.
Manual Watering
Allows you to water immediately without interrupting the set cycle(s).
- Press the MANUAL button when dial is turned to AUTO
- Press ENTER to run all stations once as previously programmed in RUN TIME section. Or, use the < and > buttons to select which station(s) to manually water.
- Press ENTER when cursor is over desired watering station.
- Use + and – buttons to set from 1 to 240 minutes
* There will be a 6 second delay till your cycle will begin Screen will flash between clock and minutes remaining on cycle. To remove manual watering and resume programmed cycle press CLEAR.
Rain Delay
Delay watering cycle during precipitation to conserve water.
- When in AUTO, press + button for 24 hrs, 48 hrs, or 72 hrs.
Screen will flash between clock and hours remaining before programmed cycle resumes. To remove rain delay, press CLEAR, or turn dial to OFF and then back to AUTO.
Off
Off stops the timer from watering and clears Rain Delay.
Troubleshooting
Water does not come on at desired time. Check if:
- Clock is set to correct time including AM and PM.
- Start time is set to desired time including AM and PM.
- Start times begin after previous watering cycle has run through all stations and set durations.
- Rain Delay is on (DELAY appears on left side of screen if on).
Timer does not water. Check if:
- Shut-off on the valve outlets are open.
- Timer is set to AUTO.
- Batteries are low.
- Clock is set to correct time including AM and PM.
- Rain Delay is on (DELAY appears on left side of screen if on).
- Valve plugs are inserted in the correct corresponding timer outlet.
Working Water Pressure
Minimum: 25 psi Maximum: 100 psi
Working Temperature
Maximum: Do not exceed 120°F Minimum: Keep from freezing

For outdoor use with cold water only.
Orbit® Irrigation Products, Inc.
North Salt Lake, UT 84054
© 2013 Orbit Irrigation Products, Inc.

Documents / ResourcesDownload manual
Here you can download full pdf version of manual, it may contain additional safety instructions, warranty information, FCC rules, etc.
Download Orbit 56041 - Automatic Yard Watering System User Manual
Advertisement


Need help?
Do you have a question about the 56041 and is the answer not in the manual?
Questions and answers