Table of Contents
Advertisement
Quick Links
Advertisement
Table of Contents

Related Manuals for Okofen FleXILO


Summary of Contents for Okofen FleXILO
- Page 1 Installation manual Pellet Outside Storage ENGLISH PE729EN...
- Page 2 Title: Installation manual Pellet Outside Storage Article number: PE729EN Version valid from: 03/2023 Approved: Christian Wohlinger Author ÖkoFEN Forschungs- & EntwicklungsgesmbH A-4133 Niederkappel, Gewerbepark 1 Tel.: +43 (0) 72 86 / 74 50 Fax.: +43 (0) 72 86 / 74 50 – 210 E-Mail: oekofen@pelletsheizung.at ©...
-
Page 3: Table Of Contents
Contents Contents Dear Customer Intended use Types of safety warning sign Planning Pellet Outside Storage General Preparatory work 4 Preparation surface Parts list 6 Structure base plate Structure fabric tank Structure base frame 9 Application foil Do-it-Yourself facade 10 Line routing... -
Page 4: Dear Customer
Intended use The FleXILO storage tank is designed for the storage of pellets for heating systems in detached and semi-detached houses or commercial buildings. Use of the FleXILO storage tank for other purposes is not permitted. No reasonably foreseeable forms of misuse of the FleXILO storage tank are known. -
Page 5: Types Of Safety Warning Sign
2 Types of safety warning sign Types of safety warning sign The warning signs use the following symbols and texts. Types of safety warning sign Risk of injury Consequences of risk Avoiding risk DANGER Danger - indicates a situation that could lead to death or lifethreatening injury. ▶... -
Page 6: Planning Pellet Outside Storage
Use only bends with 45° to allow easy retraction of the hoses. For the Flexilo Outdoor outdoor tank, a paved subsoil and a gravel subsoil with a min- imum height of 10 cm are required. Additional concrete slabs facilitate the installation of the tank and additionally improve the stability. -
Page 7: Preparatory Work
3 Planning Pellet Outside Storage Preparatory work Secure location choice • Level surface, free from backwater Safety against slipping, accessibility for filling process • Excavate the soil at least 10 cm, compact and gravel. • Recommendation: • Align 7 pieces of concrete slabs (40x40x4 cm) in the scale. •... - Page 8 3 Planning Pellet Outside Storage Variant 2 above ground line routing For above-ground piping, install a protective pipe with at least Ø DN160 and • bends with max. 45°. Install the wall duct by means of a pipe duct and a lining pipe (to be provided in •...
-
Page 9: Preparation Surface
4 Preparation surface Preparation surface There are different regulations in the different European countries. Please mind the prescription of your country. min. 300-500 Underground pipe - Ø 200 b) Concrete slabs 2210 Distance to the house wall d) House wall Excavation (2850 x 2210 x 100 mm) 2850 1644... -
Page 10: Parts List
5 Parts list Parts list Part Dimensions in mm Quantity Illustration Foot profile Middle foot profile Rear foot profile Front foot profile Base plate 27x438x1556 Installation manual... - Page 11 5 Parts list Part Dimensions in mm Quantity Illustration Angle connector Spacer boards rear 27x90x200 Spacer boards side 27x127x200 Stand 50x80x2300 Installation manual...
- Page 12 5 Parts list Part Dimensions in mm Quantity Illustration Longitudinal boards 27x200x2186 Cross boards 27x200x1608 Longitudinal profile 50x80x2186 roof Rafters 50x80x1554 Installation manual...
- Page 13 5 Parts list Part Dimensions in mm Quantity Illustration Upright extension 50x80x158 Cross board front 27x200x508,5 short Door holder Roof boards 27x402x2240 Foil Longitudinal boards 27x300x2186 Installation manual...
- Page 14 5 Parts list Part Dimensions in mm Quantity Illustration Cross board front 27x300x508,5 short - top Cross boards top 27x300x1608 Nail tape - 20 m roll Small parts Suction socket set wall connection - outside wall connection - inside Installation manual...
- Page 15 5 Parts list Check the completeness of the delivery before starting assembly. Installation manual...
-
Page 16: Structure Base Plate
6 Structure base plate Structure base plate Align the 3 foot profiles that the outer edge of the sheets match the outer edges of the panels. Make sure that the surface is horizontal! NOTICE The base plates must be pre-drilled and then screwed horizontally. Then clean the base plates. -
Page 17: Structure Fabric Tank
7 Structure fabric tank Structure fabric tank Assemble the fabric tank according to the enclosed assembly instructions. NOTICE Place the 2 rear stands against the tab. Make sure they are parallel and positioned at a right angle. ▶ Check the diagonal dimension! Once the fabric tank has been fully assembled, all 4 stands must be screwed to the base plate using the enclosed fastening set (4x). -
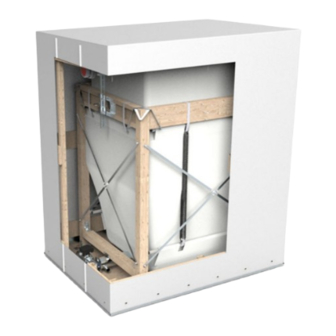
Page 18: Structure Base Frame
8 Structure base frame Structure base frame NOTICE Damage to the fabric The wood screws must not be countersunk too deeply and should be flush with the wood. Assembly of the spacer boards Carry out the process on both sides. NOTICE The spacer boards must be pre-drilled. - Page 19 8 Structure base frame Assembly of the stands Carry out the process on both sides. NOTICE The stands must be pre-drilled. 1. Place and screw the two stands to the sides of the fabric tank with the spacer boards (4x each side). No.
- Page 20 8 Structure base frame Assembly of the lower longitudinal and cross boards Carry out the process on both sides. NOTICE The longitudinal and cross boards must be pre-drilled. 1. Place and screw the longitudinal board to the 2. Place and screw the cross board to the under- underside of the fabric tank with the spacer side of the fabric tank with the spacer boards (8x).
- Page 21 8 Structure base frame Assembly of the front stands Carry out the process on both sides. NOTICE The stands must be pre-drilled. 1. Place and screw the stands to the bottom of the 2. Screw the stands to the foot profile on the fabric tank with the longitudinal boards (2x on inside (2x on each side).
- Page 22 8 Structure base frame Assembly of longitudinal profiles and rafters NOTICE The longitudinal profiles and rafters must be pre-drilled. 1. Place and screw the 2 longitudinal profiles to the 2. Place and screw the 2 longitudinal profiles to the stands. profiles.
- Page 23 8 Structure base frame Assembly of the cross and longitudinal boards Carry out the process on both sides. NOTICE The longitudinal and crossboards must be pre-drilled. 1. Place and screw the longitudinal board to the 2. Place and screw the rear cross board to the lon- longitudinal profiles of the roof and the uprights gitudinal profiles of the roof and the uprights.
- Page 24 8 Structure base frame Assembly of the door stands NOTICE The stands must be pre-drilled. 1. Place and screw the two stands to the foot pro- 2. Place and screw the two cross boards to the raf- file. ters and corner stands. No.
- Page 25 8 Structure base frame Assembly of the cross boards door NOTICE The cross boards of the door must be pre-drilled. 1. Place and screw the 4 cross boards to the stands. No. 15 (4x) - 5x70 (16x) Installation manual...
- Page 26 8 Structure base frame Assembly roof NOTICE The roof boards must be pre-drilled. 1. Place and screw the 4 roof boards. Screw the roof boards 2x to each rafter. The roof boards must be flush with the cross and longitudi- nal boards.
-
Page 27: Application Foil
9 Application foil Application foil At least two people and a stepladder are needed to apply the foil. Unwrap the foiland make sure that the zipper is on the front side. Open both zippers to 20 cm. Place the foil on the roof and align it so that the foil can be pulled down at the corners. -
Page 28: Do-It-Yourself Facade
9 Application foil Do-it-Yourself facade The Pellet Outside Storage can be optionally clad with a facade made of trapezoidal sheet metal or with a do-it-yourself wooden facade. Facade anthracite Facade wood NOTICE Nail sealing tape Use the enclosed nail sealing tape to seal the outer tank. ▶... -
Page 29: Line Routing
10 Line routing Line routing Mounting the connection flange on the outer tank For the line routing, the foil and the wood must be drilled through in the area of the discharge motor on the left or right side of a longitudinal board. Depending on the conditions on site, the placement of the line routing may vary. - Page 30 10 Line routing Mounting wall connection Check with the builder or an expert to determine the appropriate penetration for a brick wall. NOTICE Pellet hoses laid outdoors must be protected from UV radiation by a protective tube (provided by customer). ▶...
Need help?
Do you have a question about the FleXILO and is the answer not in the manual?
Questions and answers