Cuisinart DHR-20 - Dehydrator & Recipe Booklet Manual
- Instruction and recipe booklet (32 pages) ,
- Instruction and recipe booklet (32 pages)
Advertisement
- 1 IMPORTANT SAFEGUARDS
- 2 SPECIAL CORD INSTRUCTIONS
- 3 INTRODUCTION
- 4 OPERATING INSTRUCTIONS
- 5 BEFORE USING
- 6 USAGE
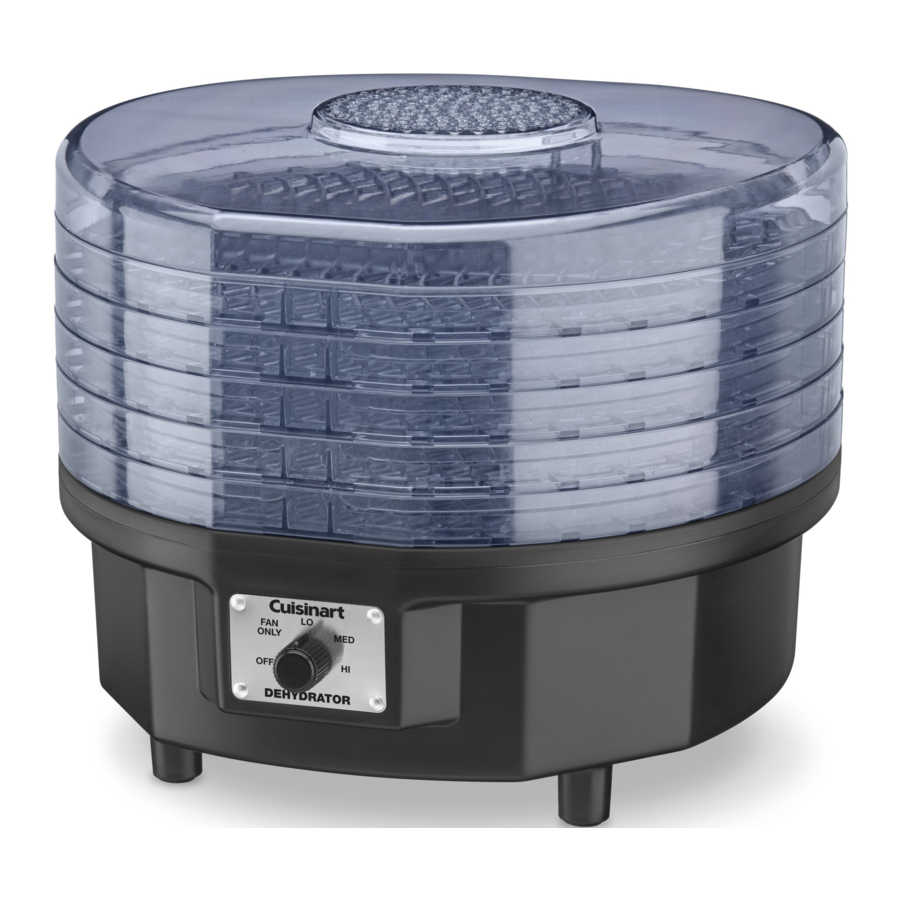
- 7 PARTS AND FEATURES
- 8 CLEANING AND MAINTENANCE
- 9 FOOD SELECTION
- 10 VEGETABLE PREPARATION AND TREATMENT
- 11 Fruit and Nuts Preparation and Treatment
- 12 HERBS AND FLOWERS
- 13 USEFUL TIPS
- 14 FOOD STORAGE
- 15 RECIPES
- 16 Documents / Resources
IMPORTANT SAFEGUARDS
When using electrical appliances, basic safety precautions should always be taken, including the following:
- READ ALL INSTRUCTIONS.
- Always unplug appliance from outlet when not in use or before cleaning. Allow plenty of time to cool before adding or removing parts.
- Never touch hot surfaces. Use handles or knobs.
- Avoid using the appliance in the presence of children. Close supervision is necessary when appliance is used by or near children or individual with certain disabilities.
- To avoid electrical shock, never immerse plugs, cord, or the base assembly in any liquids.
- Never operate any appliance with a damaged cord or plug, or one that has malfunctioned or been damaged in any way. Immediately return the appliance to the nearest authorized service facility for analysis.
- Using accessory attachments not recommended or sold by the appliance manufacturer may cause electric shock, injury, or fire.
- Never use outdoors.
- Never let the cord hang over the edge of a table or counter or touch hot surfaces.
- Never place on or near a hot gas or electric burner or in a heated oven.
- Never use this appliance for any other use than that for which it is intended.
- To disconnect, first turn control knob to OFF, then unplug from electrical wall outlet.
- Never pour liquids into the appliance.
- Never operate near combustible or pressurized spray cans.
- Do not operate your appliance in an appliance garage or under a wall cabinet. When storing in an appliance garage, always unplug the unit from the electrical outlet. Not doing so could create a risk of fire, especially if the appliance touches the walls of the garage or the door touches the unit as it closes.
SAVE THESE INSTRUCTIONS FOR HOUSEHOLD USE ONLY
SPECIAL CORD INSTRUCTIONS
A short power-supply cord is provided to reduce the risks resulting from becoming entangled in or tripping over a longer cord. Longer extension cords are available and may be used if care is exercised in their use.
If a long extension cord is used, the marked electrical rating of the extension cord should be at least as great as the electrical rating of the appliance, and the longer cord should be arranged so that it will not drape over the counter top or tabletop, where it can be pulled on by children or tripped over.
INTRODUCTION
The dehydration of fruits and vegetables is one of the earliest methods of food preservation. Since their discovery and cultivation, plums and grapes have been sun-dried into prunes and raisins. These dried fruits and vegetables make great snacks or desserts, and it's easy to dehydrate different meats to make jerky. Dehydration is a healthy way of preserving food because bacteria growth is inhibited by the removal of moisture. You can even use your food dehydrator to dry flowers and make potpourri! Before using your food dehydrator, be sure to take time to read the "Important Safeguards" and all other instructions in this manual.
OPERATING INSTRUCTIONS
This appliance is meant for household use only. First, place it on a level surface, and then insert the plug into a 120V rated electrical outlet. Do not use any other rated type outlet. This food dehydrator has a polarized plug (one blade is wider than the other). To reduce risk of electric shock, this plug is intended to fit into a polarized outlet only one way. If the plug does not fit fully into the outlet, reverse the plug and try again. If it still does not fit, contact a qualified electrician. Do not attempt to modify the plug in any way. Attempting to defeat this safety feature may result in damage to the plug or the outlet.
The food dehydrator is equipped with a short power-supply cord, reducing the risk of tangling or tripping over a longer cord. Extension cords can be used with the proper attention paid to safety concerns. When using a longer, detachable power-supply cord or extension cord, the marked electrical rating of the extension cord should be the same or greater as the electrical rating of the appliance, and the longer cord should not drape over the counter top or table where children could pull it or it could be tripped over unintentionally.
BEFORE USING
- Unpack the food dehydrator with care.
- Wash all of the dehydrator trays and lid in warm, soapy water. Rinse well and dry completely.
- Wipe the dehydrator base with a clean and dry, soft cloth or sponge. Never immerse base, plug or cord in water or any other liquids.
USAGE
- First, ensure the unit is turned to the OFF position and unplugged before preparing to use.
- Wash the trays and lid before each use to prevent food contamination.
- P lace the base on a flat, smooth counter top surface.
- Prepare food to be dehydrated as instructed, depending on the type of food; never overlap food or overload trays.
- Arrange food on trays, stack up the trays, and set them aside.
- Trays can accommodate a variety of food sizes with small adjustments.
- P lug unit into electrical wall outlet. Set control knob to desired setting.
- P lace stacked trays on base and cover the top tray with the lid. Then allow the food to dry for the recommended length of time (drying time depends on the food type).
- Top lid vent holes must be kept clear of any objects.
- M onitor the food while it is dehydrating and check it for desired doneness. It may be necessary to rotate the racks during drying as bottom racks will dehydrate faster than top racks. Once cooled, remove individual pieces and store in food-safe containers or plastic bags, preferably airtight. Leave the pieces that are not yet done in the dehydrator and monitor them until done.
- Store the pieces that are not going to be eaten in the next few days in the freezer. When storing food in the freezer, use containers or bags designed specifically for freezer storage.
- Switch the unit to OFF and unplug after using.
- W ash the dehydrator trays and lid after each use. Wipe the base with a soft, slightly damp cloth or sponge; never let water or any other liquid get into the base. Be sure the trays and lid are completely dry before storing them back on the base.

- Do not block cover vents.
- Do not block bottom vents.
PARTS AND FEATURES

HOW TO USE THE FRUIT ROLL-UP SHEET
Your unit comes with one fruit roll-up sheet.
To prepare fruit roll-up sheet, lightly spray a paper towel with cooking spray and rub over the fruit roll-up sheet. Follow preheating preparation instructions which can be found in the
recipe section of the instruction book for Yogurt Roll-Ups, Spiced Apple Trail Mix Leather and Strawberry Banana Leather. Once your fruit roll-up sheet is ready, place on top rack of unit as shown in Fig. 1.

CLEANING AND MAINTENANCE
Dehydrator racks, top cover and fruit roll-up sheet are all dishwasher safe.
To clean unit base, unplug from outlet and wipe clean using a damp cloth. Wipe dry with a clean cloth.
NOTE: Any other servicing should be performed by an authorized service representative.
FOOD SELECTION
Select foods for dehydration that are in good condition. Fruits should have just become ripe since they contain the highest amount of natural sugar and provide the best results. Vegetables should be fresh and crisp. Avoid fruits that are not ripe; they yield unpredictable results and often have a flat, bitter taste. Overripe fruits and vegetables with spoiled portions should also be avoided. Cut off any bruised or marred portions of the fruits and vegetables before dehydration. Meat, poultry and fish should be fresh and lean. Preparation, dehydration time and foodstorage method will also influence their quality and taste. Follow preparation, dehydration and storage instructions in this manual to ensure the best-tasting, highest quality dried foods.

If you suspect food contamination, do not attempt to use the dehydrator. Discard the food.
VEGETABLE PREPARATION AND TREATMENT
Vegetables are low in acid and have less sugar than fruits, so they require a little more effort. Some vegetables are better frozen than dried, so remember to be selective in the vegetables you choose.
PREPARATION
Only the highest quality vegetables should be selected for drying. Wash them carefully just before dehydrating to remove dirt and bacteria. Most vegetables should be peeled, trimmed, cut or shredded prior to drying.
PRETREATMENT
Blanching vegetables prior to drying is recommended. This destroys the enzymes that can produce "off" flavors when stored and lead to poor texture and poor rehydration. Steam blanching is a better method than water blanching because more flavor and vitamins are retained. Vegetables can also be microwaved.
STEAM BLANCHING
Layer prepared vegetables in the top portion of a steamer or a steamer insert and steam until the vegetables are heated through, but are not cooked enough to eat (usually 2 to 3 minutes). Stir to ensure all vegetables are evenly blanched. Quickly transfer steamed vegetables directly to drying trays.
MICROWAVE BLANCHING
Microwave ovens can easily be used to blanch fresh vegetables. Prepare vegetables the same way as for steam blanching. Place vegetables in a covered casserole dish with a small amount of water (refer to your microwave oven cooking chart). Cook for ¼ to 1⁄3 the time listed in the chart, stirring after half of the blanching time. Vegetables blanched in a microwave will be more brightly colored than those that are steam blanched. Quickly transfer blanched vegetables directly to drying tray.
VEGETABLE PREP
| Asparagus | Divide tips from stems by snapping in half. Tips are best for drying, but dried stems can be crushed and used for seasoning. |
| Beans (green) | Snip off ends and cut as desired. Blanch, then place in the freezer for 30 to 45 minutes. |
| Beets | Trim, leaving about an inch of the top and root. Blanch, allow to cool, then cut off the top and root. Slice. |
| Broccoli | Trim and cut into pieces. Steam for about 4 to 5 minutes. |
| Carrots | Wash, peel, and cut into ½-inch long pieces. Steam for about 4 to 5 minutes. |
| Corn | Remove husk, wash and steam blanch the whole piece of corn. Allow to cool, then shear the corn from the cob. |
| Celery | Break leaves off their stems. Place leaves separate from stalks in tray(s). |
| Chives | Wash, dry, and mince. |
| Cucumber | Wash, peel, trim and slice about ¼-inch thick. |
| Garlic | Separate and peel cloves. Cut cloves into halves or slices. |
| Mushrooms | Remove any soil and remove stem. Dry the mushroom whole, cut in half or sliced. |
| Onions | Trim off the ends and peel. Cut into rings or dice. |
| Peppers (pimentos) | Wash and remove core. Cut into halves, quarters, rings or strips. |
| Peppers (jalapeños) | Wash and dry whole. |
| Potatoes | Wash, peel, and cut or slice as desired; steam blanch. Rinse under cold water and pat dry before placing on tray(s). Note: If you wish to leave the skin on, you must wash and scrub the potato and remove all the eyes and scars with the tip of a potato peeler or paring knife. |
| Tomatoes | Wash and remove stems. Using a ladle or tongs, dip into boiling water and then into an ice water bath. You will be able to remove the skin easily. Cut into halves, quarters or thick slices. |
Fruit and Nuts Preparation and Treatment
FRUIT
Nearly all fruits can be dried at home, but some will require more drying time than others; the guidelines offered here will help get you started. It is recommended that you select the fruits that are in season and experiment with those first.
Preparation
Wash and inspect fruits and remove any bruised or overripe parts. Peel if desired. Cut larger fruits in half. If the pieces vary too much in size, slice them to 3⁄8" to ½" thick for even drying. Smaller fruits such as grapes and cherries may be dried whole. Remove pits or stones from fruits such as plums, cherries, apricots, etc. Always peel fruits that have been artificially waxed. Peeling is optional with other fruits – for instance, dried pear skins tend to be grainy, and peach skin peels are a little fuzzy.
Most fruits, like pineapples, grapes, strawberries, and plums, can be placed directly on the drying trays as they are prepared. However, some fruits will turn brown when exposed to air (apples, apricots, peaches, and pears). Following the guidelines set below, you can pretreat these fruits to slow this browning and to prevent loss of vitamins A and C. To pretreat them, the cut pieces should be kept in a holding solution until you have sufficient fruit to dry.
Pretreatment
Below are several optional methods of pretreatment. You don't always need to pretreat food in order to dry it; however, pretreatment can make food look better, increase the shelf life and even enhance the nutritional value. Experiment with both treated and untreated food to see which will work best. Remember, proper storage is critical to the quality of the final product, whether treated or untreated.
Sodium Bisulfite
Use food-safe (USP) grade only. Dissolve 1 teaspoon of sodium bisulfite in 1 quart of water. Dip small amounts of fruit in the solution for 2 minutes. This helps prevent loss of vitamin C and maintains a bright color. Sodium bisulfite is available in most pharmacies/drugstores.
Natural Pre-Dips
With their high vitamin C content, pineapple and lemon juice are natural alternatives to other pretreatments to reduce browning. Slice fruit directly into juice. Remove after about 2 minutes and place on trays. Fruits may also be dipped in honey, lime or orange juice, gelatin powders or sprinkled with coconut to give them an exotic flavor. Use your imagination!
When drying fruit halves, especially apricots, it has been suggested that popping the back ("inside out") will speed drying time. This is true, but it also results in the loss of the nutritional juices to the bottom of the dehydrator. Instead, cut each half in half again to give the end product more nutritional value, a brighter color, and faster reconstitution capabilities.
| Apples | Wash thoroughly and peel if you wish. Cut in half and core, then slice into smaller pieces. Pretreat with lemon juice to prevent browning. |
| Apricots | Wash, cut open and remove pit. If desired, cut into quarters. |
| Bananas | Peel and slice. Pretreat with lemon juice to prevent browning. |
| Cherries | Wash and remove pits. |
| Coconut | Drain the milk, open shell and remove coconut meat. Dry and cut into small chunks. |
| Figs | Wash, remove stems and cut into halves or quarters. Place dry skin side up. |
| Grapes | Remove stems and wash. |
| Papaya | Wash, peel and cut into chunks. |
| Peaches | Wash, slice in half and remove pit. If desired, cut into quarters. |
| Pears | Wash, peel, slice in half to remove core. Cut into chunks or slices. Pretreat with lemon juice to prevent browning. |
| Pineapple | Remove spiny skin, core and cut into chunks or wedges. |
| Plums | Wash, cut in half and remove pit. If desired, cut into quarters. |
| Strawberries | Hull, wash and slice or leave whole, as desired. |
NUTS
To dry nuts, first shell and rinse them with warm water. Pat dry and spread out on trays. Most nuts will take approximately 20 to 30 hours to dehydrate and they should be allowed to dehydrate until brittle.
Allow them to cool after dehydrating. Any nuts that will not be consumed within a few days should be frozen to ensure freshness. Allow them to defrost before eating.
HERBS AND FLOWERS
To dry herbs and flowers, first rinse and pat dry. Remove any dead, mushy or discolored portions, leaving the stem intact. Spread herbs or flowers on tray and allow to dehydrate for about 2 to 7 hours, depending on their type and size. Remove from tray and allow to cool when drying is complete. Remove the leaves or buds from stem and break them apart. Crush if desired.
For best results, pick flowers after the rising sun evaporates the morning dew and before the cool evening mist settles on the petals. Be aware of flowers that have been sprayed with insecticides or other harmful chemicals; do not use these. If you are dehydrating flowers at the same time as herbs, place flowers on the bottom trays and herbs on the top trays; this prevents any debris from the flowers falling on the herbs.
USEFUL TIPS
- Wash and clean the dehydrator before using if it has been stored for a long time.
- Fresh vegetables and fruits are best for dehydrating; canned goods do not dehydrate well.
- All vegetables and fruits should be cleaned before preparation and pretreatment.
- Prepare and pretreat fruits and vegetables as outlined in this manual for best results.
- It is usually not dangerous to leave the dehydrator on for a long period of time when required, but make sure that it is in a safe location. Read the Important Safeguards section of this manual, and exercise caution when using the dehydrator.
- Exact dehydrating time can vary greatly, depending on the type of food used, its size and quality, the quantity placed on trays and your personal preferences. Keeping your own notes on the type of food, weight before and after drying, total drying time, and final results will enable you to achieve the desired outcome, every time!
- Most recipes will work well with dried foods. By experimenting with the recipes offered in this manual, you'll soon discover your own unique ways of using dried foods. You'll also be able to find books on the topic in bookstores, both locally and online.
- For best results, it is recommended to rotate the trays midway through the dehydration process. For example, move the bottom tray to the top, as items in the bottom rack will dehydrate faster than those on top.
FOOD STORAGE
Packaging
In order to keep well, dried foods must be carefully packaged. Pack dried foods in plastic freezer bags, squeezing out as much air as possible. (You can also use heat-sealable bags.) Store plastic bags inside airtight metal, plastic or glass containers. When you store foods in rigid containers without putting them into freezer bags first, you expose the dried foods to air, which will negatively impact them. Vacuum packaging will greatly extend the shelf life of your dried foods – vacuum packaging equipment for home use can be found in some stores.
Storage Conditions
Store appropriately packaged dried foods in a cool, dark place. The colder the food is kept, the longer the quality will be maintained. For every 18˚F drop in temperature, the shelf life increases 2 to 3 times, so if you have room in a refrigerator or freezer, keep your dried foods there. If not, find the coolest place in your home to store dried foods. Light also causes the quality and nutritive value to deteriorate, so keep dried foods in opaque or dark-colored containers.
Shelf Life
Because fruits have a naturally high sugar and acid content, they dry well and store for longer periods of time than vegetables. When properly packaged and stored at room temperature or below (70˚F or less), most fruits will maintain a high quality and nutritional value up to a year.
Most vegetables are best when eaten within six months. FRUITS AND VEGETABLES KEPT BEYOND THE RECOMMENDED TIME MAY NOT BE AS NUTRITIOUS OR TASTE AS GOOD, BUT WILL NOT SPOIL UNLESS THE PACKAGING IS NO LONGER INTACT.
RECIPES
Beef Jerky
8 servings
| 1½ | pounds flank steak |
| 1⁄3 | cup Worcestershire sauce |
| 2 | tablespoons Liquid Smoke |
| ¼ | cup light soy sauce |
| 2 | tablespoons light brown sugar |
| 2 | cloves fresh garlic |
| ¼ | teaspoon fresh ground black pepper |
Place meat on a plate and freeze for 1 hour. This will make it easier to slice the meat into thin strips. Slice meat into ¼-inch-wide strips, cutting against the grain. Combine remaining ingredients. Marinate beef strips for a minimum of 30 minutes in the refrigerator. Place strips on the racks. Do not overcrowd; leave enough space so that pieces are not touching. Cover and dehydrate on medium for 8 hours, or until desired doneness, flipping strips once about halfway through. Depending on the uniformity of the strips, the racks may require rotating throughout the dehydrating process, as bottom racks will dehydrate faster than top racks. Store beef jerky in an airtight container in the refrigerator or freezer.
Nutritional information per serving:
Calories 165 • carb. 6g • pro. 18g • fat 7g • sat. fat 3g
• chol. 34mg • sod. 423mg • calc. 39.9mg • fiber 0g
Tuna Jerky
6 servings
| 1 | pound fresh tuna steak |
| 1 | tablespoon fresh, grated ginger |
| 2 | teaspoons crushed fresh garlic |
| ¼ | cup light soy sauce |
| ¼ | cup orange juice |
| 2 | tablespoons rice wine vinegar |
| 1 | teaspoon light brown sugar |
Place the tuna steak flat on a cutting board and cut in half. Place the tuna on a plate and freeze for 1 hour. This will make it easier to cut the tuna into thin strips. Stand tuna up with flat, cut edge on the board. Slice into ¼-inch pieces, then cut into about 1-inch-wide strips. Combine ginger, garlic, soy sauce, orange juice, rice wine vinegar and brown sugar. Marinate tuna for a minimum of 30 minutes in the refrigerator. Place strips on racks. Do not overcrowd; leave enough space so that pieces are not touching. Cover and dehydrate on medium for 6 hours, or until desired doneness, flipping strips once about halfway through. It may be necessary to rotate the racks during drying, as bottom racks will dehydrate faster than top racks. Store tuna jerky in an airtight container in the refrigerator or freezer.
Nutritional information per serving:
Calories 124 • carb. 3g • pro. 18g • fat 4g • sat. fat 1g
• chol. 28mg • sod. 384mg • calc. 11.6mg • fiber 0g
Spicy Beef Sticks
About 15 servings, 2 sticks each
| 3 | pounds ground beef |
| 1 | tablespoon paprika |
| 1½ | teaspoons cayenne pepper |
| 1½ | teaspoons crushed red pepper |
| 1 | tablespoon garlic powder |
| 4 | tablespoons Worcestershire sauce |
| 2 | teaspoons curing salt |
In a large bowl, combine all ingredients until just incorporated. To make the sticks, form a small piece of the meat mixture into a ball and then roll into 5-inch by ½-inch sticks. Place the sticks on a sheet pan. Refrigerate overnight, uncovered. Place the sticks on the dehydrating racks. Do not overcrowd; leave enough space so that pieces are not touching. Cover and dehydrate on medium for 6 hours or until desired doneness. It may be necessary to rotate the racks during drying, as bottom racks will dehydrate faster than top racks. Store beef sticks in an airtight container in the refrigerator or freezer.
Nutritional information per serving:
Calories 201 • carb. 2g • pro. 17g • fat 14g • sat. fat 5g
• chol. 61mg • sod. 182mg • calc. 20mg • fiber 0g
Teriyaki Chicken Jerky
8 servings
| 2½ | pounds boneless, skinless chicken breasts |
| ½ | cup teriyaki sauce, your favorite brand |
| ¾ | cup pineapple juice |
| 1½ | tablespoons Liquid Smoke |
| ¾ | teaspoon crushed red pepper |
Trim the chicken breast of any fat. Place trimmed breasts on a sheet pan and freeze for 1 hour. This will make it easier to slice the chicken into thin strips. Slice the chicken into ¼-inch strips. Combine teriyaki sauce, pineapple juice, Liquid Smoke, and crushed red pepper. Marinate chicken strips for a minimum of 1 hour in the refrigerator. Place strips on racks. Do not overcrowd; leave enough space so that pieces are not touching. Cover and dehydrate on medium for 6 hours, or until desired doneness, flipping strips once about halfway through. It may be necessary to rotate the racks during drying, as bottom racks will dehydrate faster than top racks. Store chicken jerky in an airtight container in the refrigerator or freezer.
Nutritional information per serving:
Calories 179 • carb. 5g • pro. 33g • fat 2g • sat. fat 0g
• chol. 81mg • sod. 340mg • calc. 22mg • fiber 0g
"Sun"-Dried Tomato Basil Spread
10 servings, ¼ cup each
| 10 | Roma tomatoes, all close in size ⁄ |
| 8 | ounces 1 3 -less-fat cream cheese |
| ½ | cup light mayonnaise |
| ¾ | cup light sour cream |
| 1 | fresh garlic clove, crushed |
| ¼ | cup fresh grated Parmesan cheese |
| 2 | tablespoons chopped fresh basil |
| 2 | scallions, light to dark green, chopped |
| Salt and pepper, to taste |
Quarter the tomatoes and place on racks, cut side up. Cover and dehydrate on medium for 15 hours or until dry and leathery. It may be necessary to rotate the racks during drying. Chop the dehydrated tomatoes into smaller pieces. Combine tomatoes, cream cheese, and mayonnaise in a food processor until the tomatoes are incorporated and it becomes a consistent mixture. Move the tomato mixture to a large bowl. Stir in sour cream, garlic, Parmesan, basil, scallions, and salt and pepper. Serve with your favorite bread or crackers.
Nutritional information per serving:
Calories 124 • carb. 6g • pro. 4g • fat 10g • sat. fat 4g
• chol. 18mg • sod. 320mg • calc. 83mg • fiber 1g
Yogurt Roll-Ups
Makes 2 roll-ups
| 1 | 8-ounce cup vanilla yogurt, your favorite brand |
| 2 | tablespoons jam, your favorite flavor |
Combine yogurt and jam. Using a rubber spatula, spread the yogurt in an even, thin layer on the fruit roll-up sheet. Place the sheet on a rack. Cover and dehydrate on high for 5 hours, or until the yogurt is no longer gooey throughout. Peel leather from sheet and cut in half. The leather may be rolled up in plastic wrap and stored at room temperature for later use.
*Fruited yogurt can be substituted for vanilla, but fruit chunks do not easily spread evenly.
Nutritional information per half sheet roll-up:
Calories 152 • carb. 29g • pro. 6g • fat 1g • sat. fat 1g
• chol. 6mg • sod. 81mg • calc. 198mg • fiber 0g
Spiced Apple Trail Mix Leather
Makes 2 fruit leathers
| 2 ⁄ 3 | cup unsweetened applesauce |
| Pinch ground cinnamon | |
| Pinch ground nutmeg | |
| ½ | teaspoon honey |
| ¼ | teaspoon fresh lemon juice |
| 1 | tablespoon dried cranberries, chopped fine |
| 1 | tablespoon walnuts, chopped fine |
In a medium bowl, combine the applesauce, cinnamon, nutmeg, honey, and lemon juice. Using a rubber spatula, spread the applesauce in a thin, even layer on the fruit roll-up sheet. Sprinkle evenly with dried cranberries and walnuts. Lightly press the cranberries and walnuts into the applesauce. Cover and dehydrate on medium for 4 hours, or until the applesauce is no longer wet throughout. Peel leather from sheet and cut in half. The leather may be rolled up in plastic wrap and stored at room temperature for later use.
Nutritional information per half sheet fruit leather:
Calories 94 • carb. 15g • pro. 0g • fat 3g • sat. fat 0g
• chol. 0mg • sod. 2mg • calc. 8mg • fiber 1g
Tropical Granola
7 servings, ½ cup each
| 3 | cups old-fashioned oats |
| ¾ | cup coconut, shredded and dried |
| ½ | cup wheat germ |
| 1⁄3 | cup brown sugar |
| ½ | cup dried cranberries |
| ½ | cup dried pineapple, small chunks |
| ½ | cup banana chips, small pieces |
| 1 | cup pecans, chopped |
| 1 | tablespoon orange zest |
| 1 | tablespoon vanilla extract |
| ¼ | cup butter, melted |
| 2 | tablespoons agave nectar, or honey |
| 1⁄3 | cup maple syrup |
| ¼ | teaspoon salt |
In a large bowl, combine the dry ingredients and vanilla. In a small bowl combine the butter, agave or honey, maple syrup and salt. Pour the butter/syrup mixture over the oat mixture. Stir to combine. Divide the granola mixture among three dehydrating trays, using parchment paper to line the trays. Clump the mixture in your hand as you divide it to form clusters. Cover and dehydrate on high for 3 hours, or until the granola is no longer wet. Rotate the clusters halfway through the dehydrating process. It may be necessary to rotate the racks during drying, as bottom racks will dehydrate faster than top racks. Store the granola in an airtight container at room temperature.
Nutritional information per serving:
Calories 318 • carb. 44g • pro. 8g • fat 13g • sat. fat 5g
• chol. 9mg • sod. 59mg • calc. 45.8mg • fiber 6g
Strawberry Banana Leather
Makes 2 fruit leathers
| ¾ | cup fresh strawberries, hulled and chopped |
| ½ | fresh banana, sliced |
| ½ | tablespoon honey |
| ½ | teaspoon fresh lemon juice |
| Cooking spray |
Combine all ingredients except cooking spray in a blender and purée until smooth. Lightly spray a paper towel with cooking spray and rub over the fruit roll-up sheet. Pour the strawberry mixture evenly on the sheet. Cover and dehydrate on high for 4 hours, or until the purée is no longer wet throughout. Peel leather from sheet and cut in half. The leather may be rolled up in plastic wrap and stored at room temperature for later use.
Nutritional information per half sheet fruit leather:
Calories 63 • carb. 16g • pro. 1g • fat 0g • sat. fat 0g
• chol. 0mg • sod. 1mg • calc. 12mg • fiber 2g
Salt and Vinegar Potato Crisps
4 servings
| 3 | medium-size russet potatoes, skin removed if desired |
| 1 | cup apple cider vinegar |
| 2 | tablespoons olive oil |
| Coarse salt to taste |
Cut the potatoes into thin slices about 1⁄8-inch thick, creating round chips. Soak the potatoes in the vinegar for 8 to 12 hours. This step is necessary so the potatoes do not taste chalky. Drain the potato slices well, transfer to a bowl, and toss with olive oil. Lay the potatoes in a single layer on parchment paper-lined racks. Sprinkle with salt. Cover and dehydrate on high for 8 to 12 hours or until desired crispiness. It may be necessary to rotate the racks during drying, as bottom racks will dehydrate faster than top racks. Store the crisps in an airtight container at room temperature.
Nutritional information per serving:
Calories 198 • carb. 29g • pro. 3g • fat 7g • sat. fat 1g
• chol. 0mg • sod. 302mg • calc. 25mg • fiber 2g
Limited Three-Year Warranty (U.S. and Canada ONLY)
This warranty is available to consumers only. You are a consumer if you own a Cuisinart® Dehydrator that was purchased at retail for personal, family or household use. Except as otherwise required under applicable law, this warranty is not available to retailers or other commercial purchasers or owners.
We warrant that your Cuisinart® Dehydrator will be free of defects in materials and workmanship under normal home use for 3 years from the date of original purchase. We recommend that you visit our website, www.cuisinart.com for a fast, efficient way to complete your product registration. However, product registration does not eliminate the need for the consumer to maintain the original proof of purchase in order to obtain the warranty benefits. In the event that you do not have proof of purchase date, the purchase date for purposes of this warranty will be the date of manufacture.
If your Cuisinart® Dehydrator should prove to be defective within the warranty period, we will repair it, or if we think necessary, replace it. To obtain warranty service, simply call our toll-free number 1-800-7260190 for additional information from our Consumer Service Representatives, or send the defective product to Consumer Service at Cuisinart, 7475 North Glen Harbor Blvd., Glendale, AZ 85307.
To facilitate the speed and accuracy of your return, please enclose $10.00 for shipping and handling of the product.

Documents / Resources
References
Download manual
Here you can download full pdf version of manual, it may contain additional safety instructions, warranty information, FCC rules, etc.
Download Cuisinart DHR-20 - Dehydrator & Recipe Booklet Manual
Advertisement


Need help?
Do you have a question about the DHR-20 and is the answer not in the manual?
Questions and answers