Table of Contents
Advertisement
Quick Links
Installation Manual
T755WHO
Pro1 Technologies
P.O. Box 3377
Springfield, MO 65808-3377
Toll Free: 888-776-1427
Web: www.pro1iaq.com
Hours of Operation: M-F 9AM - 6PM Eastern
Thermostat Application Guide
Description
Gas or Oil Heat
Electric Furnace
Heat Pump (No Aux. or Emergency Heat)
Heat Pump (With Aux. or Emergency Heat)
Multi-Stage Systems
Heat Only Systems
Cool Only Systems
Millivolt
Humidity
Dual Fuel
Table of Contents
Wireless Communication Tips
Connecting To The PROsync
Wireless System
Wireless System
U.S. Registered Trademark. Patents pending
1
Copyright
2023 All Rights Reserved.
Installation Tips
Wireless Range
The PROsync System has been tested in many different types of building construction including wood, steel beam, and brick in spaces over
5500 square feet. The wireless range performs well across multiple floors successfully. The PROsync radios constantly search for open
channels to avoid interference and ensure messages are received. The PROsync system has been shown to reliably transmit data across
hundreds of feet indoors and over 1000 feet line of sight.
Equipment Module -Attic Location
When performing an attic installation, instead of placing the
equipmentmodule in the attic, locate the closet nearest to the air
conditioning unit. We reccomend mounting the Equipment module
high on the wall inside the closet or on the ceiling of the closet. This
location will insure the equipment module is below the 150°F
maximum ambient temperature specification while also allowing easy
technician viewing.
Living space
closet
3
* P M - T 7 5 5 W H O - I M - 2 3 2 1 *
PM-T755WHO-IM-2321
Power Type
Battery Power*
Hardwire (Common Wire)
Yes
Hardwire (Common Wire) with
Yes
Battery Backup
Yes
Yes
Yes
A trained, experienced
Yes
technician must install this
Yes
product.
No
Carefully read these
Yes
instructions. You could damage
Yes
this product or cause a
hazardous condition if you fail
Page
to follow these instructions.
2-6
7
Una version en español de este
8-9
manual se puede descargar en
10
la pagina web de la compañia.
11
12
13-16
17-18
19-35
36
37-42
43-44
Good
Attic
Living Space
Installation Tips
Wall Locations
The thermostat should be installed approximately 4 to 5 feet above the
floor. Select an area with average temperature and good air circulation.
Do not install thermostat in these locations:
• Close to hot or cold air ducts
• That are in direct sunlight
• With an outside wall behind the thermostat
• In areas that do not require conditioning
• Where there are dead spots or drafts (in corners or behind doors)
• Where there might be concealed chimneys or pipes
Installation Tip
Pick an installation location that is easy for the user to access. The temperature
of the location should be representative of the building.
Rev. 2321
Installation Tips
Equipment Module - Basement Location
Good
Installation Tips
Do not install the base module in locations:
• That are behind a chimney
• Where temperature could exceed 150°F
• Where rain or snow or extreme hot or cold is possible
Note: This base module is NOT weatherproof.
Good
No
2
4
Advertisement
Table of Contents

Subscribe to Our Youtube Channel
Related Manuals for Pro1 Technologies T755WHO


Summary of Contents for Pro1 Technologies T755WHO
-
Page 1: Table Of Contents
Installation Manual Installation Tips T755WHO Wall Locations The thermostat should be installed approximately 4 to 5 feet above the floor. Select an area with average temperature and good air circulation. Pro1 Technologies P.O. Box 3377 * P M - T 7 5 5 W H O - I M - 2 3 2 1 *... -
Page 2: Installation Tips
Keypad Lockout: Indicates keypad lockout state is “Locked”. 6. Choose the install location for the T755WHO. In the tech settings, check the “Signal Strength” tech setting and ensure the value is greater than zero. Hold is displayed when the thermostat program is permanently overridden. -
Page 3: Private Label Badge
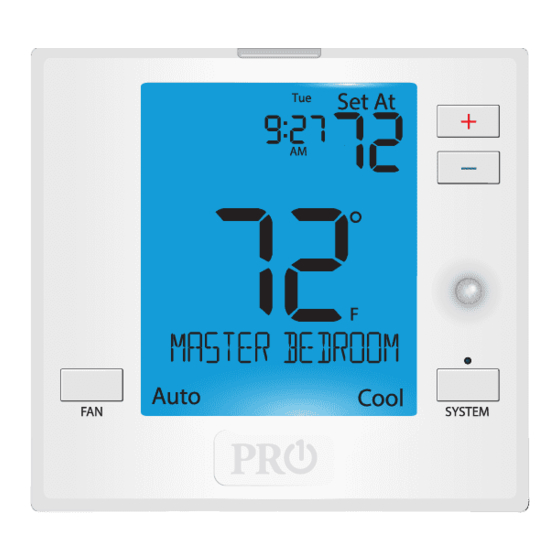
Private Label Badge Thermostat Quick Reference Getting to know your thermostat About The Badge All of our thermostats use the same universal magnetic badge. Visit the company website to learn more about our free private label program. Use the bevel on lower ridge Magnet in door Glow in the dark light button LCD Display... -
Page 4: Wiring
Wiring Wiring Terminal Designations on the Equipment Module Wiring Tips This thermostat is shipped from the factory to operate a conventional heating Power supply and cooling system. This thermostat may also be configured for a heat pump system. See the “heat pump” configuration step on page 16 of this manual to Factory - installed jumper. -
Page 5: Technician Setup Menu
Wiring Wiring Note: This thermostat is Note: In many systems hardwire powered when the with no emergency heat 24V transformer is relay a jumper can be Typical 2H/2C System: 2 Transformer connected to the R and C used between W1 and W2. terminals of the thermostat. - Page 6 Technician Setup Technician Setup Tech Setup Steps LCD Will Show Adjustment Options Default Tech Setup Steps LCD Will Show Adjustment Options Default You can set the minimum This setting allows the system Use the buttons This feature allows the installer Dual Fuel to run Gas, Oil, Propane or any to select ON/OFF.
- Page 7 Technician Setup Technician Setup Tech Setup Steps Adjustment Options Default Tech Setup Steps Adjustment Options Default LCD Will Show LCD Will Show This feature will start heating and Use the key to Pro Recovery ˚ This feature allows you to display F for Fahrenheit cooling early to bring the building select on or off.
- Page 8 Technician Setup Technician Setup Tech Setup Steps LCD Will Show Adjustment Options Default Tech Setup Steps LCD Will Show Adjustment Options Default Use the left and right arrows This feature allows the installer Options for how the HUM Use the left and right arrows to Humidity to adjust the calibration +/-3.
-
Page 9: Setting The Humidity
Main FW Version Thermostat. This can be helpful T755WHO-001 for troubleshooting if you ever Ambient Humidity Display need to call customer service. Ambient humidity will flash opposite the day and time, if the optional... -
Page 10: Programming
Programming Programming Programming Programming Set Time Default Programming (If using programming) Follow the steps below to set the day of the week and current time: Factory Default Program 1. Press the Menu button. Setpoint Setpoint Day of Events Time Temperature Temperature the Week 2. -
Page 11: Specifications
Programming Programming Custom Programming (Fill out before starting the process) Set Program Schedule For Four Time Periods (WAKE, LEAVE, RETURN, SLEEP) If you intend to use additional Remote Sensors in addition to the Custom Program Main Thermostat you must install, link and name all of the remotes in Setpoint Setpoint the system before you begin the scheduling process.
Need help?
Do you have a question about the T755WHO and is the answer not in the manual?
Questions and answers