Table of Contents
Advertisement
Owner's Manual
Thank you, and congratulations on your choice of the VK-8M organ module.
Before using this unit, carefully read the sections entitled: "IMPORTANT
SAFETY INSTRUCTIONS" (p. 2), "USING THE UNIT SAFELY" (p. 3, 4), and
"IMPORTANT NOTES" (p. 5). These sections provide important information
concerning the proper operation of the unit. Additionally, in order to feel
assured that you have gained a good grasp of every feature provided by
your new unit, owner's manual should be read in its entirety. The manual
should be saved and kept on hand as a convenient reference.
Conventions Used in This Manual
• Button names are enclosed in square brackets; e.g., [REVERB] button.
• Fractional harmonic bars (p. 21) are expressed like this: 1-1/3'; 2-2/3'.
• [1]–[6] means that you should press one of the buttons from [1]
through [6].
• The dark/lit/blinking status of an indicator is distinguished as
follows.
Indicator
Button
Copyright© 2003 ROLAND CORPORATION
All rights reserved. No part of this publication may be reproduced in any form
without the written permission of ROLAND CORPORATION.
dark
blink
lit
Advertisement
Table of Contents

Related Manuals for Roland VK-8M


Summary of Contents for Roland VK-8M
-
Page 1: Conventions Used In This Manual
Owner’s Manual Thank you, and congratulations on your choice of the VK-8M organ module. Before using this unit, carefully read the sections entitled: “IMPORTANT SAFETY INSTRUCTIONS” (p. 2), “USING THE UNIT SAFELY” (p. 3, 4), and “IMPORTANT NOTES” (p. 5). These sections provide important information concerning the proper operation of the unit. -
Page 2: Using The Unit Safely
• Subject to high levels of vibration. • When using the unit with a rack or stand recom- mended by Roland, the rack or stand must be carefully placed so it is level and sure to remain stable. If not using a rack or stand, you still need... - Page 3 012b • Immediately turn the power off, remove the AC adaptor from the outlet, and request servicing by your retailer, the nearest Roland Service Center, or an authorized Roland distributor, as listed on the “Information” page when: • The AC adaptor, the power-supply cord, or the plug has been damaged;...
-
Page 4: Important Notes
• Use only the specified expression pedal (EV-7; sold separately). By connecting any other expression pedals, you risk causing malfunction and/or damage to the unit. • Use a cable from Roland to make the connection. If using some other make of connection cable, please note the following precautions. -
Page 5: Table Of Contents
Connecting an External Keyboard ... 14 Using an External Keyboard to Play the VK-8M’s Sounds... 14 Mixing the Sound From the External Keyboard With That of the VK-8M... 14 Connecting Your Amp, Speakers, or Headphones... 15 Turning the Power On ... 16 Turning Off the Power ... - Page 6 Connecting the External Keyboard and Pedal Keyboard... 49 Using an External Sequencer to Record and Play Back ... 50 Saving VK-8M Settings on an External Sequencer (Bulk Dump)... 51 Loading Back Data That’s Been Saved on an External Sequencer ... 51 Troubleshooting...52...
-
Page 7: Main Features
The unit includes an audio input jack, allowing you to input sounds from an external keyboard. Using the input mix function, you can output the sounds of both the keyboard and the VK-8M without the need for a separate mixer. The expression pedal function adds expression to the input sound, and the “Active Expression”... -
Page 8: Panel Descriptions
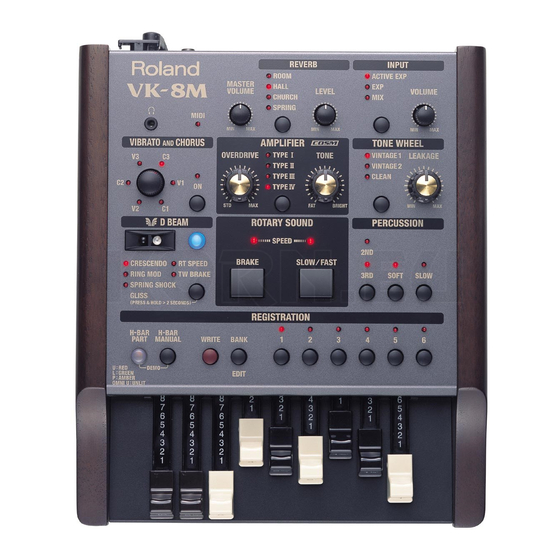
Panel Descriptions ■ FRONT PANEL [ ] (Headphone) jack An optional set of headphones can be connected here (p. 15). MIDI Indicator The indicator flashes when MIDI data from an external MIDI device is being received. [MASTER VOLUME] knob Adjust the overall volume (p. 16). ■... - Page 9 ■ AMPLIFIER 10. [OVERDRIVE] knob Adjust the depth of overdrive (p. 30). 11. [AMPLIFIER] button Switches the frequency response and cabinet resonance of the virtual amp (p. 30). 12. [TONE] knob Adjust the tonal character of the organ voice (p. 30). ■...
-
Page 10: Rear Panel
33. MIDI IN connector You can connect an external keyboard to play sounds. You could also connect an external sequencer here, and get the VK-8M to play the music the sequencer sends it (p. 50). 34. MIDI OUT connector An external MIDI device can be connected here to receive MIDI data transmitted from the VK-8M. -
Page 11: How The Vk-8M Works
On tone wheel organs, turning off percussion [SOFT] button would lower the volume of the organ, but the VK-8M allows you to adjust it so the volume of the organ won’t change when percussion [SOFT] button is switched on/off (p. 43). -
Page 12: About The Memories
The SPRING reverb type simulates a reverb circuit that used springs, and was often found on traditional organs. The VK-8M lets you adjust the reverb time (p. 48). Also, by turning the [REVERB] knob you can adjust the volume of the reverb (p. 34). -
Page 13: Before You Begin Playing
Before making a connection, make sure that the VK-8M is turned off. fig.01-01 Connect the supplied AC cable to the supplied AC adaptor. fig.00-02 AC adaptor Connect supplied power cable to the VK-8M, and plug the other end into a power outlet. fig.00-01 Ground Terminal Rear Panel... -
Page 14: Connecting An External Keyboard
■ Using an External Keyboard to Play the VK-8M’s Sounds Before making any connections, make sure that all the devices are turned off. Use a commercially available MIDI cable to connect the VK-8M’s MIDI IN connector to the MIDI OUT connector of your keyboard. MIDI IN MIDI OUT Turn on the keyboard. -
Page 15: Connecting Your Amp, Speakers, Or Headphones
Connecting Your Amp, Speakers, or Headphones The VK-8M is not equipped with an amplifier or speakers. In order to hear the sound, you will need to connect audio equipment such as a monitor speaker system or stereo set, or use headphones. -
Page 16: Turning The Power On
• The volume of the VK-8M and any connected audio equipment or speakers is turned to the minimum position. Press the [POWER] switch located on the rear panel of the VK-8M to turn on the power. When the power is on, the indicators for the [REVERB] button and other buttons’... -
Page 17: Restoring The Factory Settings (Factory Reset)
Restoring the Factory Settings (Factory Reset) This function resets all the VK-8M’s settings to their factory default values. Make sure that the volume is turned to the minimum position. Press the VK-8M’s [POWER] switch to turn off the power. fig.01-07 While holding down the [BANK] button, [WRITE] button and [H-BAR MANUAL] button, press the [POWER] switch to turn on the power. -
Page 18: Listening To The Demo Songs
Before You Begin Playing Listening to the Demo Songs The VK-8M contains four demo songs. Here’s how to listen to the demo songs and experience the various organ sounds and effects. fig.01-11 Press the [H-BAR PART] button and the [H-BAR MANUAL] button at the same time. -
Page 19: Playing The Organ
Playing the Organ Listening to Various Sounds The VK-8M comes with 36 registrations stored onboard. Here’s how to switch registrations to hear the various sounds. There are six banks of registrations, with six sounds in each bank. Switch between the registrations to hear the various sounds. -
Page 20: About The Organ Voice
Connect the external keyboard to the VK-8M (p. 14). Set the MIDI channels for the VK-8M and the external keyboard (p. 46). Press the [H-BAR PART] button to select the part whose voice you want to change. -
Page 21: Adjusting The Sound In Real Time (Harmonic Bars)
Adjusting the Sound in Real Time (Harmonic Bars) The harmonic bars are controllers for creating the basic structure of the organ sound. By sliding nine harmonic bars in and out you can create a variety of tonalities. fig.01-14 The numbers appearing on the harmonic bars allow you to rapidly set the bars to the desired setting. - Page 22 Playing the Organ The numbers (16', 5-1/3', etc.) printed on the knob of each harmonic bar indicate the pitch of that bar in “feet.” The pitch of each harmonic bar plays an important role in creating the tone. The 8' pitch is the basic pitch of the sound, and the sound is created based on this 8' pitch.
- Page 23 Folding back the high-frequency portion prevents the high-frequency sounds from being unpleasantly shrill, and folding back the low-frequency portion prevents the sound from becoming “muddy.” On the VK-8M faithfully simulates this characteristic. As you can see from the relation of the pitches, the 5-1/3' pitch is unique in that it is not arranged in order of pitch.
-
Page 24: Changing The Organ Sound (Wheel Type, Leakage Level)
Teeth are cut into the edge of each disk, and sound is generated by rotating the disks past an electrical coil at a fixed speed. The VK-8M digitally simulates the tone wheel mechanism of a tone wheel organ, and thus provides the rapid response and full polyphony that characterize these instruments. -
Page 25: Adding Crispness To The Sound (Percussion)
Adding Crispness to the Sound (Percussion) Percussion adds an attack-type sound to the beginning of the note to give the sound more crispness. When you play legato (smoothly and connectedly), percussion will be added only to the first-played note. When you play staccato (articulating each note separately), percussion will be added to all notes. - Page 26 Playing the Organ [SOFT] (Soft Percussion) button Switches the volume of the percussion. Button The percussion sound will be softer. Lit (ON) The percussion sound will be normal. Dark (OFF) When you turn the [SOFT] button off to strengthen the percussion sound, the organ sound specified by the harmonic bars will become lower.
- Page 27 The VK-8M simulates this behavior, and also allows you to modify the organ voice settings to adjust the recharge time characteristics of the circuit (p.
-
Page 28: Adding Modulation To The Sound (Vibrato And Chorus)
Playing the Organ Adding Modulation to the Sound (Vibrato and Chorus) The vibrato effect cyclically modulates the pitch of organ voice sounds. The chorus effect mixes the normal sound of the organ with a sound to which vibrato has been applied, adding richness and spaciousness to the sound. -
Page 29: Using The Cosm Rotary Speaker Effect (Rotary Sound)
Rotary Sound is an effect which adds the modulation that is produced when organ voices are used with a rotary speaker. On most rotary speakers, the high-frequency speaker and low-frequency speaker rotate at different speeds. The VK-8M can simulate this type of complex modulation. -
Page 30: Changing The Amp Type (Amp Type, Overdrive, Tone)
Playing the Organ Changing the Amp Type (Amp Type, Overdrive, Tone) fig.01-30 Changing the virtual amp Switches the frequency response and cabinet resonance of the virtual amp. Press the [AMPLIFIER] button to select the type of virtual amp. The amp type will change each time you press the [AMPLIFIER] button. Type Characteristics of the most frequently used rotary speakers. -
Page 31: Using The D Beam Controller To Produce Common Organ Effects
Using the D BEAM Controller to Produce Common Organ Effects You can apply various effects to the sound only by moving your hand over the D Beam Controller on the VK-8M panel. fig.01-34 Press D BEAM [ON] button to make the button light. - Page 32 Throughout the history of rock organ, a wide range of performers have developed unique effects and used them in their music. The VK-8M can not only simulate several of these unique effects, but also lets you enjoy effects provided by no other instrument.
-
Page 33: Adjusting The Sensitivity Of The D Beam Controller
■ Adjusting the Sensitivity of the D Beam Controller You can also adjust the sensitivity of the D Beam controller after the power is turned Caution Please be aware that the D Beam will not function in a location where there is a large amount of infrared light. -
Page 34: Adding Ambience (Reverb)
Playing the Organ Adding Ambience (Reverb) Reverb is an effect that adds reverberation to the sound. fig.01-33 Turn the REVERB [LEVEL] knob to adjust the amount of reverb effect to be applied. Rotate fully right: Maximum reverberation. Rotate fully left: No effect. Changing the Reverb Type By changing the reverberations of the notes, you can enjoy the atmosphere of performance in a wide variety of different locations. -
Page 35: Mixing The Keyboard Sound With The Organ Sound
Raise the keyboard volume by turning the knob towards MAX. ■ Using the Active Expression Function With the VK-8M, you can switch the function of the expression pedal when an external keyboard is connected to the INPUT jack. Press the [INPUT] button to switch the function of the expression pedal. -
Page 36: Using The Expression Pedal
Playing the Organ Using the Expression Pedal You can connect an expression pedal to the rear panel EXPRESSION PEDAL jack and use it to adjust the volume. Advancing the pedal away from yourself will increase the volume, and returning it toward yourself will decrease the volume. fig.01-38 EV-7 Even if you return the... -
Page 37: Saving Your Settings (Registration)
[1]–[6] buttons. By saving your favorite settings in a registration, you can easily recall them simply by pressing REGISTRATION [1]–[6] buttons. The VK-8M contains 36 different registrations. These are organized into six groups, with six registrations in each group. fig.01-45 A registration contains the following settings. -
Page 38: Saving To A Registration In The Same Bank
Saving Your Settings (Registration) ■ Saving to a Registration in the Same Bank Make the panel settings that you want to save in the registration. Hold down the [WRITE] button, and press one of the buttons from [1] through [6] to specify the save-destination registration. While the registration is being saved, the indicator of the selected registration number button will blink. -
Page 39: Advanced Use
Advanced Use Edit mode allows you to get the most out of the VK-8M’s functions by making more detailed settings. This section explains the functions that can be set in Edit mode. In this owner’s manual, the process of modifying a setting is referred to as “editing,”... - Page 40 Advanced Use State of the AMPLIER type and REVERB type Indicators in Edit Mode ❍ When the setting is “0–127,” “0–10,” “0–15,” or “0–31.” When all of the AMPLIFIER type and REVERB type indicators are unlit, it indicates that the setting is at the minimum value (0).
-
Page 41: Settings That Are Saved For The Entire System
Settings That Are Saved for the Entire System ■ Rotary-related Settings Hold down the [BANK] buttons and press the ROTARY [SLOW/FAST] button. The indicators of the [1]–[6] buttons ([1]–[3] buttons) will blink. Press one of the [1] –[6] buttons ([1]–[3] buttons) to select the parameter that you want to edit. - Page 42 Advanced Use ❍ ROTARY WOOFER LEVEL (0–127) Specifies the volume of the low-range speaker (woofer). The rotary speaker effect consists of a low range and a high range, and you can independently adjust the volume of the low-range speaker (woofer) and the high-range speaker (tweeter) to set as desired.
-
Page 43: Click Noise And Percussion Settings
■ Click Noise and Percussion Settings Hold down the [BANK] buttons and press the PERCUSSION [2ND/3RD] button. The indicators of [1]–[2] buttons ([1]–[6] buttons) will blink. Press one of the [1]–[2] buttons ([1]-[6] buttons) to select the parameter that you want to edit. There are eight parameters related to Click Noise and Percussion. -
Page 44: Midi-Related Settings
This is because the percussion on tone wheel organs was designed not to impair the volume balance of the entire organ. The VK-8M allows you to adjust this change in volume balance. ■ MIDI-related Settings ❍... - Page 45 The MIDI Thru function will be turned off. NOTE If the VK-8M receives a large amount of MIDI data or exclusive data, it may not be able to receive all of the MIDI data correctly. If this occurs, reduce the amount of MIDI data that is being transmitted from the external device, or break up the exclusive data into smaller units.
- Page 46 Select the MIDI channel that will used to transmit and receive MIDI messages to control the VK-8M. This channel can be used to select registrations on the VK-8M, and to control the expression of the organ voice, etc. ❍ UPPER ORGAN MIDI CH. (Upper Organ MIDI Channel) (1–16) (Initial setting: 1 ch.)
-
Page 47: Equalizer And Other Settings
❍ MASTER TUNE (-100cent–0–+100cent) This is a fine adjustment to the pitch of the VK-8M. You can adjust the pitch of the entire instrument in 1 cent steps, relative to the pitch of A4 (middle A) = 440.0 Hz. -
Page 48: Parameters That Are Stored In A Registration
Advanced Use Parameters That Are Stored in a Registration ■ Reverb and Other Settings Hold down the [BANK] buttons, and press the [D BEAM] button. The indicators of buttons [1]–[2] will blink. Press one of the [1]–[2] buttons to select the parameter that you want to edit. -
Page 49: Connecting The Vk-8M To External Devices
You can connect an external keyboard and play the sound of the VK-8M from the external keyboard. NOTE Turn off the power of the VK-8M and the other device before making connections. If you connect an external device when the power is turned on, damage or malfunctions may occur. -
Page 50: Using An External Sequencer To Record And Play Back
Make sure that the power of the VK-8M and your sequencer is turned off. NOTE Turn off the power of the VK-8M and the other device before making connections. If you connect an external device when the power is turned on, damage or malfunctions may occur. -
Page 51: Saving Vk-8M Settings On An External Sequencer (Bulk Dump)
Make sure that the power of the VK-8M and your sequencer is off. NOTE Turn off the power of the VK-8M and the other device before making connections. If you connect an external device when the power is turned on, damage or malfunctions may occur. -
Page 52: Troubleshooting
Troubleshooting If the VK-8M does not function in the way you except, first check the following chart. If this does not resolve the problem, consult your dealer or a nearby Roland service station. Problem Power does not turn on No sound/insufficient volume... - Page 53 MIDI channel that no other part is using. Set the MIDI channels correctly. Make sure that the VK-8M’s program changes and expression data are being transmitted on the correct MIDI channel.
-
Page 54: Error Indications
■ Error Indications When an incorrect operation is performed, or when an operation cannot be carried out correctly, the VK-8M will light all of its indicators for a few seconds. Errors are divided into two categories—those that show up at power-up, and those that occur during normal operation. -
Page 55: Registration List
Registration List REGIS- TRATION UPPER PART LOWER PART Number 88 8000 000 83 8000 000 88 8800 000 83 8000 000 88 8800 000 00 8800 000 88 8008 008 83 8000 000 88 8000 678 87 8600 000 00 7373 430 00 8800 000 88 8000 000 00 8888 000... -
Page 56: Edit Parameters
Edit Parameters Settings that are saved for the entire System ●Rotary-related settings • ROTARY WOOFER LEVEL • ROTARY TWEETER LEVEL • ROTARY WOOFER RISE TIME • ROTARY TWEETER RISE TIME • ROTARY WOOFER FALL TIME • ROTARY TWEETER FALL TIME •... -
Page 57: Midi Implementation
Organ Part. * When the MIDI IN FUNCTION is set to SINGLE KEYBOARD MODE (p. 20), this has the same function as an expression pedal connected to the VK-8M’s EXPRESSION PEDAL jack. ❍General Purpose Controller 2 (Controller number 17) (Wheel Brake) -
Page 58: Transmitted Data
EOX (End Of Exclusive) This is the last status of system exclusive message. The System Exclusive Messages received by VK-8M are; messages related to mode settings, Universal Realtime System Exclusive messages, Data Requests (RQ1), and Data Set (DT1). ●Universal Non-Realtime System Exclusive Messages... - Page 59 Transmission of “#” marked address is divided to some packets. For example, ABH in hexadecimal notation will be divied to 0AH and 0BH, and is sent/received in this order. It is shown that the description (VK-8) and (VK-8M) in the map is a parameter peculiar to each model.
- Page 60 00 0D | 0000 000a | Keyboard Split Mode (VK-8) 1 - 16 (0 - 15) | |-------------+-----------+---------------------------------------| 1 - 16 00 0E | 0000 00aa | Expression Pedal Select(VK-8M)(0 - 2) | (0 - 15) | 1 - 16 |-------------+---------------------------------------------------| (0 - 15) |...
- Page 61 ■Examples of System Exclusive Messages and Calculating the Checksum Roland exclusive messages (RQ1, DT1) are transmitted with a checksum at the end of the data (before F7) to check that the data was received correctly. The value of the checksum is determined by the address and data (or size) of the exclusive message.
-
Page 62: Midi Implementation Chart
*2 Velocity for organ parts is fixed. *3 The Messages will be received on the channel specified by Control MIDI Channel. *4 Received Data will be handled in the same way as the EXPRESSION PEDAL jack of the VK-8M itself. *5 Wheel Brake... -
Page 63: Main Specification
Main Specification VK-8M: Organ Module ● Sound Generator Virtual Tonewheel Method ● Part 3 Parts (Upper, Lower, Pedal) ● Maximum Polyphony Full Polyphony ● Organ Tone Wheel VINTAGE 1, VINTAGE 2, CLEAN Leakage Level Vibrato and Chorus V1, V2, V3, C1, C2, C3... -
Page 64: Index
Index Active Expression function ... 35 Ambience ... 34 Amp Type ... 12, 30 BANK ... 37 Bulk Dump ... 51 Chorus ... 28 Click Noise ... 43 Connection AC Adaptor ... 13 Amp ... 15 Expression Pedal ... 36 External Sequencer ... - Page 65 Index ROTARY TWEETER FALL TIME ... 42 ROTARY TWEETER LEVEL ... 42 ROTARY TWEETER RISE TIME ... 42 ROTARY TWEETER SPEED FAST ... 42 ROTARY TWEETER SPEED SLOW ... 42 ROTARY TWEETER SPREAD ... 42 ROTARY WOOFER FALL TIME ... 42 ROTARY WOOFER LEVEL ...
- Page 66 Information When you need repair service, call your nearest Roland Service Center or authorized Roland distributor in your country as shown below. AFRICA PHILIPPINES G.A. Yupangco & Co. Inc. 339 Gil J. Puyat Avenue EGYPT Makati, Metro Manila 1200, Al Fanny Trading Office...
-
Page 67: Federal Communications Commission Radio Frequency Interference Statement
This product complies with the requirements of European Directive 89/336/EEC. FEDERAL COMMUNICATIONS COMMISSION RADIO FREQUENCY INTERFERENCE STATEMENT This equipment has been tested and found to comply with the limits for a Class B digital device, pursuant to Part 15 of the FCC Rules. - Page 68 This owner’s manual is printed on recycled paper. 03122378 ’05-5-6N...
Need help?
Do you have a question about the VK-8M and is the answer not in the manual?
Questions and answers