
Related Manuals for Envirovent Damp Pro DP-EVL


Summary of Contents for Envirovent Damp Pro DP-EVL
- Page 1 AFTER INSTALLATION THE END USER SHOULD KEEP THIS GUIDE FOR FUTURE REFERENCE DO NOT THROW AWAY VENTILATION UNIT INSTALLATION GUIDE...
- Page 2 SHOULD YOU ENCOUNTER ANY PROBLEMS INSTALLING THIS UNIT, CONTACT YOUR SUPPLIER Damp Pro...
- Page 3 Safety Read and understand these instructions before beginning installation. The unit should be installed by a competent person. Location Check there is space for the unit in your chosen location. The unit must not affect the operation of open-flue appliances. Consult local regulations or a qualified gas engineer.
- Page 4 The power supply cable running into the unit must remain the supplied flexible cable (not a solid core lighting cable). If the power supply cable becomes damaged, it must be replaced by EnviroVent, an authorised service agent for your region/country, or a similarly qualified person in order to avoid a hazard.
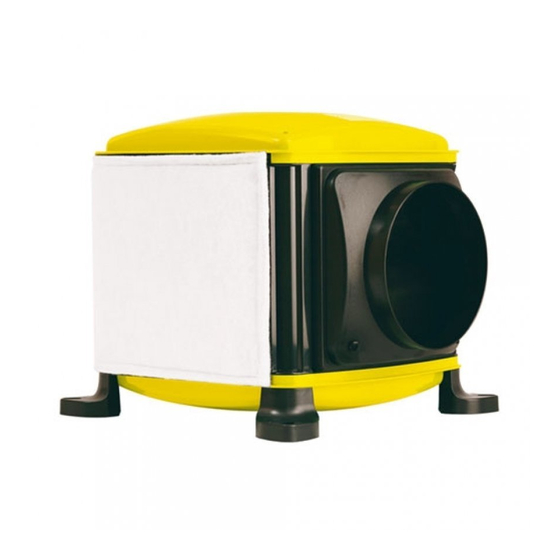
- Page 5 Diagrams DIMENSIONS 406 mm 406 mm KEYPAD 1 - Airflow 1 2 - Airflow 2 3 - Airflow 3 4 - Airflow 4 5 - Temperature <19 6 - Temperature >19 7 - Temperature >25 8 - Top button 9 - Numeric Display 10 - Bottom button FILTER DO NOT...
- Page 6 WIRING VENTILATION UNIT LOCAL ISOLATOR MAINS SUPPLY 230V 50/60HZ N E L POWER CABLE TO CONNECT OPTIONAL 0-10V (RF AND APP UNITS ONLY) OR HEATER ENABLE CABLE SEE STEP 1 TO 4 The local isolator must be connected to the mains as part of the fixed wiring.
- Page 7 Box contents • 1x Ventilation unit • 1x 200mm diffuser (+ 2x blanking plates) • 1x Instruction guide • 1x Diffuser mounting template • 1x Flexible duct (1m x 200mm dia.) • 1x Unswitched fuse spur • 8x Foam pads •...
- Page 8 Pre - Installation Checklist • Does the unit fit through the loft hatch? • Check there are no obstructions in the hallway or landing where the diffuser is to be fitted and in the loft space above. • Ensure the loft has adequate cross-flow ventilation to provide a supply of fresh air to the unit.
- Page 9 Installation 1. Place a dust sheet below the required ceiling diffuser position and check the ceiling below and loft space above are unobstructed. 2. Mark a 222mm diffuser hole using the template. 3. Wearing a dust mask and eye protection, cut out the hole. DO NOT AFTER INSTALLATION THE END USER SHOULD KEEP THIS GUIDE FOR FUTURE REFERENCE...
- Page 10 4. a) Screw the feet of the unit onto two 25mm x 50mm wood battens using the four 10g x 1.5” screws. (Battens not supplied). 4. b) Position the unit with anti-vibration pads and washers onto the loft ceiling joists as in the diagram. 4.
- Page 11 5. Insert the diffuser spigot into the ceiling hole so that the diffuser outlets face towards the walls then mark the four fixing holes. 6. Attach the duct to the spigot of the diffuser and seal the connection using the tape supplied. 7.
- Page 12 9. With the mains supply isolated, wire the power cable into the 9. With the mains supply isolated, wire the power cable into the unswitched fuse spur then wire the unswitched fuse spur into the unswitched fuse spur then wire the unswitched fuse spur into the mains supply (see wiring diagram on page 4).
- Page 13 Fire Safety Smoke Kits For installations with a floor more than 4.5m above ground, a compatible smoke kit must be fitted. The kits listed below contain all the extra parts and instructions required: Order Code Description KIT-PIV-SMOKE-125 PIV smoke kit with 1x 125mm diffuser KIT-PIV-SMOKE-150 PIV smoke kit with 1x 150mm diffuser KIT-PIV-SMOKE-200...
- Page 14 SMOKE ALARM WIRING SHOULD YOU ENCOUNTER ANY PROBLEMS INSTALLING THIS UNIT, CONTACT YOUR SUPPLIER Damp Pro...
- Page 15 SETTINGS Top button -Press to show the current air flow rate setting. -The corresponding LED will illuminate on the keypad. -Further presses scroll through the air flow rate settings 1, 2, 3 and 4 on a loop. -Adjust this according to the size, type and occupancy of the property. Bottom button -Press to show the total running time.
- Page 16 Diffuser installed without blanking plates fitted. Power usage shown with heater function disabled. Running costs Please scan our QR code to see the annual running costs of this product. Or visit: envirovent.com/annual-running-costs SHOULD YOU ENCOUNTER ANY PROBLEMS INSTALLING THIS UNIT, CONTACT YOUR SUPPLIER Damp Pro...
- Page 17 Maintenance The damp pro loft unit is designed to operate for 5 years before requiring a full service. It is recommended that the filters are replaced after 5 years usage. If there are very high amounts of particulate matter in the air and loft space, the filter will need to be replaced more frequently.
- Page 18 Warranty We appreciate you choosing this quality product, which is designed and manufactured to the highest specification in Harrogate, North Yorkshire. We are confident that you will be delighted with the performance of the system and the resulting improvement in air quality in your home after the installation of the unit. This unit is covered by a full 5-year warranty.
- Page 19 DO NOT AFTER INSTALLATION THE END USER SHOULD KEEP THIS GUIDE FOR FUTURE REFERENCE THROW AWAY Damp Pro...
- Page 20 Your feedback is important to us as we strive to improve our and improvement EnviroVent reserves the products, services, and overall customer experience. Please email right to alter products specification and us to help us serve you better: feedback@envirovent.com appearance without notice.
Need help?
Do you have a question about the Damp Pro DP-EVL and is the answer not in the manual?
Questions and answers