Table of Contents
Advertisement
Quick Links
__________________________________________________
Please follow these instructions to unpack your garden building safely
_______________________________________________________________________________________
Please note – if you have ordered a base kit it's unlikely you will be able to see the base kit from the
outside of the pack - it will be inside your panels. The fixings are also inside the pack.
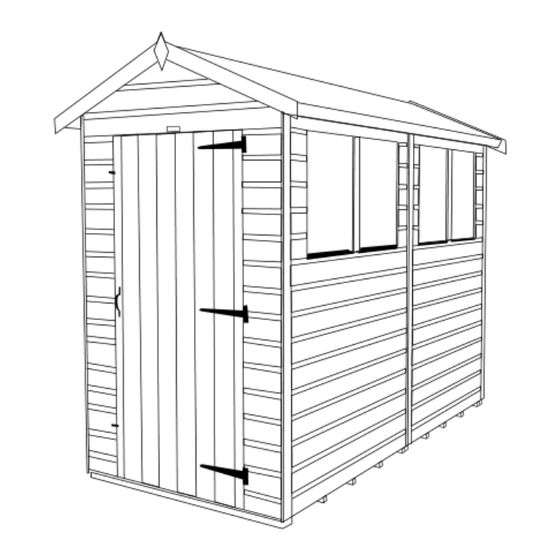
Apex
Instruction Manual
WARNING
UNPACKING SAFELY
•
Two people minimum to unpack
•
Place the pallet on firm level ground
•
Cut the plastic banding
•
Remove each panel by removing screws one column at a time as indicated below
•
Be careful of loose components inside the pack when removing panels
•
Check all the components against the checklist prior to install
BASE KIT AND FIXING PACK
Advertisement
Table of Contents

Related Manuals for Power Apex


Summary of Contents for Power Apex
- Page 1 Apex Instruction Manual __________________________________________________ WARNING UNPACKING SAFELY Please follow these instructions to unpack your garden building safely • Two people minimum to unpack • Place the pallet on firm level ground • Cut the plastic banding • Remove each panel by removing screws one column at a time as indicated below •...
-
Page 2: Watch The Video
Power Apex Product Instructions Watch the video! We recommend watching our installation video before starting assembly of your Power shed. This video can be applied to all pent sheds in our range www.powersheds.com/faqs/how-do-you-assemble-a-power-shed/... -
Page 3: Before You Start
We also strongly advise you to wear safety glasses when installing the felt to protect your eyes. 2 persons recommended Power Sheds Ltd cannot be held responsible for any damage or injury sustained due to incorrect unloading, unpacking, or assembly of any of our products. - Page 4 (75mm of concrete on top of 75mm of hardcore) or a paving slab base (slabs laid on top of 50mm of sharp sand). Power Base Kit If you have ordered a Power Base Kit the instructions can be found in the small base kit fixing pack. Please scan the QR code to watch our base kit installation video - Watch the build a base video: www.powersheds.com/faqs/how-do-you-assemble-the-power-sheds-base-kit/...
-
Page 5: Component Checklist
Component Checklist Page 5... - Page 6 Page 6...
-
Page 7: Pre-Assembly
• 70mm screws If you have ordered a Power Base, you will also receive 80mm and 100mm screws. On the rare occasion that not enough screws are provided please contact us to make us aware so we can send more out to yourself. Please be aware we are unable to reimburse if you purchase your own. - Page 8 For floors over 12ft long this method should be followed but to do it in two halves. USEFUL TIP! – If you have purchased a Power Base you can screw the floor to the timber Power base below for maximum strength and security.
- Page 9 Door Your building will either come with a single door or a double door depending on what you selected when ordering. Double doors are already hung on the door panel. However, for a single door you will need to hang the door. The key is screwed to the back of the door on the underside of the framing. For a single door you can choose which way round to hang it –...
- Page 10 If your Power shed is 5ft or 6ft wide (4x6, 6x6, 7x5, 8x6, 10x6, 12x6, 14x6, 16x6, 18x6, 20x6) then you will need to position one of the 2ft blank panels next to the 4ft (or 3ft for the 7x5) wall panel you have chosen to complete the gable end.
- Page 11 Continue doing this to place all remaining wall panels in position. When you have secured all the wall panels (door panel, 2ft, 3ft and 4ft blank panels, window panels) you then need to secure these to the floor using 70mm screws provided. Screw into the floor with 2x screws for every wall panel ensuring the screws are driven through the framing at the bottom of the side/gable walls, through the floorboards and into the floor joists.
- Page 12 Gable Tops Line up the gable tops with the panels at the gable ends (the ends where you attached the ‘heavy duty bearers’). Secure them to the wall panels with 50mm screws from the inside, screwing upwards through the framing. Trusses The trusses should be attached to the side wall panels with 40mm galvanised nails.
- Page 13 1302mm roof panels will mean there is an overhang at each end (except on the 4x4, 4x6, 6x4, 7x5 and 6x6 Power Apex where there is no roof overhang). The only time the roof panels won’t line up with the truss and join inside walls is if you have positioned a 2ft side wall panel at one end (and also on a 6x4, 6x6 and 7x5) –...
- Page 14 56mm overhang at each end. Note – there will be no roof overhang at the gable end on the 4x4 or 4x6 Power Apex. Then, screw the roof panels to the side wall panels with 50mm screws (ensuring you screw down into every upright piece of framing on the side walls) and screw the roof panels into the gables at each end with 35mm screws (4x screws for each gable).
- Page 15 Fold the overhanging felt at the gable ends under the roof boards and tack into place. Note - The 4x4, 4x6, 6x4, 6x6 and 7x5 Power Apex roof panels will finish flush with the gables and so the felt will not tuck under.
-
Page 16: Finishing Touches
Using the 40mm galvanised nails, fit the bargeboards, which are 70mm wide, to the roof panels and secure the diamond finials over the top of the bargeboards. Secure cover lats (which are 58mm wide) at each corner of your Power shed with 40mm nails. Use at least four per strip. - Page 17 USEFUL TIP – Looking for some inspiration? Our Instagram has images of hundreds of Power Sheds which have all been sent to us by customers and is a great way to look at the different ways you can build and paint your shed!
- Page 18 (4x) board lengths (at either 4ft or 6ft depending what you ordered). Please note: These are 70mm wide and are the same material as the bargeboards. Be careful not to use these during assembly of your Power Shed – These boards are usually taped together. •...
- Page 19 When screwing the shelving into position, ensure they are fixed to the internal framing of the shed and not the cladding The staging units are designed to fit our Power Potting Shed window panels (however can be attached to any shed in our range), being fixed against the internal framing of the shed with the 70mm screws.
- Page 20 Returns If Power is not for you and you’d like to return your shed within 14 days of delivery, then we will collect the item from you without charging a collection fee. No fuss, no fees! All we ask is that you do not unpack the shed or take the shed off the pallet. You will be able to see the shed panels on the pallet if you want to double check the quality of the shed panels.
Need help?
Do you have a question about the Apex and is the answer not in the manual?
Questions and answers