Advertisement
Available languages
Available languages
Quick Links
Advertisement

Related Manuals for VOITAS V11 5 M


Summary of Contents for VOITAS V11 5 M
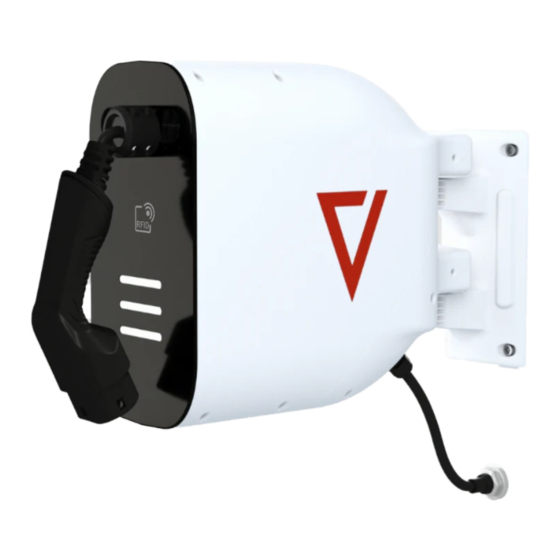
- Page 1 USER MANUAL VOITAS V11 5 M / 8 M RELEASE DATE: MAY 2023, REV. 1.0...
- Page 3 User Manual Table of Contents Electrical Safety Instructions Introduction Drawings & Dimensions Installation Installation Guide First Use & Set-up Charging Process RFID Residual Current Device (RCD) Type B LED Effects Datasheet...
- Page 4 • Do not install the VOITAS V11 in an area prone to flooding or direct water spray. • Make sure that the power supply is turned off before you start cleaning your VOITAS V11.
- Page 5 S/N placed on the nameplate indicates the serial Thank you for choosing our product! number of the VOITAS V11. The VOITAS V11 is a part of an extendable EV charging NOTE: system that allows for safe, convenient, and efficient charging of Evs.
- Page 6 Drawings & Dimensions Cable reel zone Isometric view VOITAS V11 zone - Service zone - dedicated sealed and separated to the installer functional electronics Side view Top view Front view Service plate NOTE: All dimensions are in milimeters.
- Page 7 For detailed instructions on how to install and connect the VOITAS V11, see Installation Guide section. To ensure the safe use of the VOITAS V11, the user is required to install the device according to the instructions in this manual.
- Page 8 T20 screwdriver Mount the VOITAS V11 to the wall on the dedicated Align the bracket vertically bracket included with the Wallbox or to one of the two types of VOITAS Bases (posts designed for concrete or drill) that can be purchased separately.
- Page 9 All the screws, anchors and washers needed to mount the post (for concrete or drill respectively) are STEP 1 included in the VOITAS Base kit. STEP 1: 1. Place the threaded flat bar inside the post and position it in place of the holes drilled in the post.
- Page 10 Installation Guide MOUNTING THE BASE OF THE POST TO THE The post base GROUND - with drill version WITH DRILL VERSION: Attach the base of the post to the ground using four M12 concrete anchors. NOTE: To seal the holes in the base of the post, use the four The post base M12 washers for the anchors included in the kit.
- Page 11 Side view electrical system, remove the VOITAS V11 from the bracket. 1. A power cable is included with the VOITAS V11. A Isometric view 5 x 2,5mm2 section with a length of 50 cm has been added and installed. On the installer's side, the operation consists of preparing a junction box in which they will connect and secure the cables.
- Page 12 VOITAS V11. If the device does not respond, make sure the power switch is on and set to position '1'. The VOITAS V11 will turn on its access point itself. Launch the VOITAS App on your phone and register the account.
- Page 13 Charging Process CHARGING PROCESS After the first use, the charging process goes as The VOITAS V11 8 M requires at least 5 meters of a follows: cable to be unrolled, and the VOITAS V11 5 M requires at least 2 meters to be unrolled.
- Page 14 VOITAS V11, which can be added in the configuration step when ordering the VOITAS V11. Please note that the RFID function of the VOITAS V11 only works with VOITAS RFID tokens. It allows to secure the unit and verify the user. RFID tokens are assigned to individual user accounts in the VOITA App in the configuration section in local Wi-Fi-...
- Page 15 Residual Current Device (RCD) Type B RCD - DIFFERENTIAL CURRENT MONITORING AND ELECTRIC SHOCK PROTECTION The VOITAS V11 is equipped with an RCD module type B (AC 30 mA/DC 6mA) that monitors the level of residual current and the continuity of the PE wire. In...
- Page 16 LED Effects DISPLAY MARKINGS The VOITAS V11 has three LED bars on the front panel to indicate different states and modes.
- Page 17 Datasheet POWER / CHARGING Nominal load current / voltage / v. frequency 3,7 kW (1 phase) - 16A/230V/50Hz 11 kW (3 phases) - 16A/400V/50Hz Charging current range 6 - 16A Charging power 3,7 kW - 11 kW (3 phases) 1,4 kW - 3,7 kW (1 phase) Charging mode IEC 61851-1, mode 3 Connection to the vehicle...
- Page 18 Communication WLAN, LAN, MODBUS TCP RFID verification Optional Additional accessoires (optional) VOITAS Smart Meter, VOITAS RFID tokens, VOITAS Base App control Compliance with norms, directives and certificates EU Directive 2014/35/EU, the Electrical Equipment (Safety) Regulations 2016, RoHS, PN-EN IEC 61851-...
- Page 20 USER MANUAL (ENG)
- Page 21 GEBRAUCHSANWEISUNG VOITAS V11 5 M / 8 M STAND: MAI 2023, REV. 1.0...
- Page 23 Gebrauchsanweisung Inhalt Sicherheitshinweise zur Elektronik Einführung Zeichnungen und Maße Installation Installations-Guide Erster Gebrauch und Einrichtung Laden RFID Fehlerstromschutzschalter RCD Typ B LED Anzeige Datenblatt...
- Page 24 Ersatz- und Zubehörteile oder durch unqualifiziertes Personal entstehen. Die Unser Produkt entspricht den folgenden Normen: Verwendung der VOITAS V11 ist nur zulässig, wenn EU-Richtlinie 2014/35/EU, die Electrical die Installation durch eine Elektrofachkraft Equipment (Safety) Regulations 2016, RoHS, PN- ordnungsgemäß...
- Page 25 Energieerzeugung) installiert wird. Seine Hauptaufgabe besteht darin, das elektrische System auf überschüssige Energie zu überwachen. Anhand dieser Daten kann die VOITAS V11 die Ladeleistung so anpassen, dass nur die von der Photovoltaikanlage erzeugte Energie verwendet wird. Ohne den VOITAS Smart Meter funktioniert die VOITAS V11 wie ein normales Ladegerät.
- Page 26 Zeichnungen und Maße Kabeltrommelbereich Isometrische Ansicht VOITAS V11 Zone - Service-Bereich - Für den versiegelte und getrennte Installateur bestimmt Funktionselektronik Seitenansicht Obenansicht Vorderansicht Serviceklappe HINWEIS! Alle Maße sind in Millimetern angegeben.
- Page 27 Installation HINWEIS! Detaillierte Anweisungen zur Installation und zum Anschluss der VOITAS V11 finden Sie im Abschnitt Installationsanleitung. Um einen sicheren Betrieb der VOITAS V11 zu gewährleisten, muss der Benutzer das Gerät gemäß den Anweisungen in diesem Handbuch installieren. Es ist notwendig, die VOITAS V11 vor allen Witterungseinflüssen zu schützen.
- Page 28 Bleistift, Drahtschneidezange, Abisolierzange, T20-Schraubendreher Befestigen Sie die VOITAS V11 an der Wand mit der speziellen Halterung, die der Wallbox beiliegt, oder an Richten Sie die Halterung gerade aus einem der beiden separat erhältlichen VOITAS- Sockel (Pfosten für Beton oder Bohrungen).
- Page 29 Installationsanleitung HINWEIS: Alle für die Montage des Pfostens benötigten Schrauben, Dübel und Unterlegscheiben (für Beton bzw. Bohrungen) sind im VOITAS Base Kit enthalten. MONTAGE DES PFOSTENS: SCHRITT 1 SCHRITT 1: 1. Setzen Sie die Gewindestange in den Pfosten ein und positionieren Sie sie an der Stelle, an der die Löcher im Pfosten gebohrt wurden.
- Page 30 Installationsanleitung BEFESTIGUNG DES PFOSTENSOCKELS AM BODEN: BEI BOHRVERSION: Pfostensockel - Bohrversion Befestigen Sie den Pfostensockel mit vier Betonankern M12 im Boden. HINWEIS: Um die Löcher im Pfostenfuß abzudichten, verwenden Sie die vier Unterlegscheiben M12 für die Anker, die im Bausatz enthalten sind. Die Verwendung von Unterlegscheiben ist erforderlich, um die Pfostensockel Stabilität der Ankerinstallation zu gewährleisten.
- Page 31 HINWEIS: nicht richtig funktionieren. Um den Anschluss an das Stromnetz zu erleichtern, nehmen Sie die VOITAS V11 von der Halterung ab. 1. Ein Netzkabel ist im Lieferumfang der VOITAS V11 enthalten. Ein 5 x 2,5mm2 Abschnitt mit einer Länge von 50 cm wurde hinzugefügt und installiert. Auf der...
- Page 32 Telefon und registrieren Sie sich mit einem Account. Ihr Smartphone muss mit dem lokalen W-LAN und den Mobilen Daten verbunden sein. Die App führt Sie durch den Prozess, um die VOITAS V11 Ihrem Konto zuzuordnen. Sobald Sie die VOITAS V11 mit Ihrem Konto verknüpft...
- Page 33 6. Trennen Sie das Kabel und ziehen Sie daran, um den Mechanismus zu entriegeln und das Kabel sicher in die VOITAS V11 zurückzuspulen. Bei der VOITAS V11 8 M müssen mindestens 5 Meter Kabel abgerollt werden, bei der VOITAS V11 5 M mindestens 2 Meter.
- Page 34 RFID RFID Die RFID-Identifikation ist eine optionale Funktion der VOITAS V11, die im Konfigurationsschritt bei der Bestellung der VOITAS V11 hinzugefügt werden kann. Bitte beachten Sie, dass die RFID-Funktion der VOITAS V11 nur mit VOITAS RFID-Token funktioniert. Sie ermöglicht es, das Gerät zu sichern und den Benutzer zu verifizieren.
- Page 35 Fehlerstromschutzschalter RCD Typ B RCD-DIFFERENZSTROMÜBERWACHUNG UND STROMSCHLAGSCHUTZ Die VOITAS V11 ist mit einem RCD-Modul Typ B (AC 30 mA/DC 6mA) ausgestattet, das die Höhe des Differenzstroms und die Durchgängigkeit des Schutzleiters überwacht. Im Falle einer Beschädigung eines der Ladeelemente (sowohl der VOITAS V11 als auch des zu ladenden Elektrofahrzeugs) sorgt das RCD-Modul dafür, dass der Benutzer zusätzlich vor...
- Page 36 LED Anzeige DISPLAY MARKIERUNGEN Die VOITAS V11 verfügt über drei LED-Leisten auf der Vorderseite, die verschiedene Zustände und Modi anzeigen.
- Page 37 Datenblatt POWER / LADEN Nennlast / Volt / v. Frequenz 3,7 kW (1 phasig) - 16A/230V/50Hz 11 kW (3 phasig) - 16A/400V/50Hz Ladestrom 6 - 16 A Ladeenergie 3,7 kW - 11 kW (3 - phasig); 1,4 kW - 3,7 kW (1 - phasig) Lademodus IEC 61851-1, Mode 3 Verbindungsstecker...
- Page 38 Zusätzliche infos Kommunikation WLAN, LAN, MODBUS TCP RFID Identifizierung Optional Zusätzliche Erweiterungen VOITAS Smart Meter, VOITAS RFID Token, VOITAS Base Steuerung über App Zertifizierung und Richtlinien EU-Richtlinie 2014/35/EU, die Electrical Equipment (Safety) Regulations 2016, RoHS, PN-EN IEC 61851- 1:2019-10E, PN-EN IEC 61316:2022-04 und EMC...
- Page 40 GEBRAUCHSANSWEISUNG (DE)
- Page 41 INSTRUKCJA OBSŁUGI VOITAS V11 5 M / 8 M DATA WYDANIA: MAJ 2023, REW. 1.0...
- Page 43 Instrukcja obsługi Spis treści Instrukcja bezpieczeństwa elektrycznego Wprowadzenie Rysunki i wymiary Instalacja Wytyczne dla instalatora Pierwsze użycie i konfiguracja Proces ładowania RFID Wyłącznik różnicowoprądowy (RCD) typ B Efekty LED Dokumentacja techniczna...
- Page 44 (np. piasku, kawałków gałązek niewykwalifikowanego personelu. Użytkowanie czy liści). VOITAS V11 jest dozwolone tylko wtedy, gdy instalacja • Ładowarka musi być uziemiona (przewód PE została przeprowadzona zgodnie z wytycznymi podłączony i odpowiednio poprowadzony zawartymi w tej Instrukcji obsługi i zaangażowany...
- Page 45 VOITAS V11 jest częścią rozszerzalnego systemu przeczytać całą tabliczkę znamionową, przesuń ładowania EV, który pozwala na bezpieczne, wygodne VOITAS V11 o około 90 stopni w kierunku ściany. i wydajne ładowanie pojazdów elektrycznych. S/N umieszczony na tabliczce znamionowej oznacza System składa się z: numer seryjny VOITAS V11.
- Page 46 Rysunki i wymiary Strefa bębna kablowego Widok izometryczny Strefa VOITAS V11 - Strefa serwisowa - zamknięta i przeznaczona dla instalatora odseparowana funkcjonalna elektronika Widok z boku Widok z góry Widok z przodu Pokrywa inspekcyjna WSKAZÓWKA: Wszystkie wymiary podane są w milimetrach.
- Page 47 Instalacja UWAGA! Szczegółowe instrukcje dotyczące instalacji I podłączenia VOITAS V11 znajdują się w sekcji Wytyczne dla instalatora. Aby zapewnić bezpieczne użytkowanie VOITAS V11, użytkownik jest zobowiązany do zainstalowania urządzenia zgodnie z wytycznymi i sugestiami zawartymi w niniejszej instrukcji. UWAGA! Konieczna jest ochrona VOITAS V11 przed niesprzyjającymi warunkami atmosferycznymi.
- Page 48 ściągacz izolacji przewodów, wkrętak Torx 20 Zamontuj VOITAS V11 do ściany na dedykowanym Wyrównać za pomocą wsporniku dołączonym do Wallboxa lub na jednym z poziomicy dwóch rodzajów VOITAS Bases (słupki przeznaczone do betonu lub wiercenia), które można zakupić...
- Page 49 WSKAZÓWKA: Wszystkie śruby, kotwy i podkładki potrzebne do montażu słupka (odpowiednio do betonu lub KROK 1 wiercenia) znajdują się w zestawie VOITAS Base. KROK 1: 1. Umieść nagwintowany płaskownik wewnątrz słupka i spozycjonuj go w miejscu otworów nawierconych w słupku.
- Page 50 Wytyczne dla instalatora MONTAŻ PODSTAWY SŁUPKA DO PODŁOŻA Podstawa słupka - wersja WERSJA Z WIERCENIEM: z wierceniem Zamocuj podstawę słupka do podłoża za pomocą czterech kotw do betonu M12. WSKAZÓWKA: W celu zaślepienia otworów w podstawie słupka należy użyć czterech podkładek M12 pod kotwy, Podstawa słupka dołączonych do zestawu.
- Page 51 Widok z boku Dla wygody podczas podłączania do instalacji elektrycznej należy zdjąć VOITAS V11 ze wspornika. 1. Do urządzenia VOITAS V11 dołączony jest kabel Widok izometryczny zasilający. Dodano i zainstalowano odcinek 5 x 2,5 mm2 o długości 50 cm. Po stronie instalatora zadanie polega na przygotowaniu puszki przyłączeniowej, w której połączy i zabezpieczy on...
- Page 52 Zakładając, że VOITAS V11 jest zainstalowany i podłączony zgodnie z instrukcją, można przystąpić do konfiguracji urządzenia. Upewnij się, że VOITAS V11 znajduje się w zasięgu twojej sieci Wi-Fi lub jest podłączony do twojej sieci przewodowo za pomocą...
- Page 53 Proces ładowania PROCES ŁADOWANIA OSTRZEŻENIE! Po pierwszym użyciu proces ładowania przebiega VOITAS V11 8 M wymaga rozwinięcia co najmniej 5 następująco: metrów kabla, a VOITAS V11 5 M wymaga rozwinięcia 2 metrów. 1. Sprawdź panele LED. Jeśli świecą na biało, VOITAS V11 jest gotowy do ładowania.Jeśli zakupiłeś...
- Page 54 Identyfikacja RFID to opcjonalna funkcja VOITAS V11, którą można dodać do etapu konfiguracji przy zamawianiu VOITAS V11. Należy pamiętać, że funkcja RFID VOITAS V11 działa tylko z tokenami VOITAS RFID. Pozwala ona na zabezpieczenie jednostki i weryfikację użytkownika. Tokeny RFID są przypisywane do indywidualnych kont użytkowników w aplikacji VOITAS...
- Page 55 Wyłącznik różnicowoprądowy (RCD) typ B RCD - MONITOROWANIE PRĄDU RÓŻNICOWEGO RCD I OCHRONA PRZECIWPORAŻENIOWA VOITAS V11 wyposażony jest w moduł RCD typ B (AC 30 mA/DC 6mA) monitorujący poziom prądu różnicowego oraz ciągłość przewodu PE. Dzięki tym funkcjom użytkownik jest dodatkowo zabezpieczony przed porażeniem w przypadku uszkodzenia jednej z...
- Page 56 Efekty LED OZNACZENIA WYŚWIETLACZA VOITAS V11 ma na przednim panelu trzy paski LED, które wskazują różne stany i tryby.
- Page 57 Dokumentacja techniczna ZASILANIE / ŁADOWANIE Nominalny prąd obciążenia / napięcie / 3,7 kW (1 faza) - 16A/230V/50Hz częstotlliwość V 11 kW (3 fazy) - 16A/400V/50Hz Zakres natężenia prądu ładowania 6 - 16A Moc ładowania 3,7 kW - 11 kW (3 fazy) 1,4 kW - 3,7 kW (1 faza) Tryb ładowania IEC 61851-1, tryb 3...
- Page 58 Komunikacja WLAN, LAN, MODBUS TCP Weryfikacja RFID Opcjonalna Dodatkowe akcesoria (opcjonalne) VOITAS Smart Meter, tokeny VOITAS RFID, VOITAS Base Kontrola z poziomu aplikacji mobilnej Zgodność z normami, dyrektywami i certyfikatami EU Directive 2014/35/EU, the Electrical Equipment (Safety) Regulations 2016, RoHS, PN-EN IEC 61851-...
- Page 60 INSTRUKCJA OBSŁUGI (PL)
Need help?
Do you have a question about the V11 5 M and is the answer not in the manual?
Questions and answers