Advertisement
Quick Links
Advertisement

Related Manuals for VOITAS X11 6,5 M

Summary of Contents for VOITAS X11 6,5 M
- Page 1 USER MANUAL VOITAS X11 6,5 M / 8 M RELEASE DATE: MAY 2023, REV. 1.0...
-
Page 3: Table Of Contents
User Manual Table of Contents Electrical Safety Instructions Introduction Drawings & Dimensions Installation Installation Guide First Use & Charging Process Datasheet... -
Page 4: Electrical Safety Instructions
It sunlight to prevent overheating. must be recycled at a special collection point for • Do not install the VOITAS X11 in an area prone to used electrical appliances. flooding or direct water spray. •... -
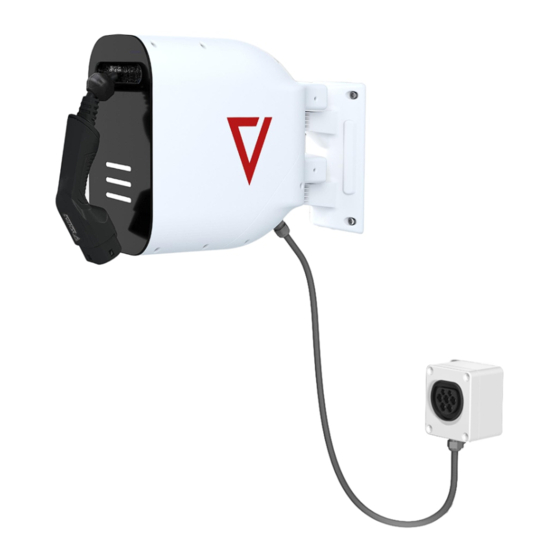
Page 5: Introduction
Introduction Thank you for choosing our product! The VOITAS X11 is a great option for people who have X11 nameplate already installed a wallbox or a charging station from a different manufacturer. The VOITAS X11 serves as a practical cable extension for the existing wallbox. -
Page 6: Drawings & Dimensions
Drawings & Dimensions Isometric view Side view Service plate Top view Front view NOTE: All dimensions are in milimeters. -
Page 7: Installation
Installation To ensure the safe use of the VOITAS X11, the user has to install the device according to the instructions in this manual. It is necessary to protect the VOITAS X11 against all weather conditions. Our warranty will not cover the damage caused by adverse weather conditions. -
Page 8: Installation Guide
4. Hammer in the screw wall plugs. 5. Place the bracket on the wall and drive the M5x80 screws into the screw wall plugs. Hang the VOITAS X11 6. Make sure the screws are tightened firmly. 7. Hang the X11 on the bracket. - Page 9 Installation Guide MOUNTING THE SOCKET BOX NOTE: All the screws and screw wall plugs needed to mount the socket box are included with the X11. The surface for mounting the socket box must be flat, solid and resistant to mechanical pressure. 1.
- Page 10 All the screws, anchors and washers needed to mount the post (for concrete or drill respectively) STEP 1 are included in the VOITAS Base kit. STEP 1: 1. Place the threaded flat bar inside the post and position it in place of the holes drilled in the post.
- Page 11 Installation Guide MOUNTING THE BASE OF THE POST TO THE The post base GROUND - a drill version WITH DRILL VERSION: Attach the base of the post to the ground using four M12 concrete anchors. NOTE: To seal the holes in the base of the post, use the four The post base M12 washers for the anchors included in the kit.
-
Page 12: First Use & Charging Process
The VOITAS X11 8 M requires at least 5 meters of a cable to be unrolled, and the VOITAS X11 6,5 M requires at least 3,5 meters of a cable to be unrolled. -
Page 13: Datasheet
Datasheet POWER / CHARGING Nominal load current / voltage / v. frequency 16A/400V/50Hz Charging current range It depends on the charger installed (max. 11 kW) Charging power It depends on the charger installed (max. 11 kW) Charging mode IEC 61851-1, mode 3 Connection to the vehicle Type 2 plug MECHANICAL DATA... - Page 15 USER MANUAL (ENG)
Need help?
Do you have a question about the X11 6,5 M and is the answer not in the manual?
Questions and answers