Advertisement
Quick Links
Save This Manual for Future Reference
Original Instruction
Plate Compactors
Operator's Manual
SKU :
TL-G-PC10
Both model number and serial number may be found on the main
label. You should record both of them in a safe place for future use.
FOR YOUR SAFETY
READ AND UNDERSTAND THE ENTIRE MANUAL BEFORE
OPERATING MACHINE
Customer Support:(888) 680-2849, inquiry@bilthardusa.com
Advertisement

Related Manuals for BILT HARD TL-G-PC10


Summary of Contents for BILT HARD TL-G-PC10
- Page 1 Original Instruction Plate Compactors Operator’s Manual SKU : TL-G-PC10 Both model number and serial number may be found on the main label. You should record both of them in a safe place for future use. FOR YOUR SAFETY READ AND UNDERSTAND THE ENTIRE MANUAL BEFORE OPERATING MACHINE Customer Support:(888) 680-2849, inquiry@bilthardusa.com...
- Page 2 Engine Manufacturer’s owner/operator’s operate, and with proper care, it will give you manual, packed separately with your unit, for many years of dependable service. more information. Specifications TL-G-PC10 Plate Size 530 X 370 mm Centrifugal Force 11000 N Exciter Speed...
- Page 3 RECYCLING AND DISPOSAL Do not smoke or have open flames. U s e e x t r e m e c a u t i o n w h e n This marking indicates that this storing, handling and using fuels, product should not be disposed with as they are highly volatile and other household wastes.
- Page 4 Check your machine before starting it. Keep Always stop the engine and allow it to cool guards in place and in working order. Make before filling the fuel tank. Never remove sure all nuts, bolts, etc. are securely tightened. the cap of the fuel tank or add fuel while the engine is running or when the engine is hot.
- Page 5 Do not put hands or feet near rotating parts. Specific Safety Rules Avoid contact with hot fuel, oil, exhaust fumes To avoid injury, keep hands, fingers and feet and hot surfaces. Do not touch the engine or away from the base plate. Grip the handle of muffler.
- Page 6 1. Plate Compactor Chassis with Engine and CONTENTS SUPPLIED Transmission 2. Handle The plate compactor comes partially assembled 3. Foldings Wheels Kit and is shipped in carefully packed carton. After 4. Operator’s Manual & Engine Manual all the parts have been removed from the carton, 5.
- Page 7 1. Mount the Handle as shown. Make the Handle ASSEMBLY Ends slot into the channels provided by the Engine Deck. Place flat washers 10, followed Following the assembly directions below, you by hex bolts M10x70 at the outer side, and will assemble the plate compactor in a few tighten with lock nuts M10 at the inner side.
- Page 8 Before compacting, fold up the Wheel Kit as shown. Engine Oil O I L H A S B E E N D R A I N E D F O R SHIPPING. Failure to fill engine sump with oil before starting engine will result in permanent damage and void engine warranty.
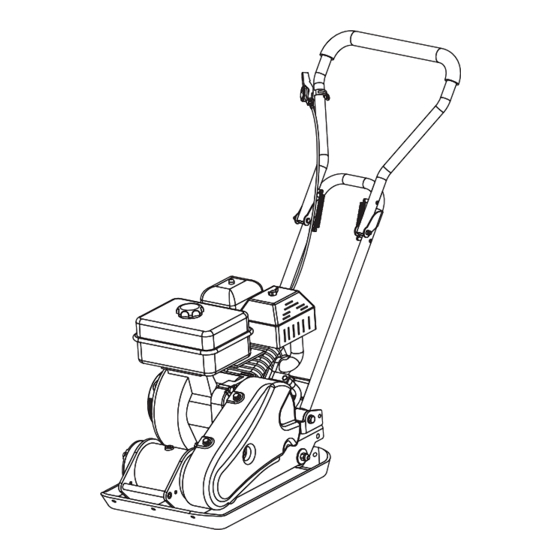
- Page 9 KNOW YOUR MACHINE Features and Controls Throttle Control Operation Handle Muffler Air Cleaner Fuel Tank Belt Guard Oil Drain Hose Exciter Base Plate Fuel Valve Control Engine Switch The fuel valve opens and closes the passage The engine switch enables and disables the between the fuel tank and the carburetor.
- Page 10 Compactor Operation for restarting a warm engine. Some engine applications use a remotely-mounted choke control rather than the engine-mounted choke Adding fuel lever. Fill the fuel tank as instructed in the separate Recoil Starter Grip Engine Manual packed with Plate Compactor.
- Page 11 3. In operation, guide the machine, but let the Stopping Engine compactor do the work. Bearing down on To stop the engine in an emergency, simply the handle is unnecessary and causes shock turn the engine switch to the OFF position. absorber wear.
- Page 12 1. Loosen 4 engine mount bolts (do not 5. Clean the bottom of the compactor base remove) only enough to move the engine as soon as it begins to pick up soil being forward. compacted. The unit can not do a good job if the bottom surface is not smooth and clean.
- Page 13 5. When the V-belt tension is correct, tighten When removing or installing the the jam nuts B against the bracket. drive belt(s), be careful not to get 6. Tighten the engine mount bolts. your fingers caught between the belt and pulley. 7.
- Page 14 2. Start the engine and allow it to run until it stops. This ensures no fuel is left in the carburetor. Run the engine until it stops. TL-G-PC10 This helps prevent deposits from forming 80 ml inside the carburetor and possible engine damage.
- Page 15 LIFTING / TRANSPORTING Do not use strong detergents or petroleum based cleaners when See technical data for the weight of the cleaning plastic parts. Chemicals machine. can damage plastics. To avoid burns or fire hazards, let engine cool 6. Pull up the spring bolt and fold up the wheels before lifting / transporting machine or storing bracket.
- Page 16 TROUBLE SHOOTING Problem Cause Remedy 1. Attach spark plug wire securely to 1. Spark plug wire spark plug. disconnected. 2. Fill with clean, fresh gasoline. 2. Out of fuel or stale fuel. 3. Move throttle control lever to start position. 3.
- Page 17 PARTS SCHEDULE PLATE COMPACTORS...
- Page 18 Parts List Description Q'ty Description Q'ty Grip Bolt M8x20 w/glue Upper Handle Nut M8 Throttle Control Flat Washer 8 Screw M5x35 Bolt M8x16 Flat Washer 5 Limited Block Spring Handle Shock Absorber Lock Nut M6 Engine Base Bolt M6x40 Washer 38x11x3 Bolt M6x50 Bolt M8x45 Nut M8...
- Page 19 PLEASE READ THE FOLLOWING CAREFULLY THE MANUFACTURER AND/OR DISTRIBUTOR HAS PROVIDED THE PARTS LIST AND ASSEMBLY DIAGRAM IN THIS DOCUMENT AS A REFERENCE TOOL ONLY . NEITHER THE MANUFACTURER OR DISTRIBUTOR MAKES ANY REPRESENTATION OR WARRANTY OF ANY KIND TO THE BUYER THAT HE OR SHE IS QUALIFIED TO MAKE ANY REPAIRS TO THE PRODUCT, OR THAT HE OR SHE IS QUALIFIED TO REPLACE ANY PARTS OF THE PRODUCT.
- Page 20 PLATE COMPACTORS...
Need help?
Do you have a question about the TL-G-PC10 and is the answer not in the manual?
Questions and answers