Table of Contents
Advertisement
Quick Links
Für weiteren Gebrauch aufbewahren!
Keep this manual for future needs!
Gardez ce mode d'emploi pour des
utilisations ultérieures!
Guarde este manual para posteriores usos.
BEDIENUNGSANLEITUNG
USER MANUAL
MODE D'EMPLOI
MANUAL DEL USUARIO
LED PAR-56
LED PAR-64
RGB Spot 10 mm
RGB Floor 10 mm
RGB Profi 10 mm
©
Copyright
Nachdruck verboten!
Reproduction prohibited!
Réproduction interdit!
Prohibida toda reproducción.
Advertisement
Table of Contents

Related Manuals for EuroLite LED PAR-56


Summary of Contents for EuroLite LED PAR-56
-
Page 1: Reinigung Und Wartung
BEDIENUNGSANLEITUNG USER MANUAL MODE D'EMPLOI MANUAL DEL USUARIO LED PAR-56 LED PAR-64 RGB Spot 10 mm RGB Floor 10 mm RGB Profi 10 mm © Für weiteren Gebrauch aufbewahren! Copyright Keep this manual for future needs! Nachdruck verboten! Gardez ce mode d’emploi pour des Reproduction prohibited! utilisations ultérieures! -
Page 2: Table Of Contents
MULTI-LANGUAGE-INSTRUCTIONS Inhaltsverzeichnis Table of contents Sommaire Contenido EINFÜHRUNG ..............................4 SICHERHEITSHINWEISE..........................4 BESTIMMUNGSGEMÄßE VERWENDUNG..................... 6 GERÄTEBESCHREIBUNG..........................7 INSTALLATION ..............................7 BEDIENUNG ..............................10 STEUERUNG ÜBER DIP SCHALTER ......................10 DMX-GESTEUERTER BETRIEB........................11 REINIGUNG UND WARTUNG........................12 TECHNISCHE DATEN ............................ 13 INTRODUCTION ............................. -
Page 3: Introduction
INTRODUCTION Thank you for having chosen a EUROLITE LED PAR-56 or PAR-64 RGB Spot, 10 mm. If you follow the instructions given in this manual, we are sure that you will enjoy this device for a long period of time. - Page 4 Please make sure that there are no obvious transport damages. Should you notice any damages on the A/C connection cable or on the casing, do not take the device into operation and immediately consult your local dealer. This device falls under protection-class I. The power plug must only be plugged into a protection class I outlet.
-
Page 5: Operating Determinations
OPERATING DETERMINATIONS This device is a lighting effect for creating decorative effects. This product is only allowed to be operated with an alternating voltage of 230 V, 50 Hz and was designed for indoor use only. This device is designed for professional use, e.g. on stages, in discotheques, theatres etc. Lighting effects are not designed for permanent operation. -
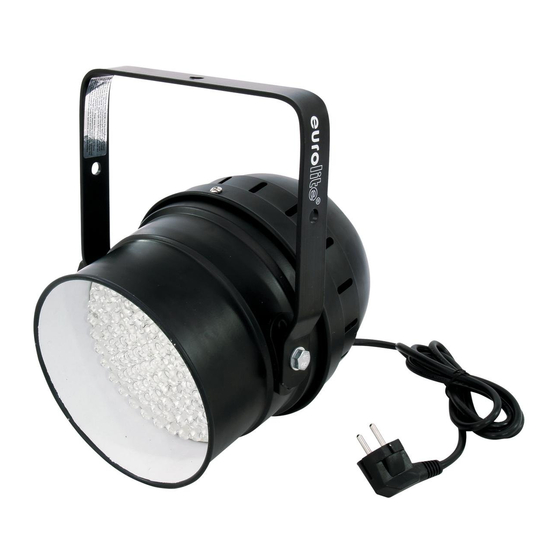
Page 6: Description
DESCRIPTION Features LED PAR Spot DMX-512 control via regular DMX-controller (occupies 5 channels) • Sound-control via built-in microphone • Color-change speed and strobe effect adjustable via dip switches • Locking possibility at the mounting bracket • For illuminating e. g. mirror balls, entrance or counter areas or as basic illumination • Perfect in public places, main halls, stages, lounges •... - Page 7 Before rigging make sure that the installation area can hold a minimum point load of 10 times the projector's weight. DANGER OF FIRE! When installing the device, make sure there is no highly-inflammable material (decoration articles, etc.) within a distance of min. 0.5 m. Mount the projector with the mounting-bracket to your trussing system using an appropriate clamp.
- Page 8 The master/slave-operation enables that several devices can be synchronized and controlled by one master- device. On the rear panel of the EUROLITE LED PAR-Spot you can find an XLR-jack and an XLR-plug, which can be used for connecting several devices.
-
Page 9: Operation
The device has two operating modes. It can be operated via DIP Switches or it can be run in DMX-controlled mode. After you connected the spot to the mains, the EUROLITE LED PAR-Spot starts running. OPERATION VIA DIP SWITCHES Auto Mode In order to select Color change and Color fade, set DIP switch 9 and 10 to OFF. - Page 10 For DMX-controlled operation set DIP Switch 10 to ON. Set DIP Switch 1 and 10 to ON in order to determine the Slave device. Addressing the device Each device occupies 5 channels. To ensure that the control signals are properly directed to each device, the device requires addressing.
-
Page 11: Cleaning And Maintenance
CLEANING AND MAINTENANCE DANGER TO LIFE! Disconnect from mains before starting maintenance operation! We recommend a frequent cleaning of the device. Please use a soft lint-free and moistened cloth. Never use alcohol or solvents! There are no servicable parts inside the device except for the fuse. Maintenance and service operations are only to be carried out by authorized dealers.
Need help?
Do you have a question about the LED PAR-56 and is the answer not in the manual?
Questions and answers