Advertisement
Table of Contents
- 1 Table of Contents
- 2 What's Included
- 3 Ajcloud App Installation and Setup
- 4 Product Overview
- 5 Detailed Camera Information
- 6 Camera Installation
- 7 APP Sign up
- 8 Connect Via QR Code
- 9 Connect Via Hotspot P
- 10 Functions Introduction and Settings
- 11 About Device Information
- 12 Client Viewing
- 13 Warranty Tips
- Download this manual
HD WiFi Security Camera
Quick Start Guide
Make sure to read this manual instruction before installing or using the
surveillance camera.
Keep this manual instruction for reference in the future.
Please read carefully before use it
www.jennov.com
support@jennov.com
U.S Hotline: +13239021978
Support
: support@jennov.com
H Series
Contact us online
H.2023.041.E
Advertisement
Table of Contents

Related Manuals for Jennov H Series


Summary of Contents for Jennov H Series
- Page 1 Support : support@jennov.com HD WiFi Security Camera Quick Start Guide H Series Contact us online Make sure to read this manual instruction before installing or using the surveillance camera. Keep this manual instruction for reference in the future. Please read carefully before use it H.2023.041.E...
- Page 2 Support : support@jennov.com...
-
Page 3: Table Of Contents
CATALOGUE Support : support@jennov.com What's Included Ajcloud App Installation and Setup Product Overview Detailed camera information Camera Installation APP Sign Up Connect via QR Code Connect via Hotspot Functions Introduction and Settings About device information Client Viewing Warranty Tips... -
Page 4: What's Included
Support : support@jennov.com What's Included Camera Screw Pack Power Adapter Sticker Warning Sticker User Manual What's Included E27 3 Prong Light Bulb Camera Reset Pin Socket to Plug Adapter User Manual Note: The package list should refer to the list of corresponding camera shape. -
Page 5: Ajcloud App Installation And Setup
Support : support@jennov.com Ajcloud App Installation and Setup Search "Ajcloud" on apple store or google play to download the app. · from Google play · from Apple store · or Scan the following QR code Download App ( IOS/ Android ) -
Page 6: Product Overview
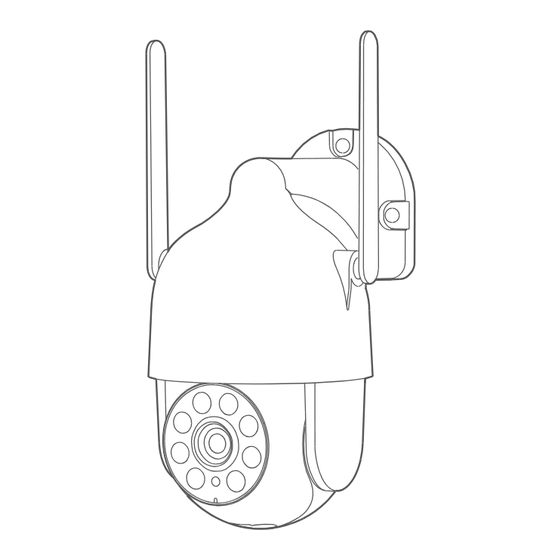
Support : support@jennov.com Product Overview Antenna Spotlights Lens Microphone Ambient Light Sensor Infrared LEDS Micro SD Card Slot Bulb camera is the same Reset button Camera front Camera back CAUTION: Please insert the Micro SD Card according to the direction shown in the picture. -
Page 7: Detailed Camera Information
Support : support@jennov.com Detailed camera information E27 lamp holder Speaker Wireless module Microphone head Infrared and white light Lens IR-CUT sensor Reset button (hole). TF card slot. (Note: TF card is also known as microSD card) Note: Insert the MicroSD card as shown in the figure. If inserted incorrectly, the MicroSD card will not work properly and may damage the device. -
Page 8: Camera Installation
Support : support@jennov.com Camera Installation Select height and location Install the camera 7-10 ft (2-3m) above the ground.This height maximizes the detection range of motion sensor of the camera. Avoid placing camera direct to sunlight. Camera fieldof view Motion Detection Zone... - Page 9 Support : support@jennov.com Installation 1. Drilling according to position sticker, drill bit:15/64 (6mm) 2. Insert the plugs Wall 3. Tighten the screw Positioning stickersx Expansion bolts Camera Screw Power Drill ( not provided ) Drill Bit Test the Wifi signal at installation position Use cell phone to test Wifi signal quality at the installation position before installing camera, make sure the Wifi router can provide good Wifi signal.
-
Page 10: App Sign Up
Support : support@jennov.com APP Sign Up 1. Open the APP to sign up an account. Go to the login interface, and click "Sign up". 2. Sign up with your email address, and click "Next". 3. Set up a "User Name" and "Password" for your APP, click "Done" and complete. -
Page 11: Connect Via Qr Code
Support : support@jennov.com Connect via QR Code 1. Set up WiFi for the camera. 1) Make sure your phone is connected to the WiFi in your house. Note: The camera can only connect to a 2.4 GHZ WiFi signal. It does not support using a 5 GHZ signal. - Page 12 Support : support@jennov.com 1. Log in to "AJCloud", then tap the "+" icon to add device. 2. Select the type of device to add cameras. 3. Ensure that the camera's blue indicator light is flashing. (Bulb-style cameras do not have a flashing light.) *About the indicator light status on the camera: Slow flashing blue light, preparing to add.
- Page 13 Support : support@jennov.com Select the WiFi needs to be connected (2.4 GHZ WiFi in your house), enter the password, and tap "Next". Turn the camera lens to the QR code on your mobile phone. When the scan is complete you will hear a prompt tone then push Next.
- Page 14 Support : support@jennov.com Pair succeeded, enter the name of the device then tap "OK". The device is displayed online, and you can view it after adding it successfully. En ligne Note: Please ensure that the camera lens and your mobile phone are at an appropriate distance (approximately 6-10 inches) when scanning the QR code.
-
Page 15: Connect Via Hotspot P
Support : support@jennov.com Connect via Hotspot-1 (Hotspot scan the QR code on the body to add) 1. Login to the "AJCloud" cloud, click the "+" icon to add a device. 2. Select the device type you want to add the camera. - Page 16 Support : support@jennov.com 1. Make sure the camera's indicator blue light is blinking alternately. (There is no indicator light on the bulb camera.) 2.Click “NEXT”. 3.Click “Auto-connect to the device”. 4.Scan the QR code on the camera. Note: If the camera is connected via a hotspot, please first ensure that the phone is connected to WIFI.
- Page 17 Support : support@jennov.com 1, the scan is successful, "AJcloud" to join the camera's hotspot, click OK. 2, join successfully, select the device needs to connect to the WIFI. 3, enter the WIFI password click OK and wait for the device to connect to the WIFI network.
- Page 18 Support : support@jennov.com Pair succeeded, enter the name of the device then tap "OK". The device is online, and you can view it on your phone. En ligne Note: Keep both your mobile phone and camera as close as possible to your router during pairing. It may take 1minutes to complete the pairing process.
- Page 19 Support : support@jennov.com Connect via Hotspot-2 1. Manually add the camera's hotspot to connect to WIFI. 2. The camera's Hotspots all start with "AJCxxxxxx" and can be found on the camera sticker. - 16 -...
- Page 20 Support : support@jennov.com 1.Look for the Hotspot connection of AJCxxxxx inside WI-FI. (No password) 2.After connecting to the Hotspot, return to the AJCloud App. 3.Return to the APP and enter the WIFI settings, you need to add WIFI to watch.(The camera only supports 2,4GWIFI)
- Page 21 Support : support@jennov.com 1.Connect to the 2,4G router. 2.Add 2,4G WiFi and wait for the connection. (If the connection fails, please check the WIFI password and whether it is a 2,4G WIFI. If it still fails, it's recommended to reset the camera and try again) 3.Name the device after a successful connection.
-
Page 22: Functions Introduction And Settings
Support : support@jennov.com Functions Introduction and Settings 1. Functions Introduction Split Screen: View multiple screens at the same time. +: Add device. Video: Video replay. Settings: Device functions setting. En ligne Devices: Return to the viewing interface. Alert: View the alarm message. - Page 23 Support : support@jennov.com 2. Functions Introduction Return to the main interface. Setting: Camera setting. Clarity View in full screen Horn: Speaker. Intercom: Microphone. Video Recording: This video needs to be recorded into the mobile phone memory. Screenshot: Save the screenshot of the current picture in the mobile phone.
- Page 24 Support : support@jennov.com 1.Setting Method for Voice Alarm A. Turn on the smartphone and tap on the "siren" icon at the bottom. B. On the "siren" screen, you can set the siren to be on/off. C. Camera settings - you can adjust the alarm volume by adjusting the height setting.
- Page 25 Support : support@jennov.com 2.Setting Detection Area and Sensitivity Launch the application, go to "Settings" - "Motion Detection," and set the detection area and sensitivity. - 22 -...
- Page 26 Support : support@jennov.com 3.Setting Method for Application Alert Notifications - 1 A. Launch the application on your smartphone and access the settings through the gear icon. B. Tap on "Motion Alert" and enable it at the "ON" position. Once motion is detected, an alert notification will be sent to your smartphone.
- Page 27 Support : support@jennov.com 4. Setting Method for Application Alert Notifications - 2 You can add alert settings for notification mode through the alarm settings screen or video settings. - 24 -...
- Page 28 Support : support@jennov.com 5.Method to Check the Capacity of TF Card. After installing the TF card in the camera, you need to confirm its capacity using the application on your smartphone. A. Launch the application on your smartphone and click on the gear icon.
- Page 29 Support : support@jennov.com 6.How to Set up and Turn On the White Light on Camera 1. Smart Night Vision Mode The default night vision mode is the Smart Night Vision Mode. At night, the infrared lights of the monitoring camera will turn on automatically, but if motion is detected, the LED lights of the camera will turn on and the screen will switch to color mode.
- Page 30 Support : support@jennov.com 2. Timed lighting mode You can manually set the camera's lighting time. Open the A mobile application and click on the gear icon. Open B Lighting and Night Vision - Light Timing - Schedule 1, and after setting the start and end times, the light will turn on at the designated time.
-
Page 31: About Device Information
Support : support@jennov.com About device information Access the settings screen by tapping the gear icon, then select "Device Informa- tion" to check the device's version, serial number, IP address, and firmware version. Additionally, you can manually set the camera's IP address from this menu. -
Page 32: Client Viewing
Support : support@jennov.com Client Viewing Download the PC client software. Our company's official website: https://www.jennov.com/download/ Download the "H-Series Product Software" in "H-Series" and view the real-time screen through the APP. - 29 -... - Page 33 Support : support@jennov.com 2. Run the "Ajcloud" computer client Front door 1. First, log in with the same email or phone number as your mobile phone. 2. View the devices that have been added to the phone in the upper left corner of “Ajcloud”, and double-click to view.
-
Page 34: Warranty Tips
12-month warranty from the order date on. After finish filling or scanning, please take a picture and send it to the email(support@jennov.com). Then your free warranty will take effect ! During the warranty period, if any parts of product are damaged, please contact us immediately and we will provide satisfactory resolution.
Need help?
Do you have a question about the H Series and is the answer not in the manual?
Questions and answers
My camera came apart how do I fix it