
Related Manuals for Rugged Computing WARRIOR Y120


Summary of Contents for Rugged Computing WARRIOR Y120
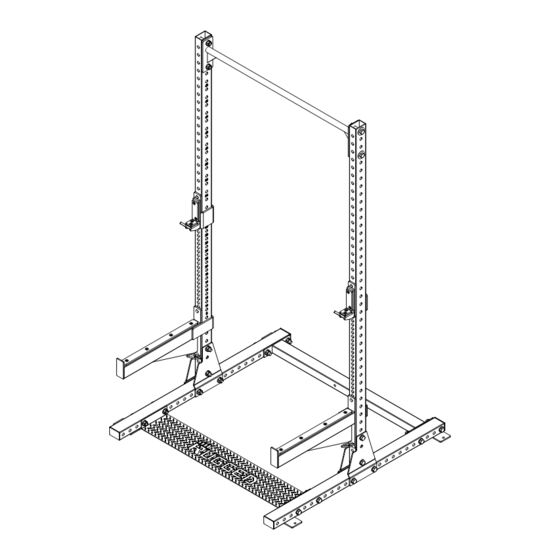
- Page 1 S T R E N G T H & F I T N E S S WARRIOR HALF RACK SKU# Y120 & A s s e m b l y I n s t r u c t i o n s O W N E R ’...
- Page 2 W a r n i n g , S a f e t y & M a i n t e n a n c e Be sure that all users carefully read and understand all warning, safety and maintenance labels on the machine before each use.
- Page 3 T a b l e o f C o n t e n t s • SAFETY INSTRUCTIONS......PAGE 4 • PREPARATION..........PAGE 5 • HARDWARE ILLUSTRATION......PAGE 6 • PARTS / HARDWARE LIST......PAGE 8 • PARTS ILLUSTRATION........PAGE 9 • ASSEMBLY INSTRUCTIONS......PAGE 12 • EXPLODED VIEW.......... PAGE 21 • CONTACT PAGE..........PAGE 22...
- Page 4 I m p o r t a n t S a f e t y I n s t r u c t i o n s Before beginning any fitness program, you should obtain a complete physical examination from your physician. Il est conseille de subir un examen medical complet avant d’entreprendre tout programme d’exercise. Si vous avez des etourdissements ou des faiblesses, arretez les exercices immediatement.
- Page 5 P r e p a r a t i o n Required Tools Assembly Tips Read all “Notes” on each page before beginning each The basic tools that you must obtain before assembling the Y120 include but are not limited to: step. While you may be able to assemble the Y120 using the illustrations only, important safety notes and other tips m Standard Wrench Set are included in the text. m Metric Wrench Set Some pieces may have extra holes that you will not use. m Adjustable Wrench Use only those holes indicated in the instructions and illustrations. NOTE: With so many assembled parts, proper Installation Requirements alignment and adjustment is critical. While tightening the nuts and bolts, be sure to leave Follow these installation requirements when assembling room for adjustments. the Y120. Set up the Y120 on a solid, flat surface. A smooth, flat surface under the machine helps keep it CAUTION: Obtain assistance! Do not attempt to level. A level machine has fewer malfunctions.
- Page 6 Y 1 2 0 H a r d w a r e I l l u s t r a t i o n Part #1 HEX HEAD BOLT M16x80mm QTY. 4...
- Page 7 Y 1 2 0 H a r d w a r e I l l u s t r a t i o n Part #4 REGULAR FLAT WASHER M16 QTY. 36...
- Page 8 Y 1 2 0 P a r t s & H a r d w a r e L i s t Part# Description RIGHT BASE FRAME RIGHT STEEL BRACKET UPRIGHT CHIN UP BAR DIAMOND PLATE LEFT SPOTTER ARM RIGHT SPOTTER ARM QUICK RELEASE PIN LEFT j CUP RIGHT j CUP LEFT STEEL BRACKET BACK BASE FRAME M16x80mm HEX HEAD BOLT M16x90mm HEX HEAD BOLT M16x110mm HEX HEAD BOLT M16 REGULAR FLAT WASHER M16 LARGE FLAT WASHER 6 M16 NYLON LOCK NUT...
- Page 9 P a r t s I l l u s t r a t i o n Part A - BASE FRAME, QTY 2 Part D - UPRIGHT, QTY 2 Part C - RIGHT STEEL BRACKET, QTY 2 Part F - DIAMOND PLATE, QTY 1 Part E - CHIN UP BAR, QTY 1 45 9...
- Page 10 P a r t s I l l u s t r a t i o n Part G - LEFT SPOTTER ARM, QTY 1 Part H - RIGHT SPOTTER ARM, QTY 1 Part K - LEFT j CUP, QTY 1 Part j - QUICK RELEASE PIN, QTY 2 Part L - RIGHT j CUP, QTY 1 Part M - LEFT STEEL BRACKET, QTY 2...
- Page 11 P a r t s I l l u s t r a t i o n Part N - BACK BASE FRAME, QTY 1...
- Page 12 S T E P Be careful to assemble all components in the sequence they are presented. NOTE: Finger tighten all hardware in this step. DO NOT wrench tighten until instructed. Some components may be pre-assembled. Nylon lock nuts will not fully screw onto bolts, they must be wrench tightened to fully go on.
- Page 13 S T E P Above shows Step 1 assembled and completed. Back of Rack Front of Rack...
- Page 14 S T E P Be careful to assemble all components in the sequence they are presented. NOTE: Finger tighten all hardware first in this step. Wrench tighten ALL hardware at the end of STEP 2C. Some components may be pre-assembled. Nylon lock nuts will not fully screw onto bolts, they must be wrench tighten to fully go on.
- Page 15 S T E P Above shows Step 2 assembled and completed. Note 1: Front of Rack Hole #12 Hole #15 Back of Rack Front of Rack...
- Page 16 S T E P Be careful to assemble all components in the sequence they are presented. NOTE: Some components may be pre-assembled. Nylon lock nuts will not fully screw onto bolts, they must be wrench tighten to fully go on. Adjustable J Cups and Spotter Arms 3A. Attach Left & Right j Cups (K &...
- Page 17 S T E P Above shows Step 3 assembled and completed. Anchor Hole Back of Rack Anchor Hole Front of Rack Anchor Hole...
- Page 18 N o t e s...
- Page 19 Y 1 2 0 E x p l o d e d V i e w...
- Page 20 S T R E N G T H & F I T N E S S Y120 PLEASE WRITE YOUR SERIAL NUMBER IN THE BOXES BELOW 013476-��-��-����-���� S/N # 1900 S. Des Plaines Ave. Forest Park, IL 60130 Phone:(708)427-3555 Fax:(708)427-3556 Hours: M-F 8:30 - 5:00 CST www.ruggedfitness.com...
Need help?
Do you have a question about the WARRIOR Y120 and is the answer not in the manual?
Questions and answers