Advertisement
Table of Contents
Contents
Panasonic VW-HU1 - Handle Unit Operating Instructions
Precautions
Thank you for purchasing this Panasonic product.
- Please read these instructions carefully before using this product, and save this manual for future use.
- The following functions can be used when this product is attached to a 4K Video Camera HC-X1500:
- Using audio equipment/external microphone (XLR, 3-pin)
- Built-in LED light
- REC button (on the handle)
- Zoom lever (on the handle)
- Tally lamp
- For details about the above functions and the operation of the handle unit, refer to the operating instructions for the 4K Video Camera.
- The 4K Video Camera is not supplied.
- Be aware that Panasonic accepts no responsibility for any incidents, damage, or malfunctions occurring due to dropping of this product or the camera while using this product.
- When requesting a repair for the handle unit, request a repair for the video camera as well, as the cause of the problem may be in the video camera.
Accessories

Check the accessories before using this unit.
- Microphone holder
- The microphone holder mounting screws are supplied with the microphone holder.
- Microphone holder mounting screws
- Length 12 mm (×2)
- Keep the microphone holder mounting screws out of reach of children to prevent swallowing.
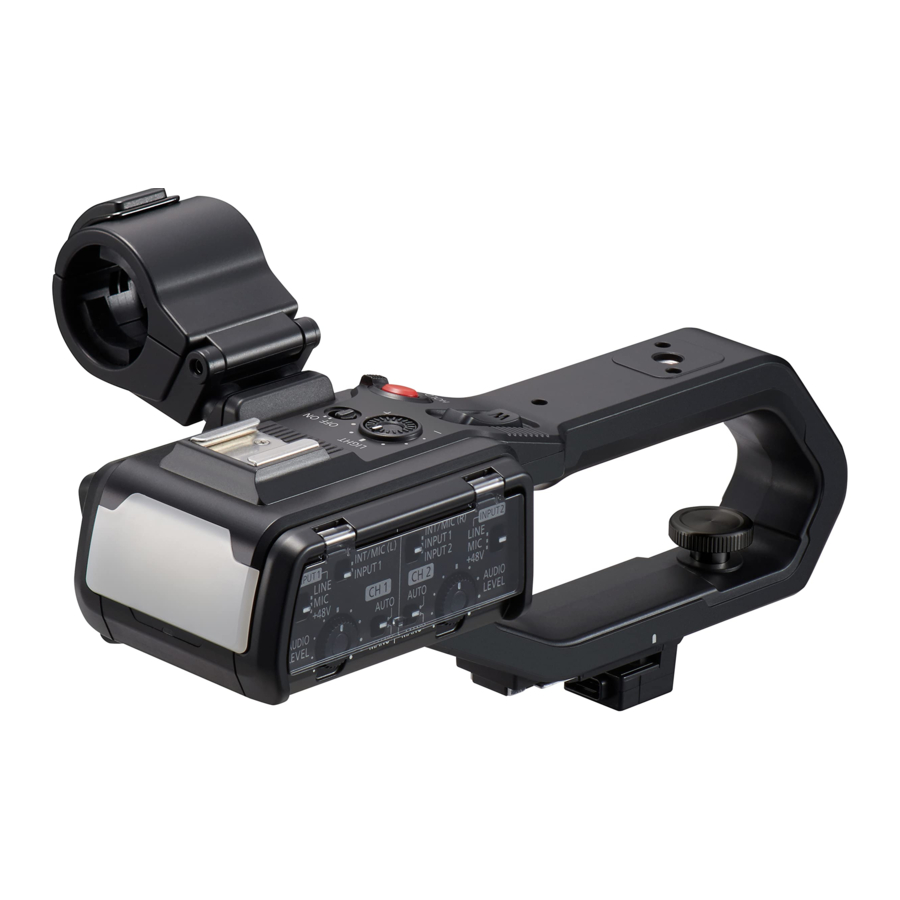
Names of the components

- Handle
- Microphone holder mounting section
- Microphone holder (
![]() With a microphone holder attached)
With a microphone holder attached) - Buckle (
![]() With a microphone holder attached)
With a microphone holder attached) - <INPUT 1> terminal (XLR, 3-pin)
- <INPUT 2> terminal (XLR, 3-pin)
- Microphone cable clamp
- <INPUT1> switch
- CH1 SELECT switch
- CH2 SELECT switch
- <INPUT2> switch
- <AUDIO LEVEL CH2> dial
- <CH2> switch
- <CH1> switch
- <AUDIO LEVEL CH1> dial
- Handle unit mounting screw
- Light cover
- Keep the light cover out of reach of children to prevent swallowing.
- Built-in LED light
- Tally lamp
- Accessory shoe (on the handle)
- <LIGHT> switch
- Hold lever
- REC button (on the handle)
- Accessory mounting hole
- Zoom lever (on the handle)
- Light dimmer dial
 With a microphone holder attached)
Attaching the handle unit

- Attach while the power of the camera is turned off.
- Open the microphone holder.
Open buckle![]() , and detach fitting
, and detach fitting ![]() from hook
from hook ![]() .
. - Attach the microphone holder to the microphone holder mounting section on the handle unit.
![]() Microphone holder mounting screws
Microphone holder mounting screws
![]() Microphone holder
Microphone holder - Attach using a commercially-available screwdriver.
- There will be some rubbing noises with the rubber when screwing in the microphone holder mounting screws, but please ensure they are done up tightly.
- Push the handle unit into the handle unit mounting section on the camera.
Match the positions of mounting mark![]() on the handle unit and mounting mark
on the handle unit and mounting mark ![]() on the camera when pushing in.
on the camera when pushing in. - Slide the handle unit in the direction indicated by the arrow.
Slide up to mounting mark![]() .
. - While pressing the handle unit mounting screw down, turn it in the direction indicated by arrow
![]() until it stops.
until it stops.
 , and detach fitting
  from hook
  .
. Microphone holder mounting screws
  Microphone holder
  on the handle unit and mounting mark
  on the camera when pushing in.
 .
. until it stops.
How to remove
Remove by doing the steps for attaching in reverse.
Specifications
| Power consumption: | Maximum approx. 3.1 W (when connected to the camera) |
| External dimensions (W×H×D): | Approx. 71 mm ×89 mm ×207 mm (including protrusions, excluding microphone holder) |
| Mass: | Approx. 305 g (main part of the handle unit only, excluding microphone holder and microphone holder mounting screws) |
| The symbols on this product (including the accessories) represent the following: |  DC DC |

Documents / ResourcesDownload manual
Here you can download full pdf version of manual, it may contain additional safety instructions, warranty information, FCC rules, etc.
Download Panasonic VW-HU1 - Handle Unit Operating Instructions
Advertisement


Need help?
Do you have a question about the VW-HU1 and is the answer not in the manual?
Questions and answers