AutoPage RF-1055KE - Professional Keyless Entry System Manual
- Operation manual (2 pages) ,
- Transmitter programming (1 page)
Advertisement
CUSTOMER SYSTEM OPERATIONS
- ACTIVE LOCKING & UNLOCKING
Active or Manual locking is activating the System by the Remote Control Transmitters. (Interfacing the vehicles horn and starter interrupt circuit requires additional installation.) Active locking is as follows...
- Press button 1 (lock) on the Remote Control Transmitter.
- The horn will honk once, the parking lights will flash once & the doors will lock.
- A steady flashing of the System LED will confirm locked status.
Unlocking is as follows...
- Press button 2 (unlock) on the Remote Control Transmitter.
- The horn will honk twice, the parking Lts. will flash twice & the doors will unlock.
- The System LED will turn off indicating unlocked status.
- PANIC FUNCTION
In the event of an emergency, the Remote Control Transmitter can be used to activate the System Panic Mode. (Interfacing the vehicles horn to the System requires additional installation.) Panic Mode operation is as follows...
- Push and hold button 4 (horn) for more than 3 seconds.
- The horn will begin honking and the vehicles parking lights will begin flashing.
- CAR LOCATOR FUNCTION
To help locate your vehicle when out of sight our parked in a crowded parking lot. (Interfacing the vehicles horn to the System requires additional installation.) You can activate the Car Locator by:
- Push button 3 (Car) 2 times.
- The horn will sound chirping 6 times & the parking lights will flash 12 times.
- VALET / OVERRIDE SWITCH
(The Valet / Override Switch has dual functions:)
Emergency Disarm (To dis-engage the optional starter interrupt circuit) – In the event the Remote Control Transmitter malfunctions or is lost the System can still be disarmed. Emergency Disarm is activated as follows...
- Turn the vehicles ignition to the "ON" position and press the Valet / Override Switch once.
- The System is now disarmed.
Valet Mode – In the event the vehicle needs to be serviced or valet parked, the System can be programmed into a "Valet Mode" that will only allow the Remote Control Transmitters to activate the door lock / unlock circuit. Programming Valet Mode is as follows...
- Turn the vehicles ignition to the "ON" position and push the Valet / Override Switch for 2 seconds or until the System LED turns on solid. The System is now in Valet mode.
- To return the System to normal operation, turn the vehicles ignition "ON" position and push the Valet / Override switch for 2 seconds or until the System LED turns off. The System has resumed normal operation.
- IGNITION CONTROLLED DOOR LOCKS
When the vehicles ignition is turned "ON" the door will automatically lock and when the vehicles ignition is turned "OFF" the doors will automatically unlock. (Please refer to System Programming to disable this function.)
- DOME LIGHT ILLUMINATION
When the System is locked, the vehicles dome light will illuminate for 10 seconds. When the System is unlocked, the vehicles dome light will illuminate for 30 seconds.
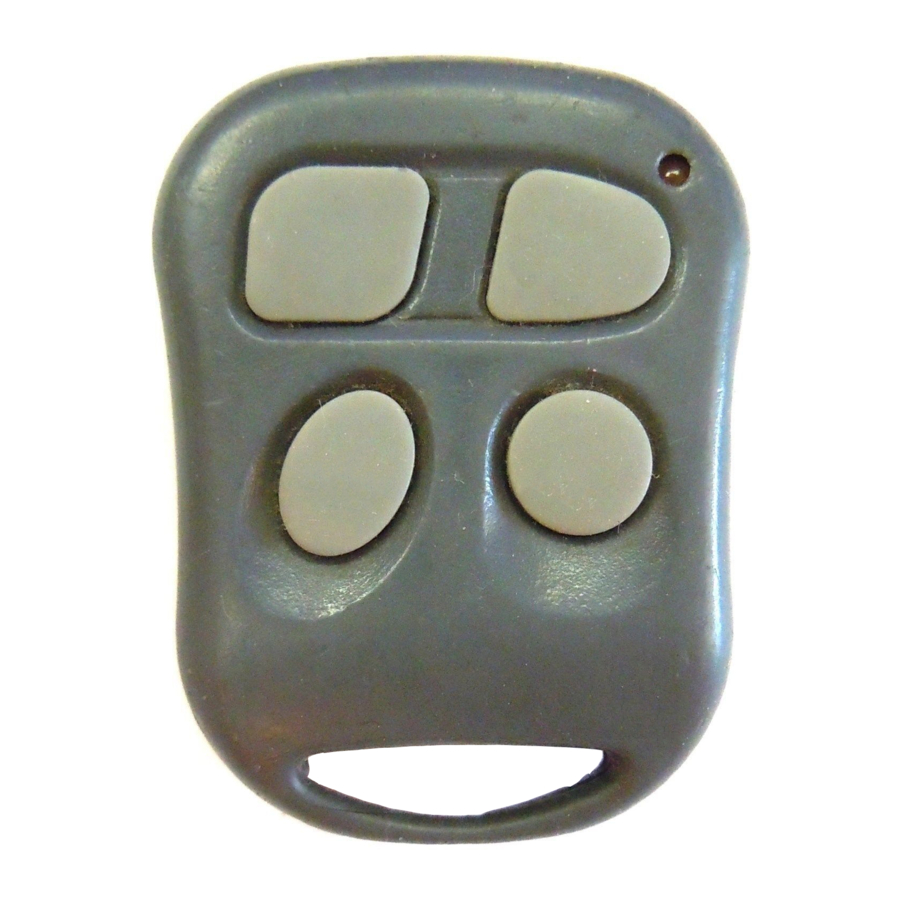
- REMOTE CONTROL TRANSMITTER OPERATION
| Transmitter Button | System Function |
| Button 1 – Locking | Locks the door / flashes the parking lights once / activates the horn once* / starter interrupt circuit engaged* |
| Button 1 – Panic Function | Activates the horn* / flashes the parking lights |
| Button 2 – Unlocking | Unlocks the doors / flashes the parking lights twice activates the horn twice* |
| Button 2 + 2 – Two Step Unlock | Unlocks the Drivers door on the first push, then unlocks the |
| Button 3 – Aux. 1 | Activates channel 2 output (Push and hold button 2 for 2 seconds to activate) |
| Button 3 + 3 – Car Locator | Activates the horn* 6 chirps & Flashes parking 12 times (Push the button 2 time to activate) |
| Button 4 – Panic Function | Activates the horn* / flashes the parking lights (Push and hold button for 3 sec.) Program #8 turned 'ON' |
| Button 4 – Silent Locking | Activates silent Locking mode (Push both buttons 1 and |
| Buttons 1 & 2 – Silent Locking | Activates silent Locking mode (Push both buttons 1 and 2 at the same time to activate)* |
* Additional Installation may be required
- LED & HORN INDICATORS
| LED | HORN* | ||
| Operation | Function | Operation | Function |
| Off | Unlocked | 1 Chirp | Locked |
| Slow Flash | Locked | 2 Chirps | Unlocked |
| Fast Flash | Passive Locking Mode Engaged | Continuous Chirp | Panic Mode Engaged (30 seconds) |
| On (Solid) | Valet Mode | ||
* Additional Installation may be required
- PARKING LIGHT INDICATORS
| PARKING LIGHTS | |
| Operation | Function |
| 1 Flash + 10 sec on | Locked / The parking lights will remain "on" for 10 seconds |
| 2 Flashes + 30 sec on | Unlocked / The parking lights will remain "on" for 30 seconds |
| Continuous Flash | Panic Mode Engaged (30 Sec.) |
- STARTER INTERRUPT CIRCUIT (OPTIONAL)
The vehicles starter circuit may be interrupted for additional protection when the System is locked. Use of the RK-1 Starter Interrupt Relay kit is recommended.
- TRANSMITTER PROGRAMMING
In the event, you should need to add or replace a Remote Control Transmitter, it is important that you follow the instructions below.
Note: Each step must be performed within 10 seconds of the previous step otherwise the System will exit the programming mode.
- Enter:
- Turn the vehicles ignition to the "ON" position
- Push the valet switch 3 times. There will be 1 long chirp and 1 short chirp
- You are now ready to program the Remote Control Transmitter(s).
- Programming the Remote Control Transmitters:
- Press any button on the first transmitter. There will be 1 short chirp.
- Within 10 seconds push any button on the second transmitter. There will be 2 short chirps.
- Exit:
- Turn the vehicles ignition key to the "OFF" position, Or
- Leave for 10 seconds; there will be 3 long chirps to confirm exit.
Note: The Keyless Entry System will only retain the last 4 Remote Control Transmitters programmed. If the Remote Transmitter memory is exceeded, the System will start deleting RemoteTransmitters from memory in chronological order.
- SECOND VEHICLE TRANSMITTER PROGRAMMING
Your AutoPage Keyless Entry System's Remote Control Transmitter can be utilized to control a second vehicle equipped with an RF1055KE, RF-305 or RF-405. All programming parameters will be the same except for the following:
- Prior to pushing any button on the Remote Control Transmitter. Select the Green side shift button first.
- While the LED is illuminated, press any button on the Remote Control Transmitter.
Note: The System will only learn up to 4 remote transmitters.
- SECOND VEHICLE OPERATION
Your AutoPage Keyless Entry Systems Remote Control Transmitter can be utilized to control a second vehicle equipped with an RF-1055KE. If your Remote Control Transmitter is programmed to a second vehicle, the remote transmitter will operate as follows:
- Push the Green side shift button on the right side of the Remote Transmitter, the System LED will illuminate for 3 seconds.
- While the System LED is illuminated, push the desired button operation. For Expample: To Lock the second vehicle, simply push the Green side shift button once then push the Lock button while the LED is illuminated.
- AUXILIARY FUNCTION (OPTIONAL)
You may use the CAR button on your Remote Control Transmitter for a separate function. For example, if your vehicle is equipped with an electronic trunk release, the Keyless Entry System can be interfaced with it and can electronically release your trunk by pressing the CAR button on the Remote Control Transmitter.

Documents / ResourcesDownload manual
Here you can download full pdf version of manual, it may contain additional safety instructions, warranty information, FCC rules, etc.
Download AutoPage RF-1055KE - Professional Keyless Entry System Manual
Advertisement


Need help?
Do you have a question about the RF-1055KE and is the answer not in the manual?
Questions and answers