Leviton A8810 Quick Start Manual
Emb hub data acquisition system
Hide thumbs
Also See for A8810:
- Installation and operation manual (44 pages) ,
- Installation and operation manual (30 pages)

Related Manuals for Leviton A8810


Summary of Contents for Leviton A8810
- Page 1 DG-005-A8810-00B EMB Hub Data Acquisition System Cat. No. A8810 Quick Start Guide...
- Page 3 1 PRODUCT APPLICATION LIMITATION • Leviton products are not intended for use in critical applications such as nuclear facilities, human implantable devices or life support. Leviton is not liable, in whole or in part, for any claims or damages arising from such uses.
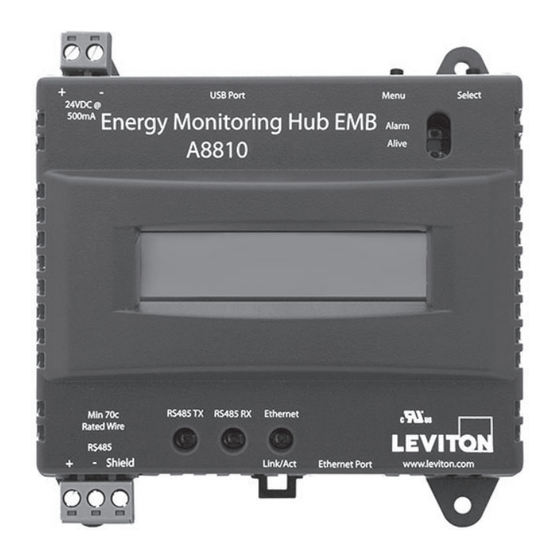
- Page 4 2 OVERVIEW EMB Hub is a family of data acquisition systems which provides owners and managers of commercial and industrial facilities with a cost-effective means of gathering crucial information in a timely manner. The EMB footprint and industrial temperature range makes this a perfect solution for embedded applications.
-
Page 5: Installation Checklist
Devices or BACnet Devices. • 2 wire, twisted pair with shield for Modbus/RS485 connection (Belden 1120A or equivalent). • Termination resistor (120 ohm) for long RS485 runs over 200 ft. Data Acquisition Server (A8810 EMB Hub, A7810 EMB HubLite, and A8812 EMH) - Page 6 Connect a PC to the DAS using a Cat 5 or better ethernet cable. (Figure 1) Supply +24VDC to the DAS. After power is applied the “Alive” light (upper right of A8810 andA7810) will turn on and the LCD display will display series of diagnostics screens.
- Page 7 5 DHCP ENABLED MODE Confirm the DAS is properly connected to the computer or a LAN, and both are powered on. Confirm that DHCP is enabled on the computer. For most computers, this is the default setting. To confirm you have established connection to the device, do a ping to the IP address shown in the DAS’s LCD display.
-
Page 8: Static Ip Mode
6 STATIC IP MODE Confirm the DAS is properly connected to the computer, and both are powered on. On the EMB Hub, click the “Menu” button to select the “TCP/IP Config” option. Click the “Select” button to enter the “TCP/IP Menu”. Select the “DHCP+UPnP on/off”... - Page 9 6 STATIC IP MODE Enter the desired admin user password in both boxes and click the Apply button. Figure 6 A Thank You message will be displayed, confirming that the password was succesfully set. Click on the line below to proceed to the login screen. Figure 7...
- Page 10 7 LOGGING INTO THE EMB HUB From the web browser interface, click on “Click here to enter”. Enter the username and password. Figure 8 Login successful. Figure 9...
-
Page 11: Warranty And Contact Information
LIMITED 5 YEAR WARRANTY AND EXCLUSIONS Leviton warrants to the original consumer purchaser and not for the benefit of anyone else that this product at the time of its sale by Leviton is free of defects in materials and workmanship under normal and proper use for five years from the purchase date. Leviton’s only obligation is to correct such defects by repair or replacement, at its option.
Need help?
Do you have a question about the A8810 and is the answer not in the manual?
Questions and answers