D-Link DCS-5222L User Manual
Hd wireless n pan/tilt network camera
Hide thumbs
Also See for DCS-5222L:
- User manual (89 pages) ,
- Quick installation manual (80 pages) ,
- Quick install manual (9 pages)

Related Manuals for D-Link DCS-5222L


Summary of Contents for D-Link DCS-5222L
- Page 1 Version 2.0 | 11/19/2013 User Manual HD Wireless N Pan/Tilt Network Camera DCS-5222L...
- Page 2 Manual Overview D-Link reserves the right to revise this publication and to make changes in the content hereof without obligation to notify any person or organization of such revisions or changes. Information in this document may become obsolete as our services and websites develop and change.
-
Page 3: Table Of Contents
Configuration Utility ..............21 Device Info ................65 Live Video ..................22 Log ...................66 Setup ....................24 Help ....................67 Setup Wizard ................24 Configuring the DCS-5222L with a Router ....68 Internet Connection Setup Wizard ......25 Motion Detection Setup Wizard .......29 Troubleshooting ..............74 D-Link DCS-5222L User Manual... - Page 4 Table of Contents Networking Basics ............77 Check your IP address ...............77 Statically Assign an IP Address ..........78 Technical Specifications ..........80 D-Link DCS-5222L User Manual...
-
Page 5: Product Overview
CAT5 Ethernet Cable Using a power supply with a different voltage rating than the one included with the DCS-5222L will cause damage and void the warranty for this product. If any of the above items are missing from your package, please contact your retailer. -
Page 6: System Requirements
• Broadband Internet connection • Computer with: • Internet Explorer 7 or higher (ActiveX) mydlink Website Requirements • Firefox 12 or higher • Safari 4 or higher • Chrome 20 or higher D-Link DCS-5222L User Manual... -
Page 7: Introduction
Congratulations on your purchase of the DCS-5222L HD Wireless N Pan/Tilt Network Camera. The DCS-5222L is a versatile solution for your small office or home. The DCS-5222L is a complete system with a built-in CPU and web server that transmits high quality video for security and surveillance. -
Page 8: Features
Simple to Use The DCS-5222L is a stand-alone system with a built-in CPU, requiring no special hardware or software such as PC frame grabber cards. The DCS-5222L supports both ActiveX mode for Internet Explorer and Java mode for other browsers such as Firefox, Chrome, and Safari. -
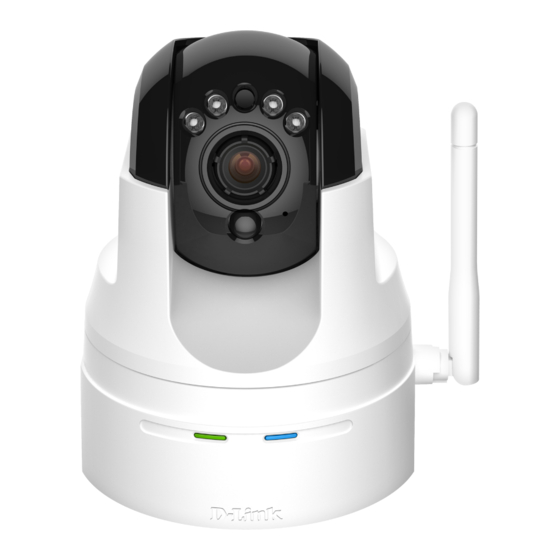
Page 9: Hardware Overview
Enables manual adjustment of the cameras focal length Passive Infrared Sensor Passive Infrared (PIR) sensor for motion detection Light Sensor Detects light levels and adjusts IR-LEDS accordingly Camera Lens Records video of the surrounding area Microphone Records audio from the surrounding area D-Link DCS-5222L User Manual... -
Page 10: Leds
The LED will switch to solid green when a proper connection has been achieved. The LED will blink green during data transfer WPS Status LED Indicates the WPS (Wi-Fi Protected Setup) connection status of the camera D-Link DCS-5222L User Manual... -
Page 11: Back
3.5 mm jack for audio I/O devices such as microphones and speakers Reset Button Press the reset button to return the device back to it’s factory conditions DI/DO Attach digital I/O devices such as alarms or motion sensors Power Receptor Connects to the power adapter D-Link DCS-5222L User Manual... -
Page 12: Left And Right Side
The external antenna increases the device’s range of connectivity. WPS Button Use WPS (Wi-Fi Protected Setup) to easily create a secure connection to your network. microSD Slot Insert a microSD card to store recorded images and video. D-Link DCS-5222L User Manual... -
Page 13: Adjusting Camera Focus
Section 1 - Product Overview Adjusting Camera Focus To manually adjust the camera focus, rotate the focusing ring around the lens clockwise or anti-clockwise. D-Link DCS-5222L User Manual... -
Page 14: Installation
• Manual Hardware Installation: This section shows you how to manually set up your camera, though in order to use the mydlink features of your camera, you will still need to run the Camera Installation Wizard. Refer to page 16. D-Link DCS-5222L User Manual... -
Page 15: Zero Configuration Setup
Connect your camera to your mydlink-enabled Cloud Router and Zero Configuration will automatically configure your DCS-5222L and automatically add the camera to your mydlink account. After the short time it takes to do this you can remotely access your camera from the www.mydlink.com website to manage and monitor your DCS-5222L. - Page 16 Click the notification to continue. A summary and confirmation notification will appear with the automatically configured details. Make a note of the details and click Yes to add the camera to your account. D-Link DCS-5222L User Manual...
- Page 17 Your camera is now set up, and you can skip to “mydlink” on page 19 to learn more about the mydlink features of this camera, or to “Configuration” on page 21 for advanced configuration of your camera. D-Link DCS-5222L User Manual...
-
Page 18: Camera Setup Wizard
Once the wizard has started simply click Set up your Cloud Camera to go through the Setup Wizard, which will guide you step-by-step through the installation process from connecting your hardware to configuring your camera and registering it with your mydlink account. D-Link DCS-5222L User Manual... - Page 19 CD drive and double-click on the SetupWizard file. After about 20-30 seconds, the Setup Wizard will open, which will guide you step-by-step through the installation process from connecting your hardware to configuring your camera and registering it with your mydlink account. D-Link DCS-5222L User Manual...
-
Page 20: Configuration
“WPS - Push Button Setup” on page 18. If your router does not support WPS, you will still be able to set up your camera’s wireless settings in the camera’s web interface. D-Link DCS-5222L User Manual...
Need help?
Do you have a question about the DCS-5222L and is the answer not in the manual?
Questions and answers