D-Link DCS-5222L Quick Install Manual
Hd wireless n pan/tilt network camera
Hide thumbs
Also See for DCS-5222L:
- User manual (89 pages) ,
- Quick installation manual (80 pages) ,
- Quick install manual (9 pages)
Advertisement
Available languages
Available languages
Quick Install Guide
HD Wireless N Pan/Tilt Network Camera
Thank you for purchasing the DCS-5222L HD Wireless N Pan/Tilt Network Camera. Follow
the easy steps in this guide to properly set up your camera. Please verify that all the package
contents below are available.
Package Contents
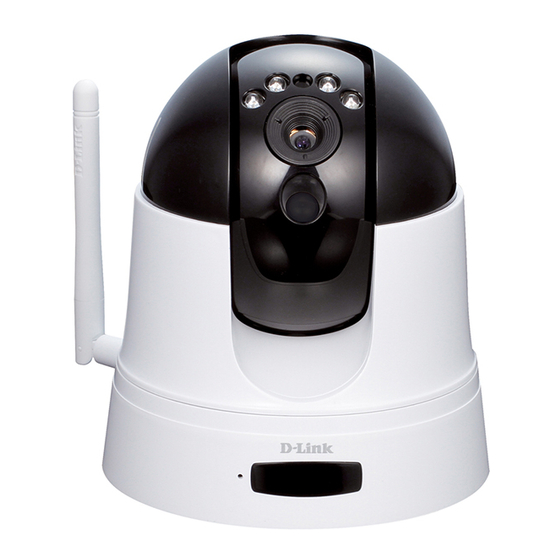
DCS-5222L HD Wireless N Pan/Tilt Network Camera
Includes Detachable Antenna
Camera Remote
Mounting Kit
CAT-5 Ethernet Cable
Power Adapter
CD with drivers and software
If any of the above items are missing, please contact your reseller.
System Requirements
• Computer with Microsoft Windows® 7 (32/64bit), XP (32/64bit),Vista® (32/64bit), Mac
OS®X 10.5 or above
• PC with 1.3GHz or above; at least 128MB RAM
• Internet Explorer 6 or above , Firefox 3.5 or above, Safari 4 or above, Chrome 2 or above
• Existing 10/100 Ethernet-based network or 802.11n wireless network
DCS-5222L
Installation
Note: If your router supports WPS, please follow the WPS Setup steps below. Your camera contains
an internal antenna and it is not necessary to attach the external antenna unless you would like to
boost your signal or install an outdoor enclosure. You must select which antenna you want to use in
the Setup > Wireless section from the camera's web configuration utility (internal is set by default).
Step 1:
Connect the included Ethernet cable to the network cable connector located on the bottom
panel of the DCS-5222L and attach it to the network.
Step 2:
Attach the external power supply to the DC power input connector located on the bottom
panel of the DCS-5222L and connect it to your wall outlet or power strip. Power is confirmed
when the green LED Power Indicator located on the back panel.
Step 3:
Insert the DCS-5222L Driver CD in the CD-ROM drive. If the CD Autorun function does
not automatically start on your computer, go to Start > Run. In the run box type
D:\autorun.exe (where D: represents the drive letter of your CD-ROM drive) and click OK. When
the autorun screen appears, click Install and follow the on-screen instructions.
Step 4:
Click on the Start button to start the wizard, and follow the
instructions from the Installation Wizard to finish setting up
your camera.
WPS Setup
Alternatively, you may create a WPS connection if your router or access point supports WPS. To
create a WPS connection:
Step 1:
Press and hold the WPS button on the back of the camera for three seconds. The blue WPS
status LED above the button will blink.
Step 2:
Press the WPS button on your wireless router or access point within 60 seconds. On some
routers, you may need to log into the web interface and then click an onscreen button to
activate the WPS feature. If you are not sure where the WPS button is on your router or access
point, please refer to your router's user manual.
The DCS-5222L will automatically create a wireless connection to your router. While connecting,
the green LED will flash and your camera will reboot.
mydlink Portal
After registering your DCS-5222L camera with a mydlink account in the Camera Installation
Wizard, you will be able to remotely access your camera from the www.mydlink.com website.
After signing in to your mydlink account, you will see a screen similar to the following:
Step 1:
Open Internet Explorer and go to http://www.mydlink.com, then sign into mydlink.
Step 2:
Select your camera from the device list, and your camera's Live View will appear.
Technical Support
Having trouble installing your new product? D-Link's website contains the latest
user documentation and software upd ates for D-Link products. U.S. and Canadian
customers can contact D-Link Technical Support through our website or by phone.
United States
Canada
Telephone:
(877) 453-5465
Telephone:
Internet:
http://support.dlink.com
Internet:
http://support.dlink.ca
Copyright ©2012 All rights reserved. D-Link and the D-Link logo are registered trademarks of D-Link Corporation or its subsidiaries.
Other trademarks are the property of their respective owners. Maximum wireless signal rate derived from IEEE Standard 802.11g and
802.11n specifications. Actual data throughput will vary. Network conditions and environmental factors, including volume of network
traffic, building materials and construction, and network overhead, lower actual data throughput rate. Environmental factors will
adversely affect wireless signal range. Product specifications, size and shape are subject to change without notice, and actual product
appearance may differ from that depicted on the packaging. Visit dlink.com (US) or dlink.ca (Canada) for more details.
Version 1.0(NA) | December 22, 2011 6CCS5222LQ01G
(800) 361-5265
Advertisement
Table of Contents

Related Manuals for D-Link DCS-5222L


Summary of Contents for D-Link DCS-5222L
- Page 1 Copyright ©2012 All rights reserved. D-Link and the D-Link logo are registered trademarks of D-Link Corporation or its subsidiaries. • Computer with Microsoft Windows® 7 (32/64bit), XP (32/64bit),Vista® (32/64bit), Mac activate the WPS feature.
- Page 2 Appuyez sur le bouton WPS du routeur ou du point d’accès sans fil dans les 60 secondes. Pour Copyright ©2012 Tous droits réservés. D-Link et le logo D-Link sont des marques déposées de D-Link Corporation ou de ses filiales. Les autres marques commerciales appartiennent à leurs propriétaires respectifs. Débit maximum du signal sans fil provenant des certains routeurs, vous devrez peut-être vous connecter à...
Need help?
Do you have a question about the DCS-5222L and is the answer not in the manual?
Questions and answers