
Related Manuals for MHS Boilers SLIMLINE touch

Summary of Contents for MHS Boilers SLIMLINE touch
- Page 1 OPERATING AND MAINTENANCE MANUAL CIRCULAR KNIFE BREAD CUTTING MACHINE MHS SLIMLINE t ouch SLIMLINE touch (EN)_allgem. Vers.01 (02-2022→) Translation of the original Page 1-47...
-
Page 2: Table Of Contents
Cleaning the circular knife / knife linkage 6.9. Cleaning the bread gripper 6.10. Care Maintenance and repair 7.1. Replacing the blade 7.2. Readjusting the feed belt 7.3. Recommended maintenance intervals Repairs Final decommissioning and disposal SLIMLINE touch (EN)_allgem. Vers.01 (02-2022→) Translation of the original Page 2-47... - Page 3 Designation: CIRCULAR KNIFE BREAD CUTTING MACHINE TYPE: MHS SLIMLINE touch We hereby declare that the CIRCULAR KNIFE BREAD CUTTING MACHINE of TYPE MHS SLIMLINE corresponds with the following authoritative specifications, which were applicable at the date of issue indicated below:...
-
Page 4: General Instructions
Im Deboldsacker 6 D-74232 Abstatt, Germany Telephone: +49 (0) 70 62 97 89 6 - 0 Telefax: +49 (0) 70 62 / 97 89 6 - 29 e-mail: info@mhs-schneidetechnik.de Internet: www.mhs-schneidetechnik.de SLIMLINE touch (EN)_allgem. Vers.01 (02-2022→) Translation of the original Page 4-47... -
Page 5: Proper Use
/ guarantee. Furthermore, waiting periods during the performance of warranty or guarantee services are not included in the warranty and guarantee cover. SLIMLINE touch (EN)_allgem. Vers.01 (02-2022→) Translation of the original Page 5-47... -
Page 6: Residual Risks
Manual where special details are provided relating to the economic use NOTE! of the machine / system and where technical requirements are to be met which the user should pay special attention to. SLIMLINE touch (EN)_allgem. Vers.01 (02-2022→) Translation of the original Page 6-47... -
Page 7: General Safety Regulations
After such work is complete, the function of all safety devices must be checked by this specialist and the unit approved for use. The machine may only be authorised for operation in this case. SLIMLINE touch (EN)_allgem. Vers.01 (02-2022→) Translation of the original Page 7-47... -
Page 8: Information For Trained Operating Personnel
If necessary, have the machine checked by a service technician for risks such as electric shocks, fire hazards and health risks before putting it back into operation. SLIMLINE touch (EN)_allgem. Vers.01 (02-2022→) Translation of the original Page 8-47... -
Page 9: Safety Devices
The machine features a protective screen (1) in the cutting area, which protects the user against unwanted access and is secured against opening during operation. The protective screen and other protective devices are inspected via the proximity switches (7, 8, and 9). SLIMLINE touch (EN)_allgem. Vers.01 (02-2022→) Translation of the original Page 9-47... -
Page 10: Safety Check
, shut down the machine immediately. ATTENTION! (pull out the power plug and secure it against reactivation) Arrange to have the machine checked by MHS Service prior to recommissioning. SLIMLINE touch (EN)_allgem. Vers.01 (02-2022→) Translation of the original Page 10-47... -
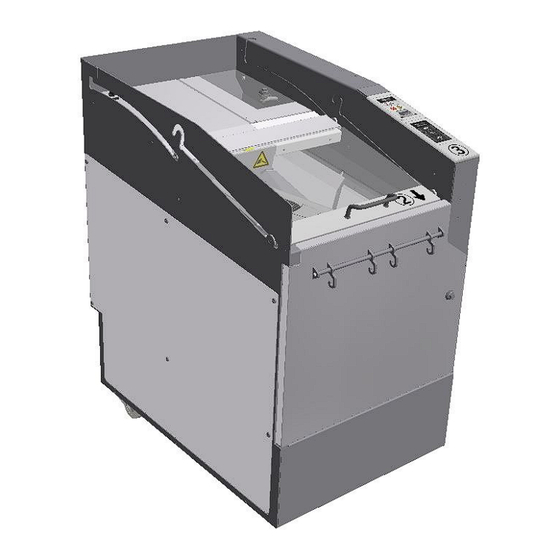
Page 11: Technical Description
TECHNICAL DESCRIPTION 3.1 DIMENSION IMAGE 3.2 TECHNICAL DATA Data MHS SLIMLINE Touch Dimension Installation dimensions: 585 x 860 (898) x 1052 (Width x depth x height) Weight: approx. 200 Product length: 100 - 380 Product width: 50 - 240 Product height: 30 - 140 Max. -
Page 12: Function Description
3.3 FUNCTION DESCRIPTION The SLIMLINE touch bread cutting machine cuts bread into 3.4 or 6 pre-selectable slice thicknesses. It is suitable for installation in areas in which the bread customer (end customer) is able to operate the machine themselves. For this purpose, the machine is equipped with additional safety components. -
Page 13: Environmental Influences
4.3 INFORMATION ON TOOL STORAGE AND PASSWORDS • Passwords or tools for opening the safety guards must not be kept visibly near the machine. SLIMLINE touch (EN)_allgem. Vers.01 (02-2022→) Translation of the original Page 13-47... - Page 14 After such work is complete, the full function of all safety devices must be checked by the specialist before the machine may be approved for production once more. SLIMLINE touch (EN)_allgem. Vers.01 (02-2022→) Translation of the original Page 14-47...
-
Page 15: Operation
In this case, the protective devices need to be checked (see chapters 2.3 + 2.4). After completing the cutting process, the blade must disappear completely outside of the cutting shaft. SLIMLINE touch (EN)_allgem. Vers.01 (02-2022→) Translation of the original Page 15-47... -
Page 16: Positioning Of The Goods To Be Cut
Next, close the protective screen. The lower display alternates between grey and white, as shown in the illustration, when the protective screen is closed correctly. The machine can now be started. SLIMLINE touch (EN)_allgem. Vers.01 (02-2022→) Translation of the original Page 16-47... -
Page 17: Cutting Slices
After the cutting process is complete, open the protective screen and remove the sliced bread. Place the bread on the bread rail and then pull the bag over the bread and the rail. SLIMLINE touch (EN)_allgem. Vers.01 (02-2022→) Translation of the original... -
Page 18: Calling Up The Selection Menu
• Press cutting thickness buttons 1,2,2,4 in order. Version with 6 cutting thickness buttons: • Press cutting thickness buttons 1,2,2,6 in order. The machine is now in the submenu SLIMLINE touch (EN)_allgem. Vers.01 (02-2022→) Translation of the original Page 18-47... - Page 19 The number of slices cut since the last service is displayed for each slice thickness and as the sum of all the thicknesses. 15.15.0 10.347.1 • To return to cutting mode, press the arrow button (1). SLIMLINE touch (EN)_allgem. Vers.01 (02-2022→) Translation of the original Page 19-47...
- Page 20 • After pushing the Error table button (1), the machine jumps to the table. The last 10 errors can be called up here. • Pressing the error memory button (2) displays the stored error in the top display. SLIMLINE touch (EN)_allgem. Vers.01 (02-2022→) Translation of the original Page 20-47...
- Page 21 • To return to submenu, press the arrow button (3). The display jumps back to the submenu. • To return to cutting mode, press the arrow button (3) again. SLIMLINE touch (EN)_allgem. Vers.01 (02-2022→) Translation of the original Page 21-47...
- Page 22 (before starting, clear out the chute and then close the flap). • After pushing the START button (2) the blade moves to the cleaning position, as indicated in the illustration. SLIMLINE touch (EN)_allgem. Vers.01 (02-2022→) Translation of the original Page 22-47...
- Page 23 • To return to the machine's submenu, close the flap and press the arrow button (4). The blade moves back to the home position. The display jumps back to the submenu. • To return to cutting mode, press the arrow button (4) again. SLIMLINE touch (EN)_allgem. Vers.01 (02-2022→) Translation of the original Page 23-47...
- Page 24 (before starting, clear out the chute and then close the flap). • After pushing the START button (2) the grab arm moves to the cleaning position, as indicated in the illustration. SLIMLINE touch (EN)_allgem. Vers.01 (02-2022→) Translation of the original Page 24-47...
- Page 25 • To return to the machine's submenu, close the flap and press the arrow button (3). The gripper moves back to the home position. The display jumps back to the submenu. • To return to cutting mode, press the arrow button (3) again. SLIMLINE touch (EN)_allgem. Vers.01 (02-2022→) Translation of the original Page 25-47...
- Page 26 (Before starting, clear out the chute and then close the flap). • After pushing the START button (2), the machine performs a self-diagnostic. Any errors detected are shown in the top display. SLIMLINE touch (EN)_allgem. Vers.01 (02-2022→) Translation of the original Page 26-47...
- Page 27 This is where you can configure the machine's basic settings. Further information on this is available in the Service Instructions. • To return to the submenu, press the arrow button (2) SLIMLINE touch (EN)_allgem. Vers.01 (02-2022→) Translation of the original Page 27-47...
-
Page 28: Troubleshooting
After the submenu is called up, the flap or door to be closed is shown on the top display. Once the door or flap in question is closed, the machine returns to cutting mode. SLIMLINE touch (EN)_allgem. Vers.01 (02-2022→) Translation of the original... - Page 29 5.7.2 General error message • Call-up of the fault menu as described in chapter 5.6. • Pressing the Error memory button (1) displays the stored errors in the top display. SLIMLINE touch (EN)_allgem. Vers.01 (02-2022→) Translation of the original Page 29-47...
- Page 30 • To return to the submenu, press the arrow button (4). The display jumps back to the submenu. • To return to cutting mode, press the arrow button (4) again. SLIMLINE touch (EN)_allgem. Vers.01 (02-2022→) Translation of the original Page 30-47...
-
Page 31: Troubleshooting Table
Poss. Item/type of part that is defective. • This ensures that any repairs that may be required can be undertaken in the shortest possible time frame by competent personnel. SLIMLINE touch (EN)_allgem. Vers.01 (02-2022→) Translation of the original Page 31-47... -
Page 32: Cleaning And Caring For Devices
After each cleaning process, dry any surfaces that are still damp. Failure to observe these restrictions on cleaning can lead to the NOTE! exclusion of guarantee and warranty claims. Cleaning with a water jet is not permitted! SLIMLINE touch (EN)_allgem. Vers.01 (02-2022→) Translation of the original Page 32-47... -
Page 33: Cleaning The Protective Screen
The protective screen can then be rotated forwards. The protective screen may be cleaned with a moist cloth and a little cleaner or a conventional window cleaner. SLIMLINE touch (EN)_allgem. Vers.01 (02-2022→) Translation of the original Page 33-47... - Page 34 Do not use scouring agents, highly alkaline cleaning products or sharp NOTE! tools for cleaning SLIMLINE touch (EN)_allgem. Vers.01 (02-2022→) Translation of the original Page 34-47...
-
Page 35: Cleaning The Bread Chute
Slide the gripper (2) backward in the shaft by hand. Sweep or vacuum out the front cutting area and then wipe out with a damp cloth. Then dry off the machine with a disposable cloth. SLIMLINE touch (EN)_allgem. Vers.01 (02-2022→) Translation of the original Page 35-47... -
Page 36: Cleaning The Bread Claw
6.5 CLEANING THE BREAD CLAW (daily cleaning work) Call up the grab arm cleaning position as described in chap. 5.6.3. The claws can now be cleaned with a disposable cloth. SLIMLINE touch (EN)_allgem. Vers.01 (02-2022→) Translation of the original Page 36-47... - Page 37 Now remove the crumb tray (3) and sweep out the cutting area before wiping it out with a damp cloth. Then dry off the machine with a disposable cloth. SLIMLINE touch (EN)_allgem. Vers.01 (02-2022→) Translation of the original Page 37-47...
- Page 38 It is recommended to remove the circular knife for cleaning in the event of severe soiling, see chapter 7.1. Edges in the area of the cutting area must be checked for fouling in particular and cleaned as necessary! SLIMLINE touch (EN)_allgem. Vers.01 (02-2022→) Translation of the original Page 38-47...
-
Page 39: Cleaning The Machine Housing
Do not use scouring agents, highly alkaline cleaning products or sharp NOTE! tools for cleaning SLIMLINE touch (EN)_allgem. Vers.01 (02-2022→) Translation of the original Page 39-47... - Page 40 Incorrect fastening of the circular knife will cause the device to be damaged. Vor der Freigabe zum Betrieb ist ein Probebetrieb gemäß Kapitel 5.1 durchzuführen und die Sicherheitsfunktionen sind gemäß Kapitel 2.4 zu prüfen. SLIMLINE touch (EN)_allgem. Vers.01 (02-2022→) Translation of the original Page 40-47...
-
Page 41: Cleaning The Bread Gripper
The cover can now be removed in an upward direction. Clean the bread claw and the gripper. Edges in the area of the bread gripper must be specifically checked for contamination and cleaned if necessary! SLIMLINE touch (EN)_allgem. Vers.01 (02-2022→) Translation of the original Page 41-47... -
Page 42: Care
After completing cleaning, put all covers back on and fasten properly! 6.10 CARE Regular cleaning of the machine helps to prevent faults and malfunctions. Wartungs- uns Instandhaltungsarbeiten sollten wie im folgenden Kapitel beschrieben ausgeführt werden (s. a. Kap. 7). SLIMLINE touch (EN)_allgem. Vers.01 (02-2022→) Translation of the original Page 42-47... -
Page 43: Maintenance And Repair
Reinigungsposition des Messers wie in Kap. 5.6.3 beschrieben aufrufen. Open the protective screen (1) and move to the raised position with the rollers on the front, as shown in the illustration. SLIMLINE touch (EN)_allgem. Vers.01 (02-2022→) Translation of the original Page 43-47... - Page 44 The protective screen can then be rotated forwards. Switch the machine off at the master switch. Next open the cleaning flap with the supplied socket wrench. SLIMLINE touch (EN)_allgem. Vers.01 (02-2022→) Translation of the original Page 44-47...
- Page 45 Before releasing for operation, a trial run must be carried out in accordance with chapter 5.1 and the safety functions must be checked in accordance with chapter 2.4. SLIMLINE touch (EN)_allgem. Vers.01 (02-2022→) Translation of the original Page 45-47...
-
Page 46: Readjusting The Feed Belt
Before releasing for operation, a trial run must be carried out in accordance with chapter 5.1 and the safety functions must be checked in accordance with chapter 2.4. SLIMLINE touch (EN)_allgem. Vers.01 (02-2022→) Translation of the original Page 46-47... -
Page 47: Recommended Maintenance Intervals
• During all work, comply with the legal regulations on waste avoidance and proper recycling and disposal. • Dispose of electrical waste properly • Scrap metal parts • Recycle plastic parts • Dispose of lubricants and other auxiliary materials properly. SLIMLINE touch (EN)_allgem. Vers.01 (02-2022→) Translation of the original Page 47-47...
Need help?
Do you have a question about the SLIMLINE touch and is the answer not in the manual?
Questions and answers