Table of Contents
Advertisement
Quick Links
Advertisement
Table of Contents

Subscribe to Our Youtube Channel
Related Manuals for GRE EVORA PLUS


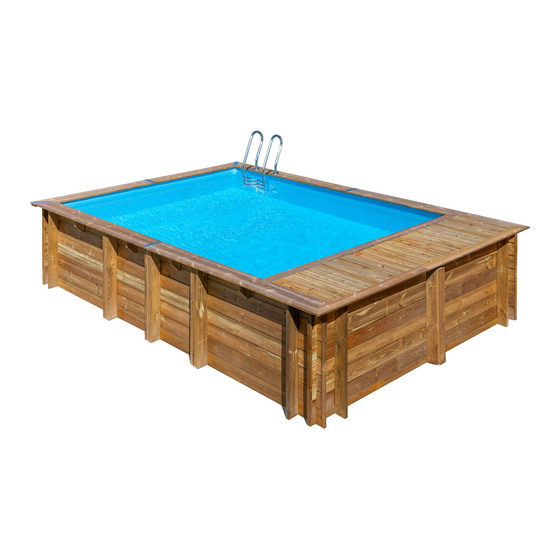
Summary of Contents for GRE EVORA PLUS
-
Page 2: Table Of Contents
SUMMARY ÍNDICE SOMMAIRE ZUSAMMENFASSUNG RIASSUNTO SAMENVATTING RESUMO Important/ Importante/ Important/ Wichtig/ Importante/ Belangrijk/ Importante Components/ Componentes/ Elements/ Bestandteile componenti/ Onderdelen/ Componentes Guarantee/ Garantía/ Garantie/ Garantie/ Garanzia/ Garantie/ Garantia Learn about the wood/ Conozca la madera/ Mieux connîatre le bois/ Das Holz besser ken- nenlernen/ Conosci il legno/ Wat u moet weten over hout/ Conheça a madeira Installation drawing / Plano de instalación / Plan d`implantation / Aufstellplan / Piano di ins- tallazione / Installatieplan / Plano de instalação... - Page 3 Wooden setpladder / Escalera de madera / Echelle bois / Holztreppe / Scala di legno / Houten trap / Escada de madeira Protective wall blanket / Manta protectora de pared / Feutre de paroi / Schutzdecke für die Wand / Copertura di protezione della parte / Beschermdeken muur / Manta protetora de parede Protective ground blanket / Manta protectora de fondo / Feutre de fond / Bodenschutzvlies / Copertura di protezione del fondo / Beschermdeken bodem / Manta protetora de fundo...
- Page 4 IMPORTANT IMPORTANTE IMPORTANT WICHTIG IMPORTANTE BELANGRIJK IMPORTANTE COMPULSORY·OBLIGATORIO·IMPÉRATIF·OBLIGATORISCH ·OBBLIGATORIO ·VERPLICHT ·OBRIGATÓRIO It is mandatory to keep it in order to use the warranty Obligatorio conservarlo para poder hacer uso de la garantía Il est obligatoire de le conserver pour pouvoir valider la garantie Um die Garantie in Anspruch zu nehmen, muss sie aufbewahrt werden Obbligatorio conservarlo per poter usufruire della garanzia U bent verplicht dit te bewaren om later gebruik te kunnen maken van de garantie...
- Page 5 The diagonal dimensions of the pool SHOULD BE verified. This is necessary to avoid problems later. Revise them several times until obtaining the dimen- sions indicated on the drawings. Es IMPRESCINDIBLE verificar las medidas de las diagonales de las piscinas. De esta manera se evitarán problemas posteriormente. Revisar esto varias veces hasta obtener las medidas indicadas en los planos.
- Page 6 Before screwing on the edges of the pool, the wood should be presented for its correct localization. If your pool has a double edge, both the internal one and the external one should be presented and you should start screwing the internal perimeter. Sitting on or walking on the beaches is strictly prohibited.
- Page 7 To install the blocks (pieces of wood that support the edges), pay attention to the pool drawing. It is important that these are screwed in the exact position indicated on the drawing. Do not over-tighten the screws to avoid splintering the wood. It is recommended to sand the areas with splinters to eliminate the risk of cutting.
- Page 8 Once you open the pallet of the wood, the pool must be assembled within a maximum period of two days. In addition, we suggest doing this on days without any rain to avoid that the wood is humidified, complicating the final assembly. Una vez se abre el palet de madera, es importante montar su piscina en un máximo de dos días.
- Page 9 · COMPONENTS · COMPONENTES · ELEMENTS · BESTANDTEILE COMPONENTI · ONDERDELEN · COMPONENTES IPN1 WOOD FLOOR 800009 SCREWS SCREWS TAPESTRY WOOD SCREWS IPN2 SCREWS WALL LINER PROTECTOR LINER STAINLESS STEEL LADER STAINLESS STEEL LADER MONOBLOCK KIT CORNER HOSE PIECE SKIMMER SMALL ANGLE COVER 90º...
- Page 10 Armazenar a palete num local com uma belüfteten Ort auf. ventilação adequada. Manufacturas GRE S.A. l Aritz Bidea nº 57 l Belako Industrialdea l Apartado 69 l 48100 Mungia (Bizkaia) Spain Tel. (34) 946 741 116 l Fax (34) 946 741 708 l gre@gre.es...
- Page 11 En su objetivo constante de mejorar sus productos, Manufacturas Gre se reserva el derecho a modificar en cualquier momento y sin previo aviso las características, los detalles técnicos, los equipamientos estandarizados y las opciones de sus productos.
-
Page 12: Previsions / Previsiones / A Prévoir / Vorausplanung / Precauzioni / Rekening Houden Met / Previsões
ATTENZIONE Leggere attentamente queste informazioni e e conservarle per farvi riferimento in futuro Congratulazioni per la tua scelta. Il modello che hai scelto è stato progettato in modo particolare per una installazione semplice e rapida, ma per un uso corretto della piscina sono necessarie alcune precauzioni. Prima di procedere con l’installazione e il montaggio della tua piscina, informati su quanto previsto dal piano regolatore. - Page 13 GARANTIE Pour toute réclamation/SAV, conservez votre notice avec avec les Nº de série (palette bois + liner) ainsi que votre preuve d’achat (ticket de caisse). Toute demande de garantie devra faire l’objet d’une du liner présent sur le produit et son emballage. Pour toute déclaration en ligne sur le site: www.grepool.com/fr/apres- demande éventuelle de prise en garantie, un échantillon du vente, accompagnée de la preuve d’achat.
-
Page 14: Installation / Instalación / Implantation / Montage / Installazione / Installatie / Instalação
• Que le manuel a été lu avec soin, étape par étape, pour bien comprendre l’installation de votre piscine. IMPORTANT: Manufacturas Gre, S.A. décline toutes responsabilités concernant la dalle en béton. La dalle en béton doit être faite par un professionnel selon les indications techniques fournies dans la notice. - Page 15 AVANT-PROPOS CONSIGNES DE SECURITE Il est impératif de placer votre kit de filtration (filtre + pompe) à au moins 3,5 m. du bassin afin d’éviter tout risque de choc électrique. Il est impératif de prévoir sur l’alimentation électrique de la pompe un dispositif de protection différentiel spécial piscines, conforme aux normes. Ne jamais laisser les enfants sans surveillance à...
- Page 16 S S T T AN AND D ARD ATTENTION: Tout appareil électrique alimenté en 220 V doit être situé au SWIMMINGPOOLS moins à 3,50 m du bord du bassin. 2015 2015 L’appareil doit être branché sur une prise de courant avec prise de terre, protégé...
-
Page 17: Learn About The Wood/ Conozca La Madera/ Mieux Connîatre Le Bois/ Das Holz Besser Ken- Nenlernen/ Conosci Il Legno/ Wat U Moet Weten Over Hout/ Conheça A Madeira
LEARN ABOUT THE WOOD WOOD: A LIVING MATERIAL Wood is a natural product, the fissures visible on the edges of the CONOZCA LA MADERA wood are completely normal and do not modify the resistance characteristics of the same. MIEUX CONNÎATRE LE BOIS Wood is always a malleable material (from 3% to 4% of dimensional variations) with humidity and temperature oscillations. - Page 18 Cracks/Grietas/Fente/Risse/ Resin/Resina/Résine/Harz/ Nerves and long knots Retention of sterilization products Differences in shades of colour Crepe/ Barsten/Fendas Resina/ Hars/Resinas Nervios y nudos alargados Retención de productos de esterilización Diferencias de tonalidad Nervures et noeuds longs Rétention de produits détuve Différences de teinte Geäder und lange knoten Rückstände von Sterilisationsprodukten Unterschiede im Farbton...
-
Page 19: Installation Drawing / Plano De Instalación / Plan D`implantation / Aufstellplan / Piano Di Ins- Tallazione / Installatieplan / Plano De Instalação
INSTALLATION DRAWING Dimensions in mm PLANO DE INSTALACIÓN Cotas en mm Cotations en mm PLAN D´IMPLANTATION Höhenangaben in mm Livello in mm Afmetingen in mm AUFSTELLPLAN Cotas em mm PIANO DI INSTALLAZIONE TIPS VOOR DE VEILIGHEID PLANO DE INSTALAÇÃO REF/RÉF DENOMINATION/DENOMINACIÓN CTD/QTÉ/ /HINWEIS/RIF... -
Page 20: Preparing The Land / Preparación Del Terreno / Terrassement / Geländevorbereitung / Preparazione Del Terreno / Voorbereiding Van Het Terrein / Preparação Do Terreno
Dimensions in mm Cotas en mm Cotations en mm Höhenangaben in mm Livello in mm Afmetingen in mm Cotas em mm 2000 4000 Wooden blocks Tacos de madera Consoles Konsolen Tasselli Console Blocos de madeira 3728 3820 6120 4945 Reinforcements Refuerzos 4853 Renforts... - Page 21 PREVISIONS PREVISIONES A PRÉVOIR 3,50 m min. VORAUSPLANUNG FILTER GROUP GRUPO DE FILTRACIÓN GROUPE DE FILTRATION FILTERANLAGE The filter group and especially El grupo defiltración y en Le groupe de filtration et Das Filteranlage und besonders the electric pump should especial la bomba eléctrica notamment la pompe électrique die elektrische Pumpe des...
- Page 22 INSTALLATION INSTALACIÓN Above ground Semi in-ground In-ground IMPLANTACIÓN Sobre el suelo Semienterrada Enterrada Hors-sol Semi-enterrée Enterrée An der oberfläche zur Hälfte eingelassen Ganz eingelassen Fuori terra Seminterrata Interrata Op de grond Half-verzonken Verzonken Em superficie Semienterrada Enterrada First level Nivel de filtración Niveau de la filtration Filtrationshöhe Livello di filtrazione...
- Page 23 Take the reference number of your pool into account when you do the assembly Tenga en cuenta la referencia de su piscina a la hora de realizar el montaje Considérez la référence et les mesures de votre piscine avant de procéder au montage Bitte beachten Sie die Referenz und die Masse Ihres Schwimmbads, wenn Sie die Montage ausführen Tener presente il codice di riferimento della piscina al momento del montaggio Op het moment van monteren dient u rekening et houden met de referentie en de afmetingen van uw...
- Page 24 GROUND LAYOUT - TRAZADO EN EL TERRENO - TRACÉ AU SOL ABSTECKEN AUF DEM BODEN 6590mm · Surrounding area 40cm · Zona periférica · Zone périphérique · Randbereich 3818mm · Concrete slab 5790mm 90º · Losa de hormigón · Dalle béton ·...
- Page 25 TRACCIATURA NEL SUOLO - GRONDLIJNEN UITZETTEN - TRAÇADO NO SOLO 6590mm · Zona periferica · Zone buitenrand 40cm · Zona periférica · Basamento in calcestruzzo 3818mm · Betonvloer · Laje de betão 5790mm 90º BASAMENTO IN CALCESTRUZZO: È FONDAMENTALE CENTRARE LA PISCINA SUL PAVIMENTO DI CEMENTO, COME INDICATO NELL’IMMAGINE.
- Page 26 TERRASSEMENT Les recommandations sur la mise en oeuvre pour les bassins enterrés ou semi-enterrés sont effectives dans le cadre d’une installation en terrain non humide. Il convient à chacun d’adapter les instructions de base pour éviter des contraintes liées au type de terre (argile par exemple) ou à la présence excessive d’eau dans le sol (source, ruissellement d’eau,…).
-
Page 27: Metal Frames/ Bastidores Metálicos/ Berceaux Métalliques/ Metallgestell/ Telai Metallici
METAL FRAMES ASSEMBLY BASTIDORES METÁLICOS The metal frame must be assembled for any type of installation. First both parts should be joined with the metal pieces to form an «L» shape, as indicated in figure 1a. BERCEAUX MÉTALLIQUES * Some pool models have the «L» shaped part already installed, so this step is not necessary. Assemble the frame according to figure 1b. - Page 28 POSITIONING Place the frames in the bottom of the excavation as per the indications in the attached drawing. Make sure the vertical parts are properly plumb. Place the metal wire mesh to fit the surface that the concrete slab will take up. Installation of the frame and the slab is mandatory. The measurements of the concrete sheet must go past the inner faces of the pool by at least 50 cm.
-
Page 29: Betonvloer/ Laje De Betão
CONCRETE SLAB LOSA DE HORMIGÓN DALLE BÉTON BETONPLATTE BASAMENTO DI CALCESTRUZZO BETONVLOER LAJE DE BETÃO The installation of your swimming pool involves constructing a concrete slab reinforced with welded wire mesh. The concrete must be of 350 kg/m3 (standard C125 430). The concrete slab must be perfectly flattened or smoothed as any minimum error will be visible. Minimum thickness: 17 cm. We recommend that you contact a professional to construct the slab. - Page 30 A´ Layer of stabilized gravel Waterproofing film representative cross-section Tereno estabilizado Película de estanqueidad sección transversal representativa Hérison de pierres stabilisées Film d’étanchéité coupe de principe Schicht aus stabilisierten Steinen Dichtungsfilm Repräsentativer Querschnitt Strato di pietra livellata Pellicola a tenuta stagna sezione trasversale rappresentativa Gestabiliseerde laag steenslag Afdichtingsfolie...
- Page 31 The wire mesh improves the strength of the concrete and prevents it from breaking due to the rigidity of the concrete. We recommend bending the ends of the structure to increase the adherence of the wire mesh. The reinforcement may not be placed less than 30 mm from the outer edge of the completed works under no circumstances.
-
Page 32: Boards / Tablas / Madriers / Holzbretter / Tavole / Planken / Tábuas
BOARDS Identification of the boards / Identificación de las tablas TABLAS Repérage des madriers / Identifizierung der Holzbretter Identificazione della tavole / Identificatie van de planken MADRIERS Identificação das tábuas ERDARBEITEN TAVOLE PLANKEN TÁBUAS IDENTIFICATION/IDEN- TIFICACIÓN/REPÉRE/ KENNZEICHNUNG/ DENOMINATION/DENOMINACIÓN/DÉSIGNATION/BEZEICHNUNG/ DENOMINAZIONE/BENA- CTD/QTÉ/ANZ/ IDENTIFICAZIONE/ MING/DENOMINAÇÃO/ AANT/TD... -
Page 33: Assembly Of The Structure / Montaje De La Estructura / Assemblage De La Structure / Zusam- Menbau Des Tragwerks / Montaggio Della Struttura / Montage Van De Constructie / Monta
•ABOVE GROUND INSTALLATION•COLOCACIÓN EN EL SUELO ASSEMBLY OF THE STRUCTURE •ENCOMBREMENT AU SOL•POSITIONIERUNG AUF DEM BODEN MONTAJE DE LA ESTRUCTURA •POSIZIONAMENTO NEL TERRENO•CONSTRUCTIE OP GRON •COLOÇÃO NO SOLO ASSEMBLAGE DE LA STRUCTURE ZUSAMMENBAU DES TRAGWERKS MONTAGGIO DELLA STRUTTURA MONTAGE VAN DE CONSTRUCTIE MONTAGEM DA ESTRUTURA •... - Page 34 After having installed the first layer, you should check the inside dimensions of the pool. For a perfect assembly, the diagonals should be equal, and in conformity with the assembly drawing at the end of this manual. Take special care when installing this first layer of boards. The precision of this assembly decides the final quality of your pool.
- Page 35 IMPORTANT: It is very important that the boards are correctly installed, above all the bottom ones, (where the water pressure is greater). There is a possibility of some boards coming loose. This is completely normal because wood is a living material. Even loose, the board may be installed. Follow these steps: •...
- Page 36 4th AND FOLLOWING LAYERS OF BOARDS: Place the boards and the following layers repeating the alternations of the second and of the third layer. Except for the wall where the door is located, with strips that repeat (A23). These are not complete like the A24 because we must leave a space to later install the door.
- Page 37 Now we can start to assemble the chest. Locate two boards (46x145x1325mm) and position them as shown in the diagram, at 80 cm. Check to see if it is vertical because the interior wall of your pool is supported on these two boards next to the vertical structures. Use one screw 6x90 in each board to correctly fix it.
- Page 38 These must be fixed the same way as the previous boards 5 and 6. The return valve will be fixed in the first later and the skimmer in the second. Take into account which is the lower and outside part. Debe fijar de la misma manera que antes las tablas 5 y 6.
- Page 39 This step is to hide the metallic structure. One screw 6x90 must be used for each board and screwed from the inside of the pool. It is very important that the piece is aligned at the upper part. (Read the indications of page 75 about the reinforcements).
- Page 40 Locate those three boards. A (46x145x1130 mm) and B(46x145x800mm). These will serve to support the filtering chest flaps. It is important to align them with the upper part of the wall. Use 5 screws 6x90 and screw the pieces well from the interior of the pool.
- Page 41 Use a level to help you and that all is perpendicular to both walls. (Repeat the process at the bottom) Utilice un nivel para ayudarse y que todo quede perpendicular a ambas paredes. (Repita el proceso en la parte inferior) Utilisez un niveau pour vous aider et vérifiez que tout est perpendiculaire aux deux parois.
-
Page 42: Wooden Blocks, Reinforcements And Trimmings / Tacos, Refuerzos Y Embellecedores / Con
WOODEN BLOCKS, REINFORCEMENTS AND TRIMMINGS TACOS, REFUERZOS Y EMBELLECEDORES CONSOLES, RENFORTS ET CACHES KONSOLEN, VERSTÄRKUNGEN UND ZIERLEISTEN TASSELLI, RINFORTZI E COPERTURE CONSOLE, VERSTEVIGINGEN EN SIERLIJSTEN BLOCOS DE MADEIRA, REFORÇOS E EMBELEZADORES CAREFULLY READ THE COMPLETE SECTION BEFORE SCREWING ANY PART TO YOUR POOL Assemble the wooden stepladder and use it as a template to define the separation of the wooden blocks that support it. - Page 43 La posizione dei tasselli e dei rinforzi è indicata nel disegno (Vedere a pagina 44). Per posizionare i tasselli si può utilizzare una scala di legno, vedi il capitolo sulla scala. TASSELLI ( 6x90) A• Allineare la parte superiore dei tasselli al livello dell’ultima tavola. Mantenere i tasselli al loro posto B•...
- Page 44 Check the verticality of the reinforcements Install the reinforcements with 1 screw board Compruebe la verticalidad de los refuerzos Instale el refuerzo mediante 1 tornillo por tabla Contrôlez l’aplomb des renforts Assemblez le renfort en mettant 1 vis par madrier Prüfen Sie die vertikale Ausrichtung der Verstärkungen Bringen Sie die Verstärkung mittels einer Schraube pro Brett an Accertarsi della verticalità...
- Page 45 Screw 6x90 (1 screw per slab) Tornillo 6x90 (1 tornillo por tablón) Vis 6x90 (1 vis par madrier) Schraube 6x90 (! Schraube pro Planke) Vite 6x90 (1 vite per tavola) Schroef 6x90 (1 schroef per paneel) Parafuso 6x90 (1 parafuso por prancha) Screw 5x70 (4 screws distributed along the top of each reinforcement) Tornillo 5x70 (4 tornillos repartidos en la altura de cada refuerzo) Vis 5x70 (4 vis réparties sur le hauteur de chaque renfort)
-
Page 46: Houten Trap / Escada De Madeira
WOODEN STEPLADDER ESCALERA DE MADERA ECHELLE BOIS HOLZTREPPE SCALA DI LEGNO HOUTEN TRAP ESCADA DE MADEIRA Check the drawings (See page 44). The wooden stepladder is included for access to the pool. Do not use for anything else. Assemble the wooden stepladder and use it as a template to define the separation of the wooden blocks that support it. In the case that the pool ahs an elongated shape, the stepladder will be positioned on a small side. - Page 47 Consultare i disegni (Vedere a pagina 44). La scala di legno per accedere alla piscina è inclusa. Non utilizzarla per scopi diversi. Montare la scala di legno e utilizzarla come metro per determinare la separazione dei tasselli che la sostengono. Nel caso in cui la vasca abbia forma rettangolare, la scala si posiziona su uno dei lati corti.
- Page 48 In the case that the pool is partially in-ground the stepladder should be cut to adapt it to the pool. For safety reasons, if the space between the floor and the first step is between 80 and 230 mm (dimension A) close this space using the step of the ladder you have removed so that dimension B is less than 89 mm.
- Page 49 For safety reasons, you should respect these dimensions whatever the configuration of the pool assembly. Por motivos de seguridad, es obligatorio respetar estas cotas cualquiera sea la configuración de montaje del vaso. Pour des raisons de sécurité, cotes à respecter impérativement, quelle que soit la configuration de mon- tage de votre bassin.
-
Page 50: Protective Wall Blanket / Manta Protectora De Pared / Feutre De Paroi / Schutzdecke Für Die Wand / Copertura Di Protezione Della Parte / Beschermdeken Muur / Manta Protetora De
PROTECTIVE WALL BLANKET MANTA PROTECTORA DE PARED FEUTRE DE PAROI SCHUTZDECKE AN DER WAND COPERTURA DI PROTEZIONE DELLA PARTE BESCHERMDEKEN MUUR MANTA PROTETORA DE PAREDE Fig. 12 / Abb. 12 / Afb. 12 Fig. 13 / Abb. 13 / Afb. 13 Fig. - Page 51 Fig. 12 / Abb. 12 / Afb. 12 Fig. 13 / Abb. 13 / Afb. 13 Fig. 14 / Abb. 14 / Afb. 14 Zwei Möglichkeiten zum Anbringen der Wandschutzdecke. DOPPELSEITIGES KLEBEBAND (NICHT IM LIEFERUMFANG ENTHALTEN) • Kleben Sie das doppelseitige Klebeband, Paneel nach Paneel, auf, indem Sie es am oberen Teil der oberen Bretter ausrichten (Abb. 10). Wenn das Holz ein wenig feucht oder staubig ist, können Sie es mit Sandpapier glätten, um das Anhaften zu erleichtern.
-
Page 52: Protective Ground Blanket / Manta Protectora De Fondo / Feutre De Fond / Bodenschutzvlies / Copertura Di Protezione Del Fondo / Beschermdeken Bodem / Manta Protetora De Fundo
PROTECTIVE GROUND BLANKET MANTA PROTECTORA DE FONDO FEUTRE DE FOND SCHUTZDECKE IM UNTERGRUND COPERTURA DI PROTEZIONE DEL FONDO BESCHERMDEKEN BODEM MANTA PROTETORA DE FUNDO Start by laying the protective blanket, which should be cut from the roll included, on the floor. •... - Page 53 FIXING OF THE SKIMMER JOINT FIJACIÓN DE LA JUNTA DEL SKIMMER FIXATION DU JOINT DE SKIMMER BEFESTIGUNG DER DICHTUNGDES SKIMMER FISSAGGIO DEL GIUNTO DELLO SKIMMER VASTZETTEN VAN DE SKIMMERVERBINDING FIXAÇÃO DA JUNTA DO SKIMMER Fixing of the skimmer joint Fijación de la primera junta del skimmer Fixation du 1er joint de skimmer Befestigung der ersten Dichtung des Skimmers Fissaggio del primo giunto dello skimmer...
- Page 54 LOCATION OF THE REFILLING FITTING WITH KEY SITUACIÓN DE LA BOQUILLA DE SALIDA Wooden structure • Estructura de madera • Structure bois • Tragewerk aus Holz • Struttura in legno • Houten constructie • Estrutura de madeira EMPLACEMENT BUSE DE REFOULEMENT EINBAUSTELLE DES DRUCKVENTILS Blanket •...
-
Page 55: Positionnement Des Baguettes D´accroche De Liner/ Positionierung Der Einhängeprofile Der
INSTALLATION OF THE LINER HOOKING PROFILE COLOCACIÓN DE LOS PERFILES DE ENGANCHE DEL LINER POSITIONNEMENT DES BAGUETTES D’ACCROCHE DE LINER POSITIONIERUNG DER EINHAKPROFILE DES LINERS POSIZIONAMENTO DEI PROFILI DI AGGANCIO DEL LINER PLAATSING VAN DE KLEMPROFIELEN VOOR INHANGEN VAN DE LINER COLOÇÃO DOS PERFIS DE ENGATE DO LINER ·... - Page 56 · The piece should be fixed at both ends. · La pieza debe quedar fijada por ambos extremos. · La pièce doit être correctement fixée par les deux extrémités. · Das Teil muss später von beiden Seiten fixiert sein. ·...
- Page 57 POSITIONIERUNG DER EINHAKPROFILE DES LINERS 4X40): Halten Sie die Leiste des Liners. Durchbohren Sie die Leiste mithilfe eines kleinen Bohrers mit Ø 4 mm, indem Sie 50 mm vom Rand entfernt beginnen. Schrauben Sie die Leiste auf der Höhe der Kante des oberen Bretts mittels der Schrauben (4 x 40) fest.
- Page 58 PREVIOUS CHECK BEFORE INSTALLING THE LINER CONTROL PREVIO A LA COLOCACIÓN DEL LINER CONTRÔLES AVANT LA POSE DU LINER KONTROLLE VOR DER POSITIONIERUNG DES LINERS CONTROLLO PRECEDENTE AL POSIZIONAMENTO DEL LINER CONTROLEER VOORAFGAAND AAN DE PLAATSING VAN DE LINER CONTROLO PRÉVIO À COLOCAÇÃO DO LINER Check the serial number in the label of the box.
-
Page 59: Installation Of The Liner / Colocación Del Liner / Mise En Place Du Liner / Positionierung Des Liners / Posizionamiento Del Liner / Plaatsing Van De Liner / Colocação Do Liner
INSTALLATION OF THE LINER COLOCACIÓN DEL LINER MISE EN PLACE DU LINER POSITIONIERUNG DES LINERS POSIZIONAMENTO DEL LINER PLAATSING VAN DE LINER COLOCAÇÃO DO LINER The liner should have been at least 24 hours at a room temperature of at least 20 ºC before being installed. The dimension of the liner are a few centimetres shorter than the inside dimensions of the pool, so the liner is tensely installed. - Page 60 Vor der Positionierung muss der Liner mindestens 24 Stunden bei einer Umgebungstemperatur von mindestens 20 °C verbracht haben. Die Maße des Liners sind einige Zentimeter kürzer als die Innenmaße des Beckens, um sicherzustellen, dass der Liner gespannt angebracht wird. Die Positionierung des Liners muss bei einer Außentemperatur von mindestens 15 °C erfolgen.
- Page 61 To move the already installed liner, slide it along the profile. If this is difficult the liner can be removed by lifting it not to damage it. Make sure that the liner is well positioned both on the floor as on the walls, uniformly adjust the tension of the same (with your foot, push the liner by its angles towards the corners of the walls) (figure 19).
- Page 62 Um den bereits positionierten Liner zu bewegen, lassen Sie ihn an der Leiste entlanggleiten. Sollte sich dies als sehr schwierig erweisen, so können Sie den Liner entfernen, indem Sie ihn anheben, um die Verknüpfung nicht zu beschädigen. Stellen Sie sicher, dass der Liner sowohl am Boden als auch an den Wänden gut positioniert ist, richten Sie die Spannung des Liners gleichmäßig ein (drücken Sie den Liner an den Ecken mit der Fußspitze Richtung Ecken der Wände) (Abb.
-
Page 63: Aterro
LAND-FILLING TERRAPLENADO REMBLAIEMENT ERDAUFSCHÜTTUNG In fully or partially in-ground pools, a gravel landfill is necessary to favour perfect draining. The landfill of a pool can seem a mere formality, because a first sight there are no special technical difficulties. Nevertheless, TERRAPIENO it is a more delicate operation than what it seems, for which certain precautions are necessary. - Page 64 • Gegebenenfalls das Rohr der peripheren Drainage zu schützen, indem Sie es mit Geotextil überziehen. Es ist wichtig, die Befüllung des Pools parallel zur Anschüttung durchzuführen, damit der Druck ausglichen wird und Verformungen im Tragwerk während des Betriebes vermieden werden. Es wird empfohlen, die Anschüttung in Dritteln (1/3 Wasser und 1/3 Anschüttung) vorzunehmen.
- Page 65 Draining gravel ø 10-30 • Grava drenante ø 10-30 Graviers drainants ø 10-30 • Kies zur Entwässerung ø 10-30 Ghiaia drenante ø 10-30 • Drainagesteenslag ø 10-30 • Grava drenante ø 10-30 Natural ground • Terreno natual Peripheral drainage • Drenaje periférico Terrain naturel •...
- Page 66 POSITIONNEMENT DES PIÈCES À SCELLER BUSE DE REFOULEMENT Commencez à remplir la piscine d’eau, en arrêtant le remplissage à 4 cm environ du bord inférieur de l’orifice de la valve. Marquez l’orifice à l’aide d’un crayon-feutre (A) et faire une coupure en croix au centre de l’orifice (B) à l’aide d’un cutter (LAME) sans dépasser le trou de l’étampe.
- Page 67 • Avant de procéder, assurez-vous que le volet du skimmer est bien positionné. • Tracez avec un feutre la position des vis de fixation sur le liner. • Placez le 2ème joint plat carré (5.1) puis la bride (6) contre le liner en alignant les trous avec les tracés d’emplacement des vis. •...
- Page 68 FILTER FILTRACIÓN FILTRATION FILTRATION FILTRAZIONE FILTERING FILTRAÇÃO ASSEMBLY SUGGESTIONS: • The filter should be located at least 3.50 m from the pool. The following diagrams explain the movement direction of the water. Check the manual that comes with the filter group for the assembly instructions.
- Page 69 All the threaded connections should be assembled with the watertight Teflon tape included , except the connection with O rings. The Teflon should be wound round the thread in a counter clockwise direction. LAND-FILLING: Finish filling the pool The water level should be situated between the upper third part and the second half of the skimmer mouth. Todas las conexiones roscadas deben montarse con la cinta estanca de Teflón incluida , excepto las conexiones con junta tórica.
- Page 70 SAND FILTER FILTRO DE ARENA FILTRE À SABLE This is the oldest of filtering systems. The filtered water passes through the sand (calibrated silicon) that retains all impurities. This type of filter is equipped with a multi-directional flap that allows SANDFILTER easy manipulations and cleaning.
- Page 71 2. WASHING POSITION (OR BACKWASH): Sand washing position. Allow the water to circulate in reverse direction in the filter. The water enters through the lower part of the filter elevates the filtering mass and therefore collects all its impurities and because they are lighter than sand, they area evacuated through the upper part of the filter towards the drain.
- Page 72 4. EMPTYING POSITION / DRAIN (OR WASTE): Position to evacuate the water of for emptying the pool. In this case, the water does not pass through the filter, it goes directly to the drain. 4. POSICIÓN VACIADO / DESAGÜE (O WASTE): Posición para evacuar el agua o para vaciar el vaso. En este caso, el agua no pasa por el filtro, sale directamente por el desagüe.
- Page 73 6. RECIRCULATION POSITION / CIRCULATION**: Position used so the water circulates through the hydraulic network without passing through the filter. This possibility is used to move the water if you want to add a product to the pool or if you should perform any operation in the filter, because in this case the filter is isolated and the water coming from the pump is directly expelled.
- Page 74 EDGES •Outside edge •Inside edge •Playa exterior •Playa interior •Margelle extérieur •Margelle intérieur PLAYAS •Äußerer Handläufe •Innerer Handläufe •Bordo esterno •Bordo interno •Buitenrand •Binnenrand MARGELLES •Bordo exterior •Bordo interior RÄNDER •Breakwater •Block of wood •Rompeolas •Taco de madera BORDI •Brise vague •Console •Wellenbrecher •Konsole...
- Page 75 RANDEN (Het is absoluut noodzakelijk om het zwembad éérst met water te vullen voordat u de randen plaatst. Het is verboden om op de zwem- badranden te zitten of te lopen. Een eventuele breuk wordt niet gedekt door de garantie.) De rand is samengesteld uit 2 tableaus, een voor binnen en de ander voor buiten.
- Page 76 This figure tries the present the copping that will form your pool. Do not screw them yet. En esta figura se trata de presentar las playas que formarán su piscina. No las atornille de momento. Cette figure indique comment présenter les margelles qui formeront votre piscine.
- Page 77 In this step, the 6 flaps must be positioned along the entire existing space. As we all know, wood is alive therefore, sometimes, depending on the humidity of the wood and the environmental temperature, you may need to add an additional board (*). There may be too much space between the 6 flaps. Therefore, we have included in the pool kit another board so that if needed you can use it between any of the flaps.
- Page 78 4x60 Fig. 22 / Abb. 22 / Afb. 22 Now we can screw the wood as indicated in the figure 22. After fixing all the copping, all the flaps must be screwed except number 5, because this will not allow access to the filtering system. Ya puede atornillar las maderas según se indica en la figura 22.
- Page 79 Locate 3 small hinges and fix them to join the flaps. The handle must also be screwed to fit flap number 5, when necessary. Localice 3 bisagras pequeñas y fíjelas para unir las trampillas 4 y 5. También debe atornillar el tirador para poder levantar la trampilla número 5 cuando sea necesario.
- Page 80 6x30 Fig. 23 / Abb. 23 / Afb. 23 Finally, you can install the trims at the points indicated by the figure. Remember there are three different types. Identify each piece before using screws 6x30 to definitely fix them. Finalmente puede instalar los embellecedores en los puntos indicados en la figura. Recuerde que hay 3 tipos diferentes. Identifique bien cada pieza antes de usar los tornillos 6x30 para fijarlos de manera definitiva.
- Page 81 4x40 PIECE UNDER THE EDGES ( 4X40) • Position the pieces of wood under the edges at the angles and fix them with 4 screws (4x40). PLACA BAJO LAS PLAYAS ( 4X40) • Coloque las placas de madera bajo las playas en los ángulos y fíjelas mediante los 4 tornillos (4x40). PLAQUE SOUS MARGELLES ( 4X40) •...
- Page 82 FIXING OF THE STAINLESS STEEL LADDER FIJACIÓN DE LA ESCALERA INOXIDABLE FIXATION DE L’ECHELLE INOX BEFESTIGUNG TREPPE AUS ROSTFREIEM MATERIAL FISSAGGIO DELLA SCALA DI ACCIAIO INOSSIDABILE BEVESTIGING VAN DE RVS LADDER FIXAÇÃO DA ESCADA INOXIDÁVEL Fig. 24/Abb. 24/Afb. 24 Fig. 25/Abb. 25/Afb. 25 A.- Slot in the upper (1) and lower (10) handrails, fasten them with the steps (9) and the steps to the handrails using screws (11), nuts (8) and washers (7).
- Page 83 Fig. 24/Abb. 24/Afb. 24 Fig. 25/Abb. 25/Afb. 25 A.- Assembler les rampes supérieure (1) et inférieure (10) en les introduisant l’une dans l’autre et les fixer aux marches (9) et celles-ci à l’aide des vis (11), des écrous (8) et des rondelles (7) correspondantes. (Fig.24) B.- Monter les butées (12) de la rampe, pour éviter que l’escalier puisse abîmer la piscine.
- Page 84 IDENTIFICATION/IDEN- TIFICACIÓN/REPÉRE/ DENOMINATION/DENOMINACIÓN/DÉSIGNATION/BEZEICHNUNG/ CTD/QTÉ/ANZ/ KENNZEICHNUNG/IDEN- DENOMINAZIONE/BENAMING/DENOMINAÇÃO/ AANT/TD TIFICAZIONE/IDENTIFICA- TIE/IDENTIFICAÇÃO •Upper handrail •Pasamanos superior •Rampe supérieure •Obere Geländer •Corrimano superiore •Bovenstuk •Corrimão superior •Trim •Tapeta embellecedora •Chapeau enjoliveur •Zierdeckel •Abbelimento •Sierring •Tampa decorativa •Screw Ø 8x50 mm •Tornillo Ø 8x50 mm •Vis Ø...
- Page 85 MISE EN SERVICE Lors de la première utilisation, il est impératif d’effectuer un lavage du filtre (voir entretien du système de filtration). La filtration est un traitement mécanique qui permet de nettoyer l’eau de la piscine en éliminant ses impuretés et particules polluantes. L’ensemble du circuit hydraulique et du groupe d’épuration d’eau est une donnée essentielle au bon fonctionnement du système de filtration.
- Page 86 CONSEILS DE SÉCURITÉ Avant d’installer et d’utiliser, la piscine, veuillez lire attentivement, assimiler et respecter toutes les informations contenues dans cette notice d’utilisation. Ces avertissements, instructions et consignes de sécurité portent sur certains des risques usuels associés aux loisirs aquatiques, mais ils ne peuvent pas couvrir la totalité...
- Page 87 ENTRETIEN COURANT RECOMMANDATION POUR L’ENVIRONNEMENT : «NE DÉMONTEZ PAS LA PISCINE SI CELA N’EST PAS ABSOLUMENT NÉCESSAIRE. EN CAS DE DÉMONTAGE, NOUS VOUS PRIONS DE RÉUTILISER L’EAU. IL N’Y A PAS D’EAU EN TROP». ENTRETIEN ET UTILISATION: - Durant la saison d’utilisation du kit piscine, le système de filtration doit obligatoirement être mis en service chaque jour, suffisamment longtemps pour assurer au moins un renouvellement complet du volume d’eau.
- Page 88 et emplacement. Toujours agiter l’eau et attendre la dissolution d’un produit chimique avant d’en rajouter un autre. Attendre environ 12 h. entre chaque ajustement de pH, de Chlore, ou d’anti-algues en faisant fonctionner le système de filtration. TRAITEMENTS MECANIQUES : Vérifier que l’épurateur, skimmer, buses et tuyaux soient correctement connectés à...
Need help?
Do you have a question about the EVORA PLUS and is the answer not in the manual?
Questions and answers