Bionaire BOH2503D - Oil Filled Radiator Manual
- Instruction manual (2 pages) ,
- Manual (29 pages) ,
- Instruction manual (29 pages)
Advertisement
- 1 DESCRIPTIONS
- 2 Technical Specifications
- 3 ASSEMBLY INSTRUCTIONS
- 4 OPERATING INSTRUCTIONS
- 5 SETTING THE THERMOSTAT
- 6 FROST GUARD INSTRUCTION
- 7 USING THE TIMER
- 8 ENERGY SAVING MODE
- 9 DISPLAY PREFERENCES
- 10 TIP OVER PROTECTION
- 11 TRANSPORTING THE UNIT
- 12 STORAGE TIPS
- 13 FITTING A REPLACEMENT PLUG FOR U.K. AND IRELAND ONLY.
- 14 INSTALLATION OF A PLUG – Applicable to U.K. and Ireland.
- 15 Documents / Resources
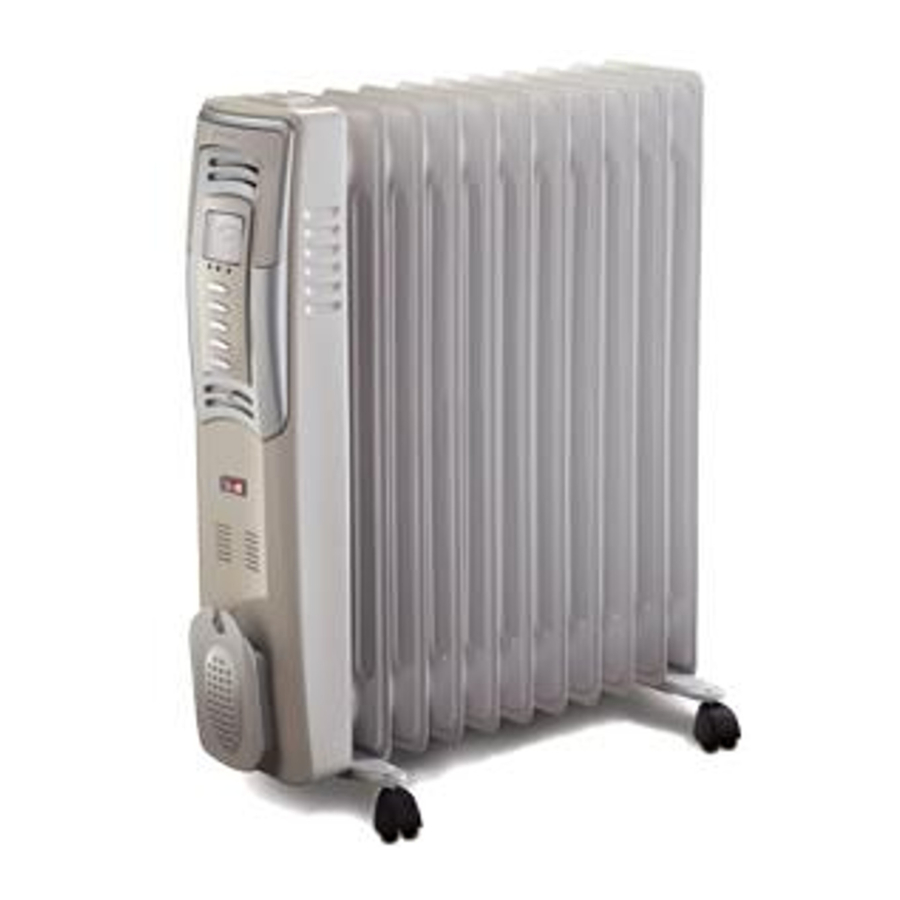
DESCRIPTIONS
(See Fig. 1, 2 & 3)
- Heated fins
- Vents
- Pull down handle
- Power switch
- Cord Storage
- Power cord
- Front castor assembly
- Digital display
- Power light
- Mode light
- Timer light
- Mode button
- Thermostat/timer button
- Adjuster buttons
- °F - °C button
- Front wing nut
- Castor
- Rear castor assembly
- Rear wing nut
- U-bolt
Technical Specifications
BOH2503D: Wattage: 2500W
ASSEMBLY INSTRUCTIONS
(See Fig. 3)
Please make sure the heater has not been plugged into any electricity outlet. Carefully remove heater from box. Some accessories are packed internally. Please make sure you have all of the following accessories prior to throwing away packaging. 2 Castor assemblies with four castors (R, G, & Q), and 2 U Bolts with wing nuts (T, P, S).
 Note: This unit is for FLOOR USE ONLY.
- Turn the heater upside down and you will see 2 U-bolts (T) with wing nuts over the first and last joint of the heater.
- Unscrew the wing nuts (S & P) from the U-bolts (T).
- Start with the front of the unit and place one hole of the front castor assembly (G) to the L shape of the U-bolt (T) and the other hole of the castor assembly into the other end of the U-bolt, then screw on the wing nut (P).
- Repeat step 3 for the rear castor assembly, using wing nut (N) instead of wing nut (K) and rear castor assemblies (M).
- Use your hand to press the four casters (L) onto the four axis of the two foot plates until you hear them click into place. Use your hand to turn the castors and if the move smoothly they have been installed properly.
- After installation of the front and rear castor assemblies and the castors turn the heater the right way up: the heater is now ready for use.
NOTE: Make sure when assembling that the castor assemblies with wheels are pointing outwards for maximum stability.
OPERATING INSTRUCTIONS
(See Fig. 1&2)
- Ensure the power switch (D) is set to the OFF (O) position.
- Plug in heater.
- Flip the power switch to the ON (-) position. The power light (I) will illuminate red until the unit is unplugged.
- Press the mode button (L) once to activate the unit. The mode light (J) will glow green to indicate the heater is running. The unit will automatically start on Setting 3 (High Heat).
- Press the mode button until the desired heat setting is shown on the digital display (H).
BOH2503D: 3=2500W, 2=1300W, 1=1200W, ![]() =Energy Saving Mode
=Energy Saving Mode
After using the heater, press the mode button until the unit is deactivated and the mode light turns off, then turn the power switch to the OFF position. Unplug the heater from the socket.
SETTING THE THERMOSTAT
- Set the desired heat setting by pressing the mode button.
- Press the thermostat/timer button (M) once to activate thermostat setting. The room temperature and a thermostat icon flash on the display.
- Press the + or - adjuster buttons (N) to select the desired temperature. (Range 12°C - 30°C)
- The thermostat symbol will stop flashing. The thermostat control will now automatically maintain the preset temperature level by turning the heater on and off.
- To deactivate the thermostat setting, press the thermostat/timer button continuously until the thermostat symbol does not appear on the display.
NOTE: The Power light will remain lit during operation.
NOTE: It is normal for the heater to cycle ON and OFF as it maintains the preset temperature.
FROST GUARD INSTRUCTION
When the heater is in frost guard mode, the temperature will be maintained at 5°C; thus the heater will be in the off status unless the room temperature is lower than 5°C. If the room temperature is lower than 5°C, the heater will automatically start working and will keep turning on & off all the time, maintaining its ambient temperature of 5°C. To activate, press the mode button to turn the unit on, then press the thermostat/timer button twice. The (![]() ) icon will display to indicate that frost guard is activated.
) icon will display to indicate that frost guard is activated.
USING THE TIMER
Programmable timer
The user can programme the heater to turn OFF after a selected period or to come ON at a preset time.
Setting the OFF timer
- Select the mode and temperature you want the heater to run.
- Press the thermostat/timer button 3 times. The OFF timer icon flashes.
- Using either the (+) or (-) adjuster buttons, programme the heater to turn off up to 24 hours later, in increments of 1 hour.
Example - 9 hours - After setting the time, the digital display will stop flashing to show the timer is activated. The timer will count down until the predetermined length of time has passed, and the heater will then automatically switch off.
Example - Switch OFF - The time is 1 pm. The heater is running and you require the heater to switch off at 10 pm; therefore, set the time to 9 hours.
Setting the ON timer
- If the heater is on, press the thermostat/timer control button 4 times. The ON timer icon flashes.
- Using either the (+) or (-) adjuster buttons, programme the heater to switch on up to 24 hours later, in increments of 1 hour.
Example - 4 hours - After setting the ON timer, the digital display will stop flashing to show the timer is activated. The timer will count down until the predetermined period has passed, and then the heater will automatically switch on.
NOTE: When the ON timer is set, the unit will remember the setting the unit was previously on and activate to this setting after the predetermined period. The heat setting may be changed after setting the timer by pressing the mode button.
ENERGY SAVING MODE
To activate, press the mode button until ![]() appears on the display. The heater will operate on a cycle – 10 minutes on High (2500W) and 30 minutes on Medium (1300W). When the temperature is at or above 85ºF (30ºC), the heater will ignore the 10 minute High setting and operate on Medium for 30 minutes immediately. The cycle repeats while in this mode.
appears on the display. The heater will operate on a cycle – 10 minutes on High (2500W) and 30 minutes on Medium (1300W). When the temperature is at or above 85ºF (30ºC), the heater will ignore the 10 minute High setting and operate on Medium for 30 minutes immediately. The cycle repeats while in this mode.
DISPLAY PREFERENCES
The default setting on the digital display is degrees Celsius (°C). To switch to degrees Fahrenheit (°F), press the °F-°C button.
NOTE: Unit must be unplugged for it to be fully off.
TIP OVER PROTECTION
When the unit is accidentally knocked over, or tilts on one side at more than a 45° angle; it will instantly shut off. To reset, simply place the heater in an upright position and press the mode button to reactivate the unit.
TRANSPORTING THE UNIT
Locate the pull down handle (C) above the control panel. Pull down to release and then grasp the handle. Pull the unit using the handle ensuring that all castors are in contact with the floor.
NOTE: Do not use handle to lift the product.
STORAGE TIPS
If the heater is not required for long periods, for example during the summer, it should be stored at room temperature; in a dry place and preferably covered to prevent the accumulation of dust and dirt.
FITTING A REPLACEMENT PLUG FOR U.K. AND IRELAND ONLY.
If the plug is not suitable for the socket outlets in your home, it can be removed and replaced by a plug of the correct type. For correct type and correct installation please refer to "Installation of a plug" below.
INSTALLATION OF A PLUG – Applicable to U.K. and Ireland.

NOTE: If you are in any doubt about wiring and the installation of the plug. Please contact a qualified electrician.
NOTE: If a 13A 3-pin plug is fitted, it must be an ASTA approved plug, conforming to the BS1363 standard. Replacement 13 amp fuse must also be BSI or ASTA approved.
The wires in this mains lead are coloured as such:
GREEN & YELLOW - Earth
BROWN - Live
BLUE - Neutral
Please note that the colour of these mains wires may not correspond with the colour markings that identify the terminals in your plug.
Please proceed as follows:
- The wire which is coloured GREEN & YELLOW must be connected to the terminal which is marked with the letter E (
![]() ) or is coloured GREEN, or GREEN & YELLOW.
) or is coloured GREEN, or GREEN & YELLOW. - The BROWN coloured wire must be connected to the pin terminal, which is marked with the letter L (Live) or is coloured RED.
- The BLUE coloured wire must be connected to the pin terminal which is marked with the letter N (Neutral) or is coloured BLACK.
- DO NOT CONNECT either of these wires to the earth terminal in the plug. The earth terminal is marked with the letter E (
![]() ) or is coloured GREEN, or GREEN & YELLOW.
) or is coloured GREEN, or GREEN & YELLOW.

Documents / ResourcesDownload manual
Here you can download full pdf version of manual, it may contain additional safety instructions, warranty information, FCC rules, etc.
Advertisement


Need help?
Do you have a question about the BOH2503D and is the answer not in the manual?
Questions and answers