
Related Manuals for MasterForce 240-5239


Summary of Contents for MasterForce 240-5239
- Page 1 Wet/Dry Vacuums 240-5239 OPERATOR’S MANUAL CAUTION: To Reduce The Risk Of Injury, User Must Read And Understand Operator's Manual. Save These Instructions For Future Reference.
-
Page 2: Table Of Contents
TABLE OF CONTENTS SECTION PAGE Safety Instructions & Warnings ......................2 Double Insulation Instructions ......................4 Extension Cords ..........................4 Unpacking & Checking Carton Contents ..................5 General Assembly Instructions .......................7 Dry Vacuum Operation .........................10 Liquid Vacuum Operation ......................12 Blower Operation ..........................14 Maintenance ..........................16 Installing &... -
Page 3: Safety Instructions & Warnings
SAFETY INSTRUCTIONS & WARNINGS The purpose of safety symbols is to attract our attention to possible dangers. The safety symbols, and the explanations with them, deserve your careful attention and understanding. The symbol warnings do not by themselves eliminate any danger. The instructions and warnings they give are no substitutes for proper accident prevention measures. - Page 4 To reduce the risk children. of personal injury or damage to your Wet/Dry • To reduce the risk of injury from accidental Vac, use only Masterforce recommended starting, unplug power cord before changing accessories. or cleaning filter.
-
Page 5: Double Insulation Instructions
DOUBLE INSULATION INSTRUCTIONS This Wet/Dry Vac is double-insulated, eliminating A DOUBLE-INSULATED APPLIANCE, NOR the need for a separate grounding system. SHOULD A MEANS FOR GROUNDING BE Use only identical replacement parts. Read ADDED. SERVICING A DOUBLE INSULATED the instructions for Servicing Double-Insulated WET/DRY VACUUM REQUIRES EXTREME Wet/Dry Vacs before servicing. -
Page 6: Unpacking & Checking Carton Contents
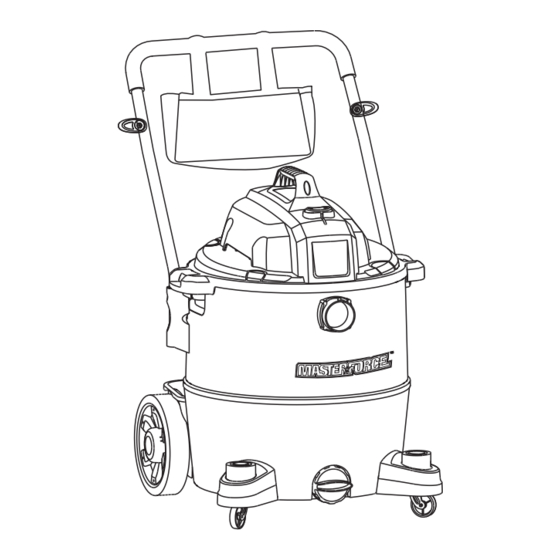
UNPACKING & CHECKING CARTON CONTENTS Remove all contents from the box. Remove the power head and take out any contents inside the collection tank. Check each item against the carton contents list. Air Control Hose Handle Utility Nozzle Crevice Tool Extension Wands Vac Assembly Filter Retainer... - Page 7 UNPACKING & CHECKING CARTON CONTENTS Push/Pull Handle With Soft Grip Cord Wrap Hook Tool Storage Bag Handle Power Head On-Off Switch Accessory Storage Vacuum Port Collection Tank Rear Wheel Accessory Storage Caster Foot Caster Drain Page 6...
-
Page 8: General Assembly Instructions
GENERAL ASSEMBLY INSTRUCTIONS A Philips head screwdriver is required. 4. Remove the contents from inside the collection tank. Make sure you have all WARNING: DO NOT PLUG POWER contents as listed on page 5. (fig. 4) C O R D I N T O P O W E R O U T L E T , M A K E Fig. - Page 9 GENERAL ASSEMBLY INSTRUCTIONS 7. Insert the wheel axle into the rear wheel Fig. 9 housing. Insert a washer onto the axle followed by rear wheel and insert another washer. Insert the ‘R’ locking pin into the hole on the end of the axle to lock the wheel.
- Page 10 GENERAL ASSEMBLY INSTRUCTIONS 12. For wet vacuum cleaning, install the supplied 15. Choose the desired accessories and push foam wet filter. (fig. 13) For filter installation onto the suction tube. (fig. 16) instructions, refer to page 18. Fig. 16 Fig. 13 POLARIZED PLUG To reduce the risk of electrical shock, this 13.
-
Page 11: Dry Vacuum Operation
DRY VACUUM OPERATION DRY VACUUMING WARNING: Fig. 2 Fig. 3 B E S U R E T O R E A D , UNDERSTAND, AND APPLY INFORMATION, ENTITLED ‘SAFETY INSTRUCTIONS & WARNINGS’. DO NOT VACUUM IN AREAS WI T H FLAMM ABL E GA S ES , VA P OR S, O R E X P L O S I V E D U S T S I N T H E A I R . - Page 12 DRY VACUUM OPERATION 7. Turn the motor on by lipping the switch to the ‘I’ ON position. (fig. 8) OPERATING INSTRUCTIONS: DRY VACUUMING Fig. 8 5. Insert the locking end of the hose into the vacuum port and lock in place. Push the required attachment onto the free end of the hose or extension.
-
Page 13: Liquid Vacuum Operation
LIQUID VACUUM OPERATION LIQUID VACUUMING Fig. 2 WARNING: B E S U R E T O R E A D , UNDERSTAND, AND APPLY INFORMATION, ENTITLED ‘SAFETY INSTRUCTIONS & WARNINGS’. DO NOT VACUUM IN AREAS WI T H FLAMM ABL E GA S ES , VA P OR S, O R E X P L O S I V E D U S T S I N T H E A I R . - Page 14 LIQUID VACUUM OPERATION 5. Turn the motor on by lipping the switch to I M P O R T A N T ! W h e n v a c u u m i n g l a r g e the ‘I’...
-
Page 15: Blower Operation
BLOWER OPERATION This Wet/Dry Vac has blowing capabilities. To 4. Insert the locking end of the hose into the blower port on the back of the power head use the blower feature follow the instructions and lock into position. (fig. 3) listed. - Page 16 BLOWER OPERATION 7. Before turning on the vac, firmly hold loose end of the hose. Turn the motor on by flipping the switch to the ‘I’ ON position. (fig. 6) Fig. 6 Page 15...
-
Page 17: Maintenance
MAINTENANCE WARNING: ALWAYS DISCONNECT Fig. 4 THE PLUG FROM THE POWER OUTLET BEFORE REMOVING THE POWER HEAD FROM THE COLLECTION TANK. 1. Verify that the power cord is disconnected from the outlet. (fig. 1) Fig. 1 5. Clean the foam wet filter by washing it with water and mild soap. -
Page 18: Installing & Cleaning Cartridge Filter
INSTALLING & CLEANING CARTRIDGE FILTER Installing Cartridge Filter Removing and Cleaning Cartridge Filter 1. Unlock and remove the filter retainer by 1. Verify that the power cord is disconnected turning retainer handle counterclockwise. from the outlet. (fig. 1) 2. Carefully remove the cartridge filter by sliding it off the filter cage. -
Page 19: Installing & Cleaning Foam Wet Filter
INSTALLING & CLEANING FOAM WET FILTER Installing Foam Wet Filter Cleaning Foam Wet Filter 1. Verify that the power cord is disconnected 1. With the removed power head in an upside from the outlet. (fig. 1) down position, carefully remove foam wet filter. -
Page 20: Troubleshooting
TROUBLESHOOTING WARNING: TO REDUCE THE RISK OF ELECTRIC SHOCK-UNPLUG BEFORE TROUBLESHOOTING. Symptom Possible Causes Corrective Action 1) Check power supply – cord, 1) No power supply. breakers, fuses. 2) Unplug and check the power Vacuum will not operate. 2) Faulty power cord. cord. -
Page 21: Exploded View & Parts List
EXPLODED VIEW & PARTS LIST Description Part # Description Part # 1 Handle Assembly 551298101 13 Rear Wheel Assembly 551298105 2 Power Head Assembly 14 Push/Pull Handle Assembly 551298106 3 Filter Basket Assembly 551298111 14.1 Cord Wrap Hook 551298112 4 Cartridge Filter 240-5250 15 Floor/Brush Squeegee Nozzle 551298107... - Page 22 NOTES Page 21...
-
Page 23: Warranty
This MASTERFORCE brand wet/dry vacuum carries our famous No Hassle 3-Year Limited Warranty to the original purchaser. If, during normal use, this MASTERFORCE wet/dry vacuum breaks or fails due to a defect in material or workmanship within three (3) years from the date of original purchase, simply bring the vacuum with the original sales ®... - Page 24 © 2011 Menard, Inc., Eau Claire, WI 54703 11/2017...
Need help?
Do you have a question about the 240-5239 and is the answer not in the manual?
Questions and answers