Saramonic Vmic Recorder - Shotgun Microphone and Audio Recorder For DSLR Cameras Manual
- Quick start manual ,
- User manual ,
- Manual (17 pages)
Advertisement
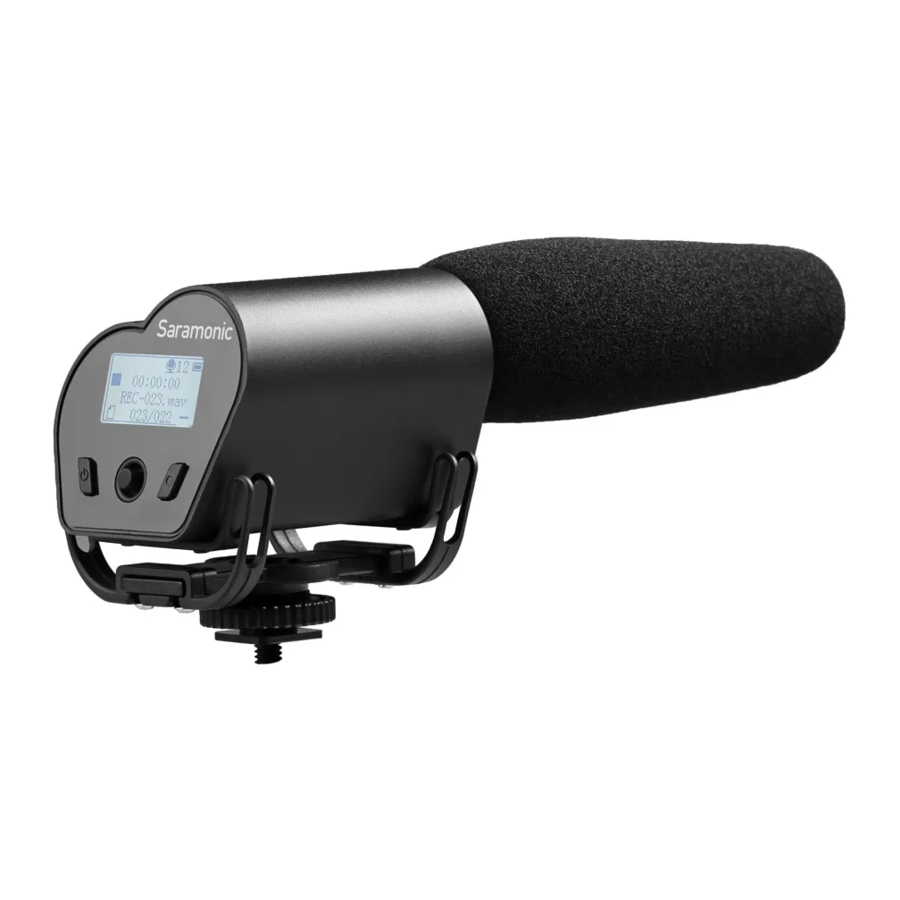
Product Introduction
Saramonic Vmic Recorder is a broadcast quality condenser microphone specially designed for DSLR cameras and camcorders. The integrated flash recording allows you to record 24-bit/48kHz wav audio files to MicroSDHC cards, supporting capacities up to 32GB.
It features one-button recording and easy-to-read menu display, making your recording work much easier. The detachable 3.5mm cable connects the Vmic Recorder to your camera's audio input, while the stereo headphone output allows you to monitor incoming audio. The shock mount system provides isolation from vibration and mechanical noise.
Highlights
- Supercardioid polar pick up pattern
- Records 24-bit/48kHz wav audio to a MicroSDHC card
- Easy-to-use menu system and LCD display
- Switchable low-cut filter
- 3.5mm headphone monitor input
- Standard size shoe mount
- Lightweight all-metal construction
Product Structure


- Foam windshield
- Battery and memory card compartment
- Camera shoe mount
- Integrated shock mount system
- Audio output jack
- Headphone jack
- Control panel
Quick Setup Guide
- Install two AA batteries and a memory card.

- Lock the battery compartment
- Unlock the battery compartment


Insert a MicroSDHC memory card into the card slot ![]() with the contacts facing up.
with the contacts facing up.
To remove: Press the card to unlock it, then pull it out from the card slot.
Note: Vmic Recorder can still work as a microphone even if there is no memory card installed. Please make sure the power is off when you insert or remove the memory card.
Insert two AA batteries to the battery compartment ![]() according to the polarity indicators. When the battery power is low, the LCD screen will show "low power" and the unit will turn off automatically.
according to the polarity indicators. When the battery power is low, the LCD screen will show "low power" and the unit will turn off automatically.
- Attach the Vmic Recorder to the hot shoe of your camera or camcorder. Connect the supplied audio transmission cable from the audio output
![]() to the MIC input of your camera or camcorder.
to the MIC input of your camera or camcorder. - Plug a headphone to the headphone output
![]() to monitor the audio.
to monitor the audio.
Note: The sound can be monitored only on recording screen and playbcak screen. - Set the control panel. Please refer to "5. Control Panel Introduction."
- Press the recording button to enter recording screen, and press again to start recording.
Control Panel Introduction
Control Panel Structure

- Power Button: Power or main menu
- Long press the power button to turn on or off the unit.
- Recording Button: Start, pause or stop recording
- Five-Position Joystick: Navigates through the menu
- LCD Screen: Display the menu and settings
Control Panel Adjusting Indication
| Control Panel | On Recording Screen | On Playback Screen | On Main Menu | On Submenu | |
| Joystick Direction | Left  | --- | Play previous audio | --- | Exit the submenu |
Right  | Set low cut on/off | Play next audio | --- | Delete (only active on submenu of "FILE") | |
Up  | Increase gain volume | Increase play volume | Scroll up |
| |
Down  | Decrease gain volume | Decrease play volume | Scroll down |
| |
Center button  | --- | Pause/play | Enter | Enter/confirm | |
| Recording Button | Start/pause/ stop recording | Enter recording screen | |||
| Power Button | Enter Main Menu | --- | --- | ||
LCD Screen

![]() Indicates recording screen.
Indicates recording screen.
![]() Indicates playback screen.
Indicates playback screen.- Microphone volume ( from 1 to 60).
Press the joystick up and down to adjust volume. - Level meter.
- Power indicator.
- Elapsed time. This shows the elapsed time (hours: minutes: seconds) of the current file.
You can set the maximum elapsed time of every audio file in the main menu. - Current file name/total number of files.
- Recording statue.
![]() Record
Record
![]() Pause
Pause
![]() Stop
Stop
![]() Play
Play - Folder name. Vmic Recorder allows you to create maximum 9 folders, every folder can accommodate 200 wav files. The screen shows now you are recording No.002 wav file, the wav file will be stored in FOLDER01.
- Low-cut filter icons.
On:![]()
Off:![]()


Audio Path

Note: If you want to record the audio into your camera, please make sure the Vmic Recorder is on recording screen.
Operating Menu

Menu Introduction
- FILE: Press joystick center button to browse all recorded files.
FOLDER01: Folder name REC-001.wav: File name.
Delete File: Select a file and press joystick to right to delete the file. The rest file's name will not change if a file is deleted. When you begin to record a new file, it will be named after the deleted file name.
Note: Once audio files have been deleted, they cannot be recovered. - INPUT: Set low cut filter. Default setting is low cut off.
low cut on: Vmic Recorder will filter audio signal that lower than 200hz to reduce noises. low cut off: Record original audio. - REC SET: Set recording parameter. file limit: Set maximum elapsed time limit. If you set file limit to 30 minutes, a 90 minutes' recording will be divided into 3 separate wav files. Default setting is 60 minutes. sample rate: Set sample rate. The higher rate you set, the higher audio quality you will get. Default setting is 48kHZ.
Recording Time (hour)
| Memory Card\Sample Rate | 24kHZ/16bit | 48kHZ/16bit | 24kHZ/24bit | 48kHZ/24bit |
| 16GB | 90hrs | 45hrs | 60hrs | 30hrs |
| 32GB (maximum card size) | 180hrs | 90hrs | 120hrs | 60hrs |
- SD CARD:
total: Total memory storage. remain: Remain memory storage. format SD: Format SD card will erase all data.
Please always format new memory cards in the device before recording. - PLAY MODE: Set mode of playback.
single play: Play one selected wav file for one time. single cycle: Play one selected wav file circularly. order play: Play wav files in order of file name. content cycle: Play all stored wav files in circulation. - SYSTEM SET:
date & time: Set the date and time so that files include a timestamp when exported.
lcd backlight: Set background LCD lights. Select LCD backlight on, off or delay 5/10/15/30 seconds. lcd contrast: Set LCD contrast. Default setting is 3.
Set LCD screen contrast from 1 to 5. In LCD contrast screen, press joystick up/down to adjust contrast level. Then press left to exit.
version: version of Vmic Recorder. factory rst: Restore the factory settings.
Vmic Recorder Firmware Upgrade
Note: Please check the version of the Vmic recorder before upgrading. Only version after V2.10 can be upgraded.
Please make sure the Vmic Recorder is working at full power when upgrading it.
Saramonic may release new versions of firmware to upgrade the Vmic Recorder. The new firmware will be released on our website. Please update the Vmic Recorder by the following steps:
- Download the latest ".bin" file to a MicroSDHC Card and rename it to "VMIC_R.bin"
- Insert the MicroSDHC Card and batteries into the unit.
- Press the ENTER (Joystick) and POWER button at the same time for about 2 seconds to turn on the unit.
- The LCD Screen will light up and show "APP Updating..."
- About 6 seconds later, it will show " Update Succeed!"
- The Vmic Recorder will automatically run on the updated program and is ready to use.
- If any error occurs, please try again from step 1.
Specifications
Technical Specifications
| Type | Condenser Microphone |
| Polar Pattern | Supercardioid |
| Recording Format | WAV, 16bit/24bit, 24kHz/48kHz Sampling Rate |
| Frequency Response | 50 HZ to 20 kHZ |
| Maximum SPL | 0 dB Gain Setting, 1 kHz at 1% THD, 1000 Ω load 110 dB SPL |
| Signal to Noise Ratio | +30 dB Gain Setting 78 dB |
| Operating Temperature Range | -17°C (0°62.6F) to 57°C (134.6°F) |
| Audio Output Impedance | 47 Ω |
| Headphone Output Impedance | 5 Ω |
| Plug | Mini-pin plug (3.5 mm) |
| Power | Two AA batteries (8 hours) |
| Dimensions (L x H x W) | 255 x 66 x 80 mm |
| Net Weight | 000 g (00000000000000000000000000000000000 oz.) |
Frequency Response

Polar Pattern

Packing List
- One Vmic Recorder unit
- One pop wind shield
- One 3.5mm audio transmission cable
- User manual
- Warranty card
Statement
Please read this manual carefully before using and strictly operate and store in accordance with the instructions. Please save it for your future reference. If the user manual can not help you to solve certain problems, please ask your retailer for help or email us: info@saramonic.com.

- Do not use the unit under water, don't expose it to rain. Please store it in a cool, dry place.
- Please use and store it in normal temperature. Do not move it from overheated to supercooled condition frequently as well as keep away from heat sources such as heater and oven.
- When using and storing, please pay attention to dust and moisture.
- Be careful to violent collision.

Documents / ResourcesDownload manual
Here you can download full pdf version of manual, it may contain additional safety instructions, warranty information, FCC rules, etc.
Download Saramonic Vmic Recorder - Shotgun Microphone and Audio Recorder For DSLR Cameras Manual
Advertisement


Need help?
Do you have a question about the Vmic Recorder and is the answer not in the manual?
Questions and answers