
Related Manuals for TECHNIMOUNT Bracket Pro Series 92-GR3

Summary of Contents for TECHNIMOUNT Bracket Pro Series 92-GR3
- Page 1 BRACKET PRO SERIE® 92 - GR3 OPERATING GUIDE SAFETY AND FLEXIBILITY WHERE IT MATTERS MOST...
-
Page 2: Copyrights
- Sapphire is a trademark of Eitan Medical Ltd. ® For any issues with your Technimount product, its components, or for any technical questions during the installation, operation, or maintenance, please contact Technical Support at techsupport@technimount.com. Contact Information Technimount E.M.S. Holding Inc. -
Page 3: Table Of Contents
..2.4. Remove the Bracket Pro Serie 92 - GR3 from the Micro Base ................10 3. Perform the Daily Safety Checks ........................11 ..3.1. Required Tools ................................11 ..3.2. Daily Safety Checks ..............................11 ..3.3. Illustrated Inspections Points ............................14 © 2023 Technimount E.M.S. Holding Inc. OG-BP92-GR3-202305EN-01 | Page iii of iii... -
Page 4: Safety Guidelines
- Perform the safety checks, as described in the operating guide. Failing to follow the recommended guidelines could cause premature damage to the product. CAUTION - Safe Handling and Operation Improper use of the Technimount product may damage the equipment or cause injury to the patients or EMS personnel. CAUTION - Safe Practice - Always pay close attention to the condition of the safety mechanisms to prevent undue risk to the equipment, patients, and EMS personnel. -
Page 5: Operate The Bracket Pro Serie 92 - Gr3
NOTE: Always perform the Safety checks BEFORE using the Bracket Pro Serie 92 - GR3. Refer to the "Daily Safety Checks" on page 11 before each use. NOTE: Technimount continually seeks advancements in product design and quality. While this operating guide contains the most updated product information available at the time of printing, it may contain minor differences from the current version. -
Page 6: Install The Infusion Pump In The Bracket Pro Serie 92 - Gr3
2. Locate the two (2) cavities at the bottom of the infusion pump (Figure 3 A) and two (2) inserts at the bottom of the pump holder (Figure 3 B). Figure 3: Infusion pump installation (1 of 2) © 2023 Technimount E.M.S. Holding Inc. OG-BP92-GR3-202305EN-01 | Page 6 of 16... - Page 7 Figure 4: Infusion pump installation (2 of 2) 7. Repeat steps 3 to 6 until all pumps have been installed (Figure 5). Figure 5: Infusion pumps installed in the Bracket Pro Serie 92 - GR3 © 2023 Technimount E.M.S. Holding Inc. OG-BP92-GR3-202305EN-01 | Page 7 of 16...
-
Page 8: Remove The Infusion Pump From The Bracket Pro Serie 92 - Gr3
5. Lift and pull out the pump, then set it aside on a flat surface. 6. Repeat steps 1 to 5 to remove other pumps if needed. Figure 6: Infusion pump removal © 2023 Technimount E.M.S. Holding Inc. OG-BP92-GR3-202305EN-01 | Page 8 of 16... -
Page 9: Install The Bracket Pro Serie 92 - Gr3 On A Micro Base
Operating Guide 2.3. Install the Bracket Pro Serie 92 - GR3 on a Micro Base NOTE: Only a Technimount bracket with an anti-rotation micro disc or micro bottom disc can be installed on a Micro Base. 1. Lift the Bracket Pro Serie 92 - GR3 using the handle and align the anti-rotation micro disc located at the back of the bracket with the Micro Base opening (Figure 7 A). -
Page 10: Remove The Bracket Pro Serie 92 - Gr3 From The Micro Base
2. Set the bracket aside on a flat surface or store it until future use. 1. Quick release button 2. Handle Figure 8: Removing the Bracket Pro Serie 92 - GR3 from the Micro Base © 2023 Technimount E.M.S. Holding Inc. OG-BP92-GR3-202305EN-01 | Page 10 of 16... -
Page 11: Perform The Daily Safety Checks
3. Perform the Daily Safety Checks Daily safety checks on Technimount products are recommended to keep them in good condition and avoid failure or injury to the patient or EMS personnel. EMS personnel should perform the daily safety checks at the beginning of each work shift. - Page 12 - Visually inspect the (4) feet to ensure there is no damage or chemical attack, loose parts and that the hardware is in good condition. Daily Safety Checks completed on (dd/mm/yyyy), by Comments and observations: © 2023 Technimount E.M.S. Holding Inc. OG-BP92-GR3-202305EN-01 | Page 12 of 16...
- Page 13 BRACKET PRO SERIE 92 - GR3 ® Operating Guide DAILY SAFETY CHECKS COMPLIANT INSPECTIONS © 2023 Technimount E.M.S. Holding Inc. OG-BP92-GR3-202305EN-01 | Page 13 of 16...
-
Page 14: Illustrated Inspections Points
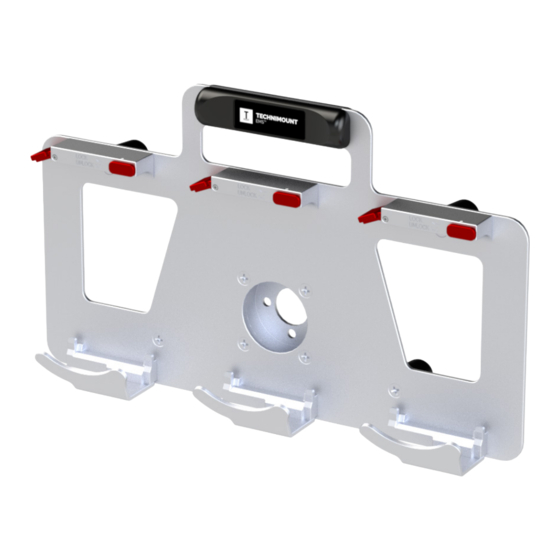
3. Anti-rotation micro disc 2. Lock/unlock slider button (3X) 4. Foot (4X) Figure 9: Bracket Pro Serie 92 - GR3 Inspection points (front and back of bracket shown) © 2023 Technimount E.M.S. Holding Inc. OG-BP92-GR3-202305EN-01 | Page 14 of 16... - Page 15 BRACKET PRO SERIE 92 - GR3 ® Operating Guide © 2023 Technimount E.M.S. Holding Inc. OG-BP92-GR3-202305EN-01 | Page 15 of 16...
- Page 16 Critical Care Transport (CCT) teams for ground and air ambulances. Safety is at the core of our values, all Technimount systems are tested in compliance with the highest industry standards for impact resistance. Technimount EMS is committed to developing innovative solutions as healthcare practices evolve.
Need help?
Do you have a question about the Bracket Pro Series 92-GR3 and is the answer not in the manual?
Questions and answers