Table of Contents
Advertisement
Available languages
Available languages
2/2
978931 - WF 714 A W566C
977797 - WF 714 A S566C
977798 - WF 814 A W566C
979636 - WF 814 A S566C
977800 - WF 1214 A W566C
977851 - WF 1214 A S566C
CONSIGNES D'UTILISATION
INSTRUCTIONS FOR USE
GEBRUIKSAANWIJZINGEN
INSTRUCCIONES DE USO
Lave-linge
Washing machine
Wasmachine
Lavadora
....................02
....................40
....................76
....................112
12/2022-01
Advertisement
Chapters
Table of Contents

Related Manuals for VALBERG WF 714 A W566C


Summary of Contents for VALBERG WF 714 A W566C
- Page 1 12/2022-01 Lave-linge Washing machine Wasmachine Lavadora 978931 - WF 714 A W566C 977797 - WF 714 A S566C 977798 - WF 814 A W566C 979636 - WF 814 A S566C 977800 - WF 1214 A W566C 977851 - WF 1214 A S566C CONSIGNES D'UTILISATION ....02...
- Page 4 Merci ! M e rc i d ’ a v o i r c h o i s i c e p ro d u i t VA L B E R G . Choisis, testés et recommandés par ELECTRO DEPOT, le s p ro d u i t s d e l a m a rq u e VA L B E R G v o u s a s s u re n t u n e u t i l i s a t i o n s i m p l e , u n e p e r f o r m a n c e f i a b l e e t u n e q u a l i t é...
- Page 5 Table des matières Description des pièces Aperçu de l’appareil Caractéristiques Installation Utilisation de Fonctionnement l’appareil Nettoyage et entretien Nettoyage et Dépannage entretien Transport Fiche produit Les notices sont aussi disponibles sur le site http://www.electrodepot.fr/sav/notices/ http://www.electrodepot.be/fr/sav/notices...
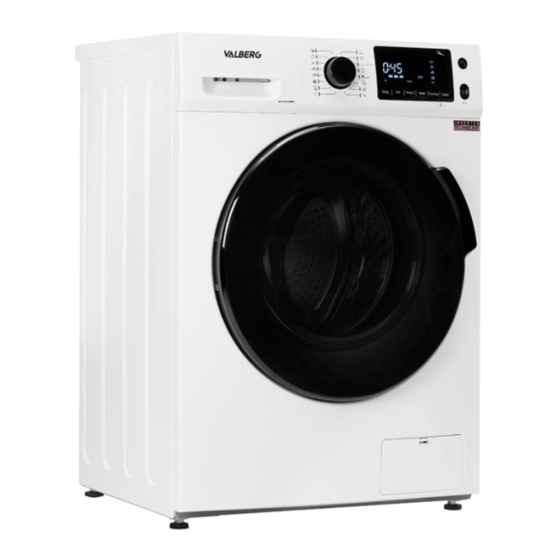
- Page 6 Aperçu de l’appareil Description des pièces Couvercle supérieur Porte Panneau de commande Bac à lessive Cordon d’alimentation Tuyau d’arrivée d’eau Tambour 4 couvercles Tuyau de vidange 1 tuyau d’arrivée d’eau froide Mousse acoustique OU panneau Clapet pour réparation acoustique Remarque : • L’image du produit est fournie à titre d’illustration uniquement. Veuillez vous reporter au produit réel pour référence.
- Page 7 Aperçu de l’appareil Caractéristiques WF 714 A W566C WF 814 A W566C WF 1214 A W566C Modèle : WF 714 A S566C WF 814 A S566C WF 1214 A S566C Alimentation 220-240 V~, 50 Hz électrique : MAX. Courant : Pression d'eau 0,05 MPa ~ 1 MPa standard :...
- Page 8 Utilisation de l’appareil Installation Zone d’installation Avertissement ! • Il est important que le produit soit stable, car cela l’empêchera de se déplacer ! Assurez-vous que la machine soit debout, droite et stable. • Veillez à ce que le produit ne soit pas placé sur son cordon d'alimentation. •...
- Page 9 Utilisation de l’appareil Retirez le carton d’emballage et les éléments en polystyrène. Soulevez le lave-linge et retirez l’emballage de la base. Veillez à ce que le petit triangle en mousse (a) soit retiré avec l’emballage de la base. Si ce n’est pas le cas, couchez l’appareil sur le côté...
- Page 10 Utilisation de l’appareil Raccord du tuyau d’arrivée d’eau Avertissement ! Pour éviter une fuite ou des dégâts des eaux, suivez les instructions de ce chapitre. • Ne pliez pas, n’écrasez pas et ne modifiez pas le tuyau d’arrivée d’eau. Raccordez le tuyau d’arrivée d’eau à la vanne d’arrivée d’eau et à un robinet d’eau froide comme indiqué.
- Page 11 à celle de la mousse. • Mousse acoustique : WF 1214 A W566C / WF 1214 A S566C • Panneau acoustique : WF 814 A W566C / WF 814 A S566C / WF 714 A W566C / WF 714 A S566C Fonctionnement Démarrage rapide Attention ! •...
- Page 12 Utilisation de l’appareil Appuyez sur [ ] pour démarrer l’appareil et attendez que « **** » s’affiche. • Avant l’utilisation Brancher Ouvrir le robinet Charger Fermer la porte Ajouter la lessive Remarque : • Il faut ajouter la lessive dans le compartiment I si la fonction de prélavage est sélectionnée.
- Page 13 Utilisation de l’appareil Appuyez sur Démarrer/Pause pour lancer le programme • Après le lavage La sonnerie retentit et « End » (Fin) s’affiche à l’écran. Avant chaque lavage • La température ambiante doit être comprise entre 5 et 40 °C pour utiliser le lave-linge. S’il est utilisé...
- Page 14 Utilisation de l’appareil Avertissement ! • Lors du lavage d’un seul article, le déséquilibre détecté à l’intérieur du tambour pourrait causer une erreur. Il est donc conseillé d’ajouter un ou deux articles supplémentaires pour les laver ensemble, afin de permettre une vidange fluide. •...
-
Page 15: Rapide 45'/15
Utilisation de l’appareil Sports Jean Rapide 45’/15’ Hygiène vapeur ÉCO 40-60 20 °C Laine Essorage Seul Nettoyage du tambour Signifie Obligatoire Signifie Optionnel Recommandations en matière de lessive Lessive recommandée Programmes de... - Page 16 Utilisation de l’appareil Remarque : • La lessive ou les additifs agglomérants ou fibreux peuvent être dilués dans de l’eau avant d’être versés dans le bac à lessive, afin d’éviter qu’il ne se bloque et n’entraîne un débordement d’eau. • Veuillez choisir un type de lessive adapté pour obtenir des performances de lavage maximales avec une consommation d’eau et d’électricité...
- Page 17 Utilisation de l’appareil Ce bouton permet de sélectionner une fonction Options supplémentaire. Il s’allumera une fois sélectionné. Programmes disponibles à la sélection selon le type de Programmes linge. L’écran affiche les réglages, une estimation du temps Écran restant, les options et les messages d’état de votre lave- linge.
-
Page 18: Table Of Contents
Utilisation de l’appareil Programmes Modèle : WF 714 A W566C; WF 714 A S566C; WF 814 A W566C; WF 814 A S566C; WF 1214 A S566C; WF 1214 A W566C Programme Charge (kg) Durée par défaut 12,0 12,0 0:45 0:45 0:45 Rapide 45’/15’... -
Page 19: Éco
Utilisation de l’appareil WF 714 A W566C / WF 714 A S566C Programme 20 °C 1:01 0,177 65 %/1 000 3:44 1,392 53 %/1 400 Coton 2:01 1,212 65 %/1 000 Soin Bébé 1:20 0,696 65 %/1 000 Mixte 1:30 1,158 65 %/1 000 Mixte 60 °C 0:45 0,131 70 %/800 Rapide 45’/15’... - Page 20 Utilisation de l’appareil WF 814 A W566C / WF 814 A S566C Programme 20 °C 1:01 0,183 65 %/1 000 3:44 1,498 53 %/1 400 Coton 2:01 1,317 65 %/1 000 Soin Bébé 1:20 0,754 65 %/1 000 Mixte 1:30 1,263 65 %/1 000 Mixte 60 °C 0:45 0,131 70 %/800 Rapide 45’/15’ 3:38 0,752 53,9 %/1 350...
- Page 21 Utilisation de l’appareil WF 1214 A W566C / WF 1214 A S566C Programme 20 °C 1:01 0,206 65 %/1 000 12,0 3:44 1,919 53 %/1 400 Coton 60°C 12,0 1:20 0,988 65 %/1 000 Mixte 12,0 1:30 1,684 65 %/1 000 Mixte 60 °C 0:45 0,131 75 %/800 Rapide 45’/15’ 12,0 4:00 1.186 84,0...
- Page 22 Utilisation de l’appareil Programmes Les programmes sont disponibles à la sélection selon le type de linge. Programmes Textiles robustes, textiles résistant à la chaleur composés de coton Coton ou de lin. Pour laver les articles synthétiques, par exemple les chemises, les manteaux et les textiles mélangés.
-
Page 23: Laine
La machine reprendra le programme une fois le courant rétabli. Options Modèle : WF 714 A W566C; WF 714 A S566C; WF 814 A W566C; WF 814 A S566C; WF 1214 A S566C; WF 1214 A W566C Temp. par Vitesse d’essorage... -
Page 24: Essorage Seul
Utilisation de l’appareil 1400 ÉCO 40-60 20 °C 1000 Laine 1000 Essorage Seul Nettoyage du tambour Jean Sports 1000 Soin Bébé 1000 Mixte 1200 Synthétique 1400 Coton Remarque : • Pour connaître la vitesse d’essorage maximale, la durée du programme et d’autres détails du programme ÉCO 40-60, veuillez vous reporter au contenu de la page de la fiche produit. - Page 25 Utilisation de l’appareil Départ différé 1. Choisissez un programme. 2. Appuyez sur le bouton Départ différé pour sélectionner le délai, de 0 à 24 h. 3. Appuyez sur le bouton Démarrer/Pause pour activer le départ différé. Choisir un programme Définir la durée Démarrer Pour annuler la fonction Départ différé, appuyez sur le bouton « Départ différé »...
- Page 26 Utilisation de l’appareil Coton, Synthétique, Produits cosmétiques, Santé et beauté Mixte sang, médicaments Mon programme Pour mémoriser le programme utilisé le plus souvent. Après avoir choisi le programme et réglé les options, appuyez sur le bouton [Essorage] et [Taches difficiles] pendant 3 secondes avant le début du programme.
- Page 27 Utilisation de l’appareil Ajout de linge Cette opération peut être effectuée pendant le processus de lavage, lorsque le tambour tourne encore et qu’il y a encore une grande quantité d’eau à température élevée dans le tambour. Cette situation est dangereuse et la porte ne peut alors pas être ouverte de force. Appuyez pendant 3 secondes sur le bouton [Démarrer/Pause] pour changer la charge de linge et ajouter des articles en cours de programme.
- Page 28 Nettoyage et entretien Nettoyage et entretien Avertissement ! • Débranchez toujours l’appareil et fermez le robinet d’eau avant d’effectuer une opération de nettoyage ou d’entretien. Nettoyage du corps de l’appareil L'entretien correct du lave-linge permet de prolonger sa durée de vie. Ses surfaces peuvent être nettoyées avec du détergent neutre non abrasif dilué, si nécessaire.
- Page 29 Nettoyage et entretien Remarque : • Gardez le linge à l’écart de la machine lorsque vous nettoyez le tambour. Nettoyage du joint de porte et du hublot Essuyez le hublot et le joint après chaque lavage pour retirer les peluches et les taches. Une accumulation de peluches peut entraîner des fuites.
- Page 30 Nettoyage et entretien 4. Nettoyez le filtre à l’aide d’une brosse. 5. Remettez le filtre en place au niveau de l’arrivée d’eau et raccordez à nouveau le tuyau d’arrivée d’eau. 6. Nettoyez le filtre d’arrivée tous les 3 mois pour garantir le bon fonctionnement de l’appareil.
- Page 31 Nettoyage et entretien Nettoyage du filtre de la pompe de vidange Avertissement ! • Assurez-vous que le programme de lavage est terminé et que la machine est vide. Éteignez la machine et débranchez-la avant de nettoyer le filtre de la pompe de vidange.
- Page 32 Nettoyage et entretien Attention ! • Veillez à ce que le couvercle de la vanne et le tuyau de vidange d’urgence soient correctement remis en place. Les couvercles doivent être alignés avec les trous de la plaque, faute de quoi de l’eau pourrait couler. •...
- Page 33 Nettoyage et entretien Description Cause possible Solution Les voyants • Problèmes de • Éteignez l’alimentation et vérifiez si la ou l’écran ne connexion au niveau fiche d’alimentation est correctement fonctionnent pas. du circuit imprimé branchée. ou du faisceau de fils. Bruit anormal •...
- Page 34 Nettoyage et entretien Transport ÉTAPES IMPORTANTES LORS DU TRANSPORT DE L’APPAREIL • Débranchez l’appareil et fermez le robinet d’arrivée d’eau. • Vérifiez que la porte et le bac à lessive sont bien fermés. • Retirez le tuyau d’arrivée d’eau et le tuyau de vidange des installations domestiques. •...
- Page 35 Fiche produit Nom du fournisseur ou marque de commerce : (a),(c) Adresse du fournisseur : (a),(c) Identifiant du modèle : WF 714 A W566C / WF 714 A S566C Paramètres généraux du produit : Paramètre Valeur Paramètre Valeur Hauteur Capacité nominale...
- Page 36 Fiche produit Émissions de bruit Classe d’émissions acoustique aérien de bruit acoustique pendant la phase aérien (phase d’essorage d’essorage) (dB(A) re 1 pW) Mode Arrêt (W) Mode Veille (W) 0,50 (le cas échéant) (le cas échéant) Départ différé (W) Veille connectée (W) 4,00 (le cas échéant) (le cas échéant)
- Page 37 Fiche produit Nom du fournisseur ou marque de commerce : (a),(c) Adresse du fournisseur : (a),(c) Identifiant du modèle : WF 814 A W566C / WF 814 A S566C Paramètres généraux du produit : Paramètre Valeur Paramètre Valeur Hauteur Capacité nominale Dimensions en cm Largeur (a),(c)
- Page 38 Fiche produit Émissions de bruit Classe d’émissions acoustique aérien de bruit acoustique pendant la phase aérien (phase d’essorage d’essorage) (dB(A) re 1 pW) Mode Arrêt (W) Mode Veille (W) 0,50 (le cas échéant) (le cas échéant) Départ différé (W) Veille connectée (W) 4,00 (le cas échéant) (le cas échéant)
- Page 39 Fiche produit Nom du fournisseur ou marque de commerce : (a),(c) Adresse du fournisseur : (a),(c) Identifiant du modèle : WF 1214 A W566C / WF 1214 A S566C Paramètres généraux du produit : Paramètre Valeur Paramètre Valeur Hauteur Capacité nominale Dimensions en cm Largeur (a),(c)
- Page 40 Fiche produit Émissions de bruit Classe d’émissions acoustique aérien de bruit acoustique pendant la phase aérien (phase d’essorage d’essorage) (dB(A) re 1 pW) Mode Arrêt (W) Mode Veille (W) 0,50 (le cas échéant) (le cas échéant) Départ différé (W) Veille connectée (W) 4,00 (le cas échéant) (le cas échéant)
- Page 42 Thank you! T h a n k y o u f o r c h o o s i n g t h i s VA L B E R G p ro d u c t . V A L B E R G p r o d u c t s a r e c h o s e n , t e s t e d , a n d recommended by ELECTRO DEPOT, so you can be sure y o u a re g e t t i n g a t o p - q u a l i t y, e a s y - t o - u s e p ro d u c t t h a t w o n ’...
- Page 43 Table of Contents Parts Product overview Specifications Installation Product usage Operation Cleaning and maintenance Cleaning and Trouble Shooting maintenance Transport Product Fiche...
-
Page 44: Product Overview
Product overview Parts Top cover Door Control panel Detergent dispenser Power supply cord Water supply hose Drum 4 x Cover caps Drain hose 1 x Supply hose cold water Service flap Acoustic sponge OR Acoustic panel Note: • The product picture is for illustration only, please refer to real product as reference. - Page 45 Product overview Specifications WF 714 A W566C WF 814 A W566C WF 1214 A W566C Model: WF 714 A S566C WF 814 A S566C WF 1214 A S566C Power Supply: 220-240V~, 50Hz MAX. Current: Standard Water 0.05MPa ~ 1MPa Pressure: Washing Capacity: 7.0kg...
-
Page 46: Product Usage
Product usage Installation Installation area Warning! • Stability is important to prevent the product from wandering! Make sure the machine is standing leveled and stable. • Make sure that the product does not stand onto the power cord. • Make sure to maintain the minimum distances from the walls as shown in the picture. - Page 47 Product usage Remove the tape securing the power supply cord and drain hose. Remove the inlet hose from the drum. Remove transport bolts Warning! • You must remove the transport bolts from the backside before using the product. Loosen the 4 transport bolts with a spanner. Remove the bolts including the rubber parts and keep them for future use.
- Page 48 Product usage Connect the water supply hose Warning! To prevent leakage or water damage, follow the instructions in this chapter. • Do not kink, crush or modify water inlet hose. Connect the water supply hose to the water inlet valve and a water tap with cold water as indicated.
-
Page 49: Operation
Installation of panel is same as sponges. • Acoustic Sponge: WF 1214 A W566C / WF 1214 A S566C • Acoustic Panel: WF 814 A W566C / WF 814 A S566C / WF 714 A W566C / WF 714 A S566C Operation Quick Start Caution! •... - Page 50 Product usage Press [ ] to start the appliance and wait till “****” is displayed. • Before Washing Plug in Open tap Load Close door Add detergent Note: • Detergent need to be added in compartment I if the pre-wash function is selected.
- Page 51 Product usage Press Start/Pause to start the program • After Washing Buzzer beep and “End” on display. Before Each Washing • The ambient temperature of the washing machine should be 5-40°C. If used under 0°C, the inlet valve and draining system may be damaged. If the machine is installed under freezing conditions, it should be transferred to normal ambient temperature to ensure the water supply hose and drain hose can unfreeze before use.
- Page 52 Product usage Detergent Dispenser Pre wash Main wash Softener Release button to pull out the dispenser Caution! • Detergent only need to be added in “compartment I” after selecting pre-wash function. • Do not put laundry beads into the detergent dispenser. Programme Cotton ...
- Page 53 Product usage Detergent Recommendation Recommended washing Wash cycles Washing temp. Type of laundry and detergent textile Heavy-duty detergent White laundry made Cotton, ECO 40-60, with bleaching agents 40/60/90 from boil-proof cotton and optical brighteners or linen Colour detergent without Coloured laundry Cotton, ECO 40-60, bleaching agent and 20/30/40...
- Page 54 Product usage Control Panel Power Product is on/off. Start/Pause Press the button to start or pause the washing cycle. This allows you to select an additional function and will Option light when selected. Programmes Available according to the laundry type. The display shows the settings, estimated time Display remaining, options, and status messages for your...
- Page 55 Pre Wash-Wash-Rinse-Spin Stain Master Extra Rinse Pre Wash Boost Programmes Model: WF 714 A W566C; WF 714 A S566C; WF 814 A W566C; WF 814 A S566C; WF 1214 A S566C; WF 1214 A W566C Programme Load(kg) Default Time 12.0 12.0...
- Page 56 Product usage WF 714 A W566C / WF 714 A S566C Cycle 20°C 1:01 0.177 65%/1000 3:44 1.392 53%/1400 Cotton 2:01 1.212 65%/1000 Baby Care 1:20 0.696 65%/1000 1:30 1.158 65%/1000 Mix 60°C 0:45 0.131 70%/800 Quick 45'/15' 3:28 0.645 54.0...
- Page 57 Product usage WF 814 A W566C / WF 814 A S566C Cycle 20°C 1:01 0.183 65%/1000 3:44 1.498 53%/1400 Cotton 2:01 1.317 65%/1000 Baby Care 1:20 0.754 65%/1000 1:30 1.263 65%/1000 Mix 60°C 0:45 0.131 70%/800 Quick 45'/15' 3:38 0.752 53.9%/1350 2:48 0.412...
- Page 58 Product usage WF 1214 A W566C / WF 1214 A S566C Cycle 20°C 1:01 0.206 65%/1000 12.0 3:44 1.919 53%/1400 Cotton 60°C 12.0 1:20 0.988 65%/1000 12.0 1:30 1.684 65%/1000 Mix 60°C 0:45 0.131 75%/800 Quick 45’/15’ 12.0 4:00 1.186 84.0 53.9%/1350 3:00...
- Page 59 Product usage Programmes Programmes are available according to the laundry type. Programmes Hard-wearing textiles, heat-resistant textiles made of cotton or Cotton linen. Wash synthetic articles, for example: shirts, coats, blending. While washing the knitting textiles, detergent quantity shall be reduced Synthetic due to its loose string construction and easily forming bubbles.
- Page 60 The machine will continue the programme when the power supply is re-established. Option Model: WF 714 A W566C; WF 714 A S566C; WF 814 A W566C; WF 814 A S566C; WF 1214 A S566C; WF 1214 A W566C Default Temp.
- Page 61 Product usage Drum Clean Jeans Sports 1000 Baby Care 1000 1200 Synthetic 1400 Cotton Note: • For the maximum spin speed, program time, and other details of the ECO 40-60 program, please refer to the content on the Product Fiche page. •...
- Page 62 Product usage Delay 1. Select a programme 2. Press the Delay button to choose the delaying time 0-24h 3. Press [Start/Pause] to start the delay operation Choose programme Setting time Start To cancel the Delay function, press the “Delay” button before starting the program until the display shows 0 h.
- Page 63 Product usage My Cycle To memory the frequently used programme. After choosing the programme and setting the options, press [Spin] and [Stain Master] button 3 sec. before start to wash. The default setting course is Cotton. Child Lock This function is meant to keep children from misusing the controls. Press [Option] and [Boost] simultaneously for 3 sec until the buzzer beep.
- Page 64 Product usage Reload This operation can be executed during the washing progress. When the drum is still rolling and there is large amount of water with high temperature in the drum. The state is unsafe and the door cannot be opened forcefully.
- Page 65 Cleaning and maintenance Cleaning and maintenance Warning! • Always unplug the appliance and close the water tap before cleaning and maintenance. Cleaning the Cabinet Proper maintenance on the washing machine can extend its working life. The surface can be cleaned with diluted non-abrasive neutral detergents when necessary.
- Page 66 Cleaning and maintenance Cleaning the Door Seal and Glass Wipe the glass and seal after each wash to remove lint and stains. If lint builds up it can cause leakages. Remove any coins, buttons and other objects from the seal after each wash.
- Page 67 Cleaning and maintenance Clean The Detergent Dispenser 1. Press down the release [ ] on the softener cover and pull the dispenser drawer out of the recess. 2. Lift the softener cover off the dispenser drawer and wash both items with water. 3.
- Page 68 Cleaning and maintenance 1. Open the lower cover cap. 2. Rotate 90° and pull out the emergency drain hose, and take off the hose cap. 3. After water runs out, reset the drain hose. 4. Open the filter by turning to the counter clockwise. 5.
-
Page 69: Trouble Shooting
Cleaning and maintenance Trouble Shooting Whenever there is a problem with the appliance, check if you can solve it following the tables below. If the problem persists, please contact the customer service. Description Possible cause Solution Appliance does not • Door is not closed •... -
Page 70: Transport
Cleaning and maintenance Warning! Risk of electric shock • Never try repair an appliance which is defective of presumed to be defective. You may put your own and future users’ lives in danger. Only authorised specialists are allowed to carry out this repair work. •... -
Page 71: Product Fiche
Product Fiche Product Fiche Supplier’s name or trade mark (a),(c) Supplier’s address (a),(c) Model identifier : WF 714 A W566C / WF 714 A S566C General product parameters: Parameter Value Parameter Value Height Rated capacity (kg) Dimensions in cm Width... - Page 72 Product Fiche Airborne acoustical Airborne acoustical noise emissions in noise emission class the spinning phase (spinning phase) (dB(A) re 1 pW) Off-mode (W) Standby mode (W) 0.50 (if applicable) (if applicable) Delay start (W) Networked standby 4.00 (if applicable) (W) (if applicable) Minimum duration of the guarantee offered by the supplier (a),(c) This product has been designed to release...
- Page 73 Product Fiche Supplier’s name or trade mark (a),(c) Supplier’s address (a),(c) Model identifier : WF 814 A W566C / WF 814 A S566C General product parameters: Parameter Value Parameter Value Height Rated capacity (kg) Dimensions in cm Width (a),(c) Depth Energy efficiency Energy efficiency 51.9...
- Page 74 Product Fiche Off-mode (W) Standby mode (W) 0.50 (if applicable) (if applicable) Delay start (W) Networked standby 4.00 (if applicable) (W) (if applicable) Minimum duration of the guarantee offered by the supplier (a),(c) This product has been designed to release silver ions during the washing cycle Additional information: Weblink to the supplier’s website, where the information in point 9 of Annex II to...
- Page 75 Product Fiche Supplier’s name or trade mark (a),(c) Supplier’s address (a),(c) Model identifier : WF 1214 A W566C / WF 1214 A S566C General product parameters: Parameter Value Parameter Value Height Rated capacity (kg) Dimensions in cm Width (a),(c) Depth Energy efficiency Energy efficiency 52.0...
- Page 76 Product Fiche Off-mode (W) Standby mode (W) 0.50 (if applicable) (if applicable) Delay start (W) Networked standby 4.00 (if applicable) (W) (if applicable) Minimum duration of the guarantee offered by the supplier (a),(c) This product has been designed to release silver ions during the washing cycle Additional information: Weblink to the supplier’s website, where the information in point 9 of Annex II to...
- Page 78 Proficiat met uw keuze voor een product van VALBERG. De selectie en de testen van de toestellen van VALBERG g e b e u re n v o l le d i g o n d e r c o n t ro le e n s u p e r v i s i e v a n E L E C T R O D E P O T.
- Page 79 Inhoudstafel Onderdelen Overzicht van het Technische gegevens toestel Installatie Gebruik van het Werking toestel Reiniging en onderhoud Reiniging en Probleemoplossing onderhoud Transport Productfiche...
- Page 80 Overzicht van het toestel Onderdelen Bovenblad Deur Bedieningspaneel Wasmiddellade Netsnoer Watertoevoerslang Trommel 4x Afdekkappen Afvoerslang 1 x Toevoerslang koud water Akoestische spons OF Akoestisch Serviceklep paneel Opmerking: • De productafbeelding dient alleen ter illustratie, raadpleeg het echte product als referentie.
- Page 81 Overzicht van het toestel Technische gegevens WF 714 A W566C WF 814 A W566C WF 1214 A W566C Model: WF 714 A S566C WF 814 A S566C WF 1214 A S566C Voeding: 220-240V~, 50Hz MAX. Stroom: Standaard waterdruk: 0,05MPa ~ 1MPa...
- Page 82 Gebruik van het toestel Installatie Installatieruimte Waarschuwing! • Stabiliteit is belangrijk om het verschuiven van het product te vermijden! Zorg ervoor dat de machine waterpas en stabiel staat. • Zorg ervoor dat het product niet op het netsnoer staat. • Zorg ervoor dat u de minimale afstand tot de muur aanhoudt, zoals weergegeven in de afbeelding.
- Page 83 Gebruik van het toestel Verwijder de kartonnen doos en de piepschuimverpakking. Til de wasmachine op en verwijder de verpakking onderaan. Zorg ervoor dat het kleine driehoekig schuim (a) samen met de verpakking onderaan wordt verwijderd. Als dit niet het geval is, leg het apparaat op zijn zijde en verwijder het handmatig. Verwijder de tape waarmee het netsnoer en de afvoerslang zijn vastgemaakt.
- Page 84 Gebruik van het toestel De watertoevoerslang aansluiten Waarschuwing! Volg de instructies in dit hoofdstuk om lekkage of waterschade te voorkomen. • Zorg dat de watertoevoerslang niet wordt geknikt, geplet of aangepast. Sluit de watertoevoerslang aan op de waterinlaatklep en een waterkraan met koud water, zoals aangegeven.
- Page 85 Installatie van paneel is hetzelfde als sponzen. • Akoestische spons: WF 1214 A W566C / WF 1214 A S566C • Akoestisch paneel: WF 814 A W566C / WF 814 A S566C / WF 714 A W566C / WF 714 A S566C Werking Snelle start Voorzichtig! •...
- Page 86 Gebruik van het toestel Druk op [ ] om het apparaat te starten en wacht totdat "****" wordt weergegeven. • Voor het wassen Stekker in stopcontact steken Kraan opendraaien Vullen Deur sluiten Wasmiddel toevoegen Opmerking: • Doe wasmiddel in vak I wanneer de voorwasfunctie wordt geselecteerd. •...
- Page 87 Gebruik van het toestel • Na het wassen Zoemer gaat af en "End" (einde) wordt op het display weergegeven. Voor elke wasbeurt • De omgevingstemperatuur van de wasmachine moet tussen 5 en 40°C zijn. Bij een gebruik onder 0°C kunnen de inlaatklep en het afvoersysteem beschadigd raken. Als de machine onder vorstomstandigheden wordt geïnstalleerd, moet deze eerst worden overgebracht naar een normale omgevingstemperatuur om ervoor te zorgen dat de watertoevoerslang en afvoerslang voor gebruik kunnen ontdooien.
- Page 88 Gebruik van het toestel Wasmiddellade Voorwas Hoofdwas Wasverzachter Vrijgaveknop om de lade uit te trekken Voorzichtig! • Doe alleen wasmiddel in vak I nadat de voorwasfunctie is geselecteerd. • Doe geen waspods in de wasmiddellade. Programma Katoen Synthetisch ...
- Page 89 Gebruik van het toestel Aanbeveling voor soort wasmiddel Aanbevolen wasmiddel Wascycli Wastemp. Soort wasgoed en textiel Heavy-duty wasmiddel Witte was van Katoen, ECO 40-60, met bleekmiddel en 40/60/90 kookvast katoen of Gemengd optisch witmiddel linnen Kleurwasmiddel zonder Katoen, ECO 40-60, Gekleurd wasgoed van bleekmiddel en optisch 20/30/40...
- Page 90 Gebruik van het toestel Bedieningspaneel Aan/uit Product is in-/uitgeschakeld. Druk op de knop om de wascyclus te starten of te Start/Pauze pauzeren. Hiermee kunt u een extra functie selecteren en brandt Optie wanneer geselecteerd. Programma's Beschikbaar naargelang het soort wasgoed. Het display toont de instellingen, geschatte resterende Display tijd, opties en statusmeldingen voor uw wasmachine.
- Page 91 Uitstel Voorwas-Wassen-Spoelen-Centrifugeren Vlekkenverwijderaar Extra spoelen Voorwas Boost Programma's Model: WF 714 A W566C; WF 714 A S566C; WF 814 A W566C; WF 814 A S566C; WF 1214 A S566C; WF 1214 A W566C Programma Lading (kg) Standaard tijd 12,0 12,0...
- Page 92 Gebruik van het toestel WF 714 A W566C / WF 714 A S566C Cyclus 20°C 1:01 0,177 65%/1000 3:44 1,392 53%/1400 Katoen 2:01 1,212 65%/1000 Babyzorg 1:20 0,696 65%/1000 Gemengd Gemengd 1:30 1,158 65%/1000 60°C 0:45 0,131 70%/800 Snel 45'/15'...
- Page 93 Gebruik van het toestel WF 814 A W566C / WF 814 A S566C Cyclus 20°C 1:01 0,183 65%/1000 3:44 1,498 53%/1400 Katoen 2:01 1,317 65%/1000 Babyzorg 1:20 0,754 65%/1000 Gemengd Gemengd 1:30 1,263 65%/1000 60°C 0:45 0,131 70%/800 Snel 45'/15' 3:38 0,752 53,9%/1350...
- Page 94 Gebruik van het toestel WF 1214 A W566C / WF 1214 A S566C Cyclus 20°C 1:01 0,206 65%/1000 12,0 3:44 1,919 53%/1400 Katoen 60°C 12,0 1:20 0,988 65%/1000 Gemengd Gemengd 12,0 1:30 1,684 65%/1000 60°C 0:45 0,131 75%/800 Snel 45'/15' 12,0 4:00 1,186...
- Page 95 Gebruik van het toestel Programma's Programma's zijn beschikbaar naargelang het soort wasgoed. Programma's Slijtvast textiel, hittebestendig textiel van katoen of linnen. Katoen Was synthetische artikelen, zoals overhemden, jassen, gemengde stoffen. Tijdens het wassen van breiwerk moet de hoeveelheid Synthetisch wasmiddel worden verminderd vanwege de losse draadconstructie en het gemakkelijk vormen van bellen.
- Page 96 De machine gaat door met het programma zodra de stroomvoorziening is hersteld. Optie Model: WF 714 A W566C; WF 714 A S566C; WF 814 A W566C; WF 814 A S566C; WF 1214 A S566C; WF 1214 A W566C Standaard...
- Page 97 Gebruik van het toestel 20°C 1000 1000 Alleen centrifuge Trommel reinigen Jeans Sport 1000 Babyzorg 1000 Gemengd 1200 Synthetisch 1400 Katoen Opmerking: • Voor de maximale centrifugesnelheid, programmatijd en andere details van het ECO 40-60-programma verwijzen wij u naar de inhoud op de Productfiche- pagina.
- Page 98 Gebruik van het toestel Uitstellen 1. Selecteer een programma 2. Druk op de uitstelknop om een uitsteltijd tussen 0 en 24 uur te kiezen 3. Druk op [Start/Pauze] om de uitgestelde werking te starten Programma kiezen Tijd instellen Starten Om de uitstelfunctie te annuleren, druk op de "Uitstel" knop voordat u het programma start totdat '0 h' op het scherm wordt weergegeven.
- Page 99 Gebruik van het toestel Mijn cyclus Om het veelgebruikte programma te onthouden. Nadat u het programma hebt gekozen en de opties hebt ingesteld, druk 3 sec. op de knoppen [Centrifuge] en [Vlekkenverwijderaar] voordat u begint met wassen. De standaardinstelling is Katoen. Kinderslot Deze functie is bedoeld om te voorkomen dat kinderen de bedieningselementen op een verkeerde manier gebruiken.
- Page 100 Gebruik van het toestel Bijvullen Deze handeling kan worden uitgevoerd tijdens het wasproces, Wanneer de trommel nog aan het draaien is en er zich een grote hoeveelheid water aan een hoge temperatuur in de trommel bevindt. Deze toestand is niet veilig en de deur kan niet met kracht worden geopend.
- Page 101 Reiniging en onderhoud Reiniging en onderhoud Waarschuwing! • Haal altijd de stekker uit het stopcontact en draai de waterkraan dicht voordat u het apparaat reinigt en onderhoudt. De buitenkant schoonmaken Een juist onderhoud van de wasmachine kan de levensduur verlengen. De buitenkant kan indien nodig worden gereinigd met een verdund, niet-schurend en neutraal reinigingsmiddel.
- Page 102 Reiniging en onderhoud Opmerking: • Houd tijdens het reinigen van de trommel het wasgoed uit de buurt van de machine. De deurafdichting en het glas schoonmaken Veeg het glas en de afdichting na elke wasbeurt schoon om pluis en vlekken te verwijderen. Als er zich pluis ophoopt, kan dit tot lekkage leiden.
- Page 103 Reiniging en onderhoud 4. Gebruik een borstel om de filter schoon te maken. 5. Plaats de filter terug op de waterinlaat en maak de watertoevoerslang weer vast. 6. Reinig de inlaatfilter elke 3 maanden om een normale werking van het apparaat te garanderen. De wasmiddellade schoonmaken 1.
- Page 104 Reiniging en onderhoud De filter van de afvoerpomp schoonmaken Waarschuwing! • Zorg ervoor dat de machine de wascyclus heeft beëindigd en leeg is. Schakel de machine uit en haal de stekker uit het stopcontact voordat u de filter van de afvoerpomp reinigt. •...
- Page 105 Reiniging en onderhoud Voorzichtig! • Zorg dat de klepkap en de noodafvoerslang juist worden teruggeplaatst. De kapplaten moeten zich op één lijn bevinden met de gatenplaten om het lekken van water te vermijden. • Sommige machines hebben geen noodafvoerslang, in dit geval kunnen stap 2 en stap 3 worden overgeslagen.
- Page 106 Reiniging en onderhoud Beschrijving Mogelijke oorzaak Oplossing Controlelampje • Printplaat of • Schakel de stroom uit en controleer of display werkt kabelboom heeft of de stekker goed is aangesloten. niet verbindingsproblemen. Abnormaal • Zitten de • Controleer of de geluid bevestigingsbouten nog bevestigingsbouten zijn steeds op hun plaats.
- Page 107 Reiniging en onderhoud Transport BELANGRIJKE STAPPEN BIJ HET VERPLAATSEN VAN HET APPARAAT • Haal de stekker uit het stopcontact en draai de watertoevoerkraan dicht. • Controleer of de deur en de wasmiddellade goed gesloten zijn. • Verwijder de watertoevoerleiding en de afvoerslang van de installaties in uw woning. •...
- Page 108 Productfiche Productfiche Naam of handelsmerkvan de leverancier (a),(c) Adres van leverancier (a),(c) Typeaanduiding : WF 714 A W566C / WF 714 A S566C Algemene productparameters: Parameter Waarde Parameter Waarde Hoogte Nominaal vermogen Afmetingen in cm Breedte (a),(c) (kg) Diepte Energie-efficiëntie-...
- Page 109 Productfiche Geluidsemissie Geluidsemissie via via de lucht in de de lucht-klasse centrifugefase (centrifugefase) (dB(A) re 1 pW) Stand-bymodus Uit-modus (W) (indien 0,50 (W) (indien van van toepassing) toepassing) Uitgestelde start Netwerkgebonden (W) (indien van 4,00 stand-by (W) (indien toepassing) van toepassing) Minimale duur van de door de leverancier geboden garantie (a),(c) Dit product is ontworpen om zilverionen...
- Page 110 Productfiche Naam of handelsmerkvan de leverancier (a),(c) Adres van leverancier (a),(c) Typeaanduiding : WF 814 A W566C / WF 814 A S566C Algemene productparameters: Parameter Waarde Parameter Waarde Hoogte Nominaal vermogen Afmetingen in cm Breedte (a),(c) (kg) Diepte Energie-efficiëntie- Energie- 51,9 index (EEI...
- Page 111 Productfiche Geluidsemissie Geluidsemissie via via de lucht in de de lucht-klasse centrifugefase (centrifugefase) (dB(A) re 1 pW) Stand-bymodus Uit-modus (W) (indien 0,50 (W) (indien van van toepassing) toepassing) Uitgestelde start Netwerkgebonden (W) (indien van 4,00 stand-by (W) (indien toepassing) van toepassing) Minimale duur van de door de leverancier geboden garantie (a),(c) Dit product is ontworpen om zilverionen...
- Page 112 Productfiche Naam of handelsmerkvan de leverancier (a),(c) Adres van leverancier (a),(c) Typeaanduiding : WF 1214 A W566C / WF 1214 A S566C Algemene productparameters: Parameter Waarde Parameter Waarde Hoogte Nominaal vermogen Afmetingen in cm Breedte (a),(c) (kg) Diepte Energie-efficiëntie- Energie- 52,0 index (EEI...
- Page 113 Productfiche Geluidsemissie Geluidsemissie via via de lucht in de de lucht-klasse centrifugefase (centrifugefase) (dB(A) re 1 pW) Stand-bymodus Uit-modus (W) (indien 0,50 (W) (indien van van toepassing) toepassing) Uitgestelde start Netwerkgebonden (W) (indien van 4,00 stand-by (W) (indien toepassing) van toepassing) Minimale duur van de door de leverancier geboden garantie (a),(c) Dit product is ontworpen om zilverionen...
- Page 114 ¡Muchas gracias! M u c h a s g r a c i a s p o r h a b e r e le g i d o n u e s t ro p ro d u c t o VA L B E R G .
- Page 115 Índice Partes Descripción del Especificaciones aparato Instalación Utilización del Funcionamiento aparato Limpieza y mantenimiento Limpieza y Solución de problemas mantenimiento Transporte Ficha del producto...
- Page 116 Descripción del aparato Partes Tapa superior Puerta Panel de control Dispensador de detergente Cable de alimentación Manguera de suministro de agua Tambor 4 tapas 1 manguera de suministro de agua Tubo de desagüe fría Tapa de mantenimiento Esponja acústica o panel acústico Nota: •...
- Page 117 Descripción del aparato Especificaciones WF 714 A W566C WF 814 A W566C WF 1214 A W566C Modelo: WF 714 A S566C WF 814 A S566C WF 1214 A S566C Fuente de 220-240V~, 50Hz alimentación: Corriente máx.: Presión de agua 0,05 MPa ~ 1 MPa estándar:...
- Page 118 Utilización del aparato Instalación Área de instalación ¡Advertencia! • ¡La estabilidad es importante para evitar que el producto se desplace! Asegúrese de que la lavadora esté en posición vertical, nivelada y estable. • Asegúrese de que el producto no esté colocado sobre el cable de alimentación. •...
- Page 119 Utilización del aparato Retire la caja de cartón y el embalaje de espuma de poliestireno. Levante la lavadora y retire el embalaje de la base. Asegúrese de que la espuma triangular pequeña (a) se retire junto con el embalaje inferior. En caso contrario, coloque el aparato sobre su superficie lateral y retírela manualmente.
- Page 120 Utilización del aparato Conecte la manguera de suministro de agua ¡Advertencia! Para evitar fugas o daños por agua, siga las instrucciones incluidas en este capítulo. • No retuerza, aplaste ni modifique la manguera de entrada de agua. Conecte la manguera de suministro de agua a la válvula de entrada de agua y un grifo de agua fría tal y como se indica.
- Page 121 • Esponja acústica: WF 1214 A W566C / WF 1214 A S566C • Panel acústico: WF 814 A W566C / WF 814 A S566C / WF 714 A W566C / WF 714 A S566C Funcionamiento Inicio rápido ¡Precaución! •...
- Page 122 Utilización del aparato Pulse [ ] para iniciar el aparato y espere hasta que aparezca “****” en la pantalla. • Antes del lavado Enchufar Abrir el grifo Cargar Cerrar la puerta Añadir el detergente Nota: • Es necesario añadir detergente en el compartimento I si se selecciona la función de prelavado.
- Page 123 Utilización del aparato Seleccionar la función o mantener los ajustes predeterminados Pulsar Inicio/Pausa para iniciar el programa • Después del lavado Tono de aviso y aparece “End” en la pantalla. Antes de cada lavado • La temperatura ambiente de la lavadora deberá ser de 5-40 °C. Si se usa a menos de 0 °C, la válvula de entrada y el sistema de desagüe pueden sufrir daños.
- Page 124 Utilización del aparato ¡Advertencia! • Lavar una sola prenda puede causar fácilmente una gran excentricidad y emitir una alerta debido a un gran desequilibrio. Por lo tanto, se recomienda añadir una o dos prendas más para lavarlas juntas para que el centrifugado se pueda hacer sin problemas.
- Page 125 Utilización del aparato Programa Algodón Sintético Mixto Ropa de bebé Ropa deportiva Vaqueros Rápido 45'/15' Higiene de vapor ...
- Page 126 Utilización del aparato Nota: • El detergente o aditivo aglomerante o viscoso se puede diluir en un poco de agua antes de echarlo en el dispensador de detergente, para evitar que su entrada se bloquee y provoque un desbordamiento del agua. •...
- Page 127 Utilización del aparato Programas Disponibles según el tipo de prendas. La pantalla muestra los ajustes, el tiempo restante estimado, las opciones y los mensajes del estado de la Pantalla lavadora. La pantalla permanecerá encendida durante todo el ciclo. Pantalla • Tiempo de lavado •...
- Page 128 Utilización del aparato Programas Modelo: WF 714 A W566C; WF 714 A S566C; WF 814 A W566C; WF 814 A S566C; WF 1214 A S566C; WF 1214 A W566C Programa Carga (kg) Hora predeterminada 12,0 12,0 0:45 0:45 0:45 Rápido 45'/15'...
- Page 129 Utilización del aparato WF 714 A W566C / WF 714 A S566C Ciclo 20 °C 1:01 0,177 65%/1000 3:44 1,392 53%/1400 Algodón 2:01 1,212 65%/1000 Ropa de bebé 1:20 0,696 65%/1000 Mixto 1:30 1,158 65%/1000 Mixto 60 °C 0:45 0,131 70%/800 Rápido 45'/15'...
- Page 130 Utilización del aparato WF 814 A W566C / WF 814 A S566C Ciclo 20 °C 1:01 0,183 65%/1000 3:44 1,498 53%/1400 Algodón 2:01 1,317 65%/1000 Ropa de bebé 1:20 0,754 65%/1000 Mixto 1:30 1,263 65%/1000 Mixto 60 °C 0:45 0,131 70%/800 Rápido 45'/15' 3:38...
-
Page 131: Rápido 45'/15
Utilización del aparato WF 1214 A W566C / WF 1214 A S566C Ciclo 20 °C 1:01 0,206 65%/1000 12,0 3:44 1,919 53%/1400 Algodón 60 °C 12,0 1:20 0,988 65%/1000 Mixto 12,0 1:30 1,684 65%/1000 Mixto 60 °C 0:45 0,131 75%/800 Rápido 45'/15' 12,0 4:00... -
Page 132: Higiene De Vapor
Utilización del aparato Programas Programas disponibles según el tipo de prendas. Programas Telas muy resistentes o resistentes al calor de algodón o de lino. Algodón Lave prendas sintéticas, por ejemplo: camisas, abrigos o mezclas. Cuando se laven los tejidos de punto, la cantidad de detergente se Sintético reducirá... -
Page 133: Lana
Utilización del aparato Lana lavable a mano o a máquina o telas con mucha lana. Programa de lavado especialmente suave para evitar la Lana contracción, pausas más largas del programa (las telas reposan en la solución de lavado). Solo Centrifugado extra con una velocidad seleccionable. centrifugado La temperatura más alta alcanzada por la ropa en el ciclo de lavado durante al menos 5 minutos. -
Page 134: Limpieza Del Tambor
Utilización del aparato Opción Modelo: WF 714 A W566C; WF 714 A S566C; WF 814 A W566C; WF 814 A S566C; WF 1214 A S566C; WF 1214 A W566C Velocidad de Temperatura centrifugado Ciclo predeterminada Funciones adicionales predeterminada (°C) en rpm... - Page 135 Utilización del aparato Temp. Cuando sea necesario, la temperatura de lavado se puede ajustar presionando el botón de temperatura en los siguientes pasos: Frío - 20 °C - 30 °C - 40 °C - 60 °C - 90 °C. Centrifugado Cuando sea necesario, la velocidad de centrifugado se puede ajustar presionando el botón Velocidad en los siguientes pasos: 1400: 0-600-800-1000-1200-1400...
- Page 136 Utilización del aparato Algodón, Sintético, Vino tinto, bebida Bebidas Mixto, Ropa de bebé caliente, refresco Ropa deportiva Algodón, Sintético, Manchas de hierba, y de fitness Mixto, Ropa deportiva polvo, manchas de sudor Actividades Algodón, Sintético, Grasa, manchas de al aire libre y Mixto, Ropa deportiva, barro, pigmento de trabajo...
- Page 137 Utilización del aparato Silenciar el tono de aviso Elija el programa Mantenga presionados los botones [Antimanchas] y [Opción] durante 3 segundos y el tono de aviso se silenciará. Para activar la función del tono de aviso, presione el botón de nuevo durante 3 segundos.
- Page 138 Limpieza y mantenimiento Limpieza y mantenimiento ¡Advertencia! • Desenchufe siempre el aparato y cierre el grifo de agua antes de la limpieza y el mantenimiento. Limpieza de la carcasa El mantenimiento adecuado de la lavadora puede alargar su vida útil. La superficie se puede limpiar con detergentes neutros no abrasivos diluidos cuando sea necesario.
- Page 139 Limpieza y mantenimiento Limpieza del cristal y la junta de la puerta Limpie el cristal y la junta después de cada lavado para eliminar pelusas y manchas. Si se acumulan pelusas, pueden producirse fugas. Quite todas las monedas, botones y otros objetos que hayan podido quedar en la junta después de cada lavado.
- Page 140 Limpieza y mantenimiento 6. Limpie el filtro de entrada cada 3 meses para asegurarse de que el aparato funcione con normalidad. Limpie el dispensador de detergente 1. Presione hacia abajo el botón de liberación [ ] de la tapa del suavizante y saque de la cavidad el cajón del dispensador.
- Page 141 Limpieza y mantenimiento 1. Abra la tapa inferior. 2. Gire 90° y saque el tubo de desagüe de emergencia, y quite la tapa del tubo. 3. Después de que se haya vaciado el agua, vuelva a colocar el tubo de desagüe. 4.
- Page 142 Limpieza y mantenimiento ¡Precaución! • Asegúrese de que la tapa de la válvula y el tubo de desagüe de emergencia se vuelvan a instalar correctamente, deberá insertar las muescas de la tapa alineándolas con las muescas del agujero; de lo contrario, podrían producirse fugas de agua.
- Page 143 Limpieza y mantenimiento Descripción Posible causa Solución Fugas de agua • Las conexiones • Revise y deje bien sujeta la manguera no están lo de entrada de agua. suficientemente • Revise y limpie la manguera de salida. apretadas. Residuos de •...
- Page 144 Limpieza y mantenimiento ¡Advertencia! Riesgo de descarga eléctrica • Nunca intente reparar un aparato que esté defectuoso o presuntamente defectuoso. Podría poner en peligro su propia vida o la de futuros usuarios. Solo los especialistas autorizados pueden realizar estos trabajos de reparación. •...
- Page 145 Ficha del producto Ficha del producto Nombre del proveedor o marca comercial (a),(c) Dirección del proveedor (a),(c) Identificador del modelo : WF 714 A W566C / WF 714 A S566C Parámetros generales del producto: Parámetro Valor Parámetro Valor Altura Capacidad nominal...
- Page 146 Ficha del producto Capacidad 3:28 nominal Duración del Media 2:42 Tipo independiente programa (h:min) carga Cuarto de 2:42 carga Emisiones de ruido Clase de emisión acústico aéreo en la de ruido acústico fase de centrifugado aéreo (fase de (dB(A) re 1 pW) centrifugado) Modo apagado (W) Modo de espera (W)
- Page 147 Ficha del producto Nombre del proveedor o marca comercial (a),(c) Dirección del proveedor (a),(c) Identificador del modelo : WF 814 A W566C / WF 814 A S566C Parámetros generales del producto: Parámetro Valor Parámetro Valor Altura Capacidad nominal Dimensiones en cm Ancho (kg) (a),(c)
- Page 148 Ficha del producto Emisiones de ruido Clase de emisión acústico aéreo en la de ruido acústico fase de centrifugado aéreo (fase de (dB(A) re 1 pW) centrifugado) Modo apagado (W) Modo de espera (W) 0,50 (si procede) (si procede) Retardo en el inicio Modo de espera en 4,00 (W) (si procede)
- Page 149 Ficha del producto Nombre del proveedor o marca comercial (a),(c) Dirección del proveedor (a),(c) Identificador del modelo : WF 1214 A W566C / WF 1214 A S566C Parámetros generales del producto: Parámetro Valor Parámetro Valor Altura Capacidad nominal Dimensiones en cm Ancho (kg) (a),(c)
- Page 150 Ficha del producto Emisiones de ruido Clase de emisión acústico aéreo en la de ruido acústico fase de centrifugado aéreo (fase de (dB(A) re 1 pW) centrifugado) Modo apagado (W) Modo de espera (W) 0,50 (si procede) (si procede) Retardo en el inicio Modo de espera en 4,00 (W) (si procede)
- Page 152 CONDITION DE GARANTIE Ce produit est garanti pour une période de 2 ans à partir de la date d’achat*, contre toute défaillance résultant d’un vice de fabrication ou de matériau. Cette garantie ne couvre pas les vices ou les dommages résultant d’une mauvaise installation, d’une utilisation incorrecte ou de l’usure anormale du produit.
Need help?
Do you have a question about the WF 714 A W566C and is the answer not in the manual?
Questions and answers
J ai ma machine à laver elle fonctionne plus elle indique cl elle clignot