Table of Contents
Advertisement
Available languages
Available languages
Quick Links
Advertisement
Table of Contents

Related Manuals for iOttie Auto Sense


Summary of Contents for iOttie Auto Sense
- Page 1 Auto Sense Dash & Windshield Mount Manual • Guide • Manuale • Handbuch • Manual...
-
Page 2: Auto Sense
Auto Sense Dash & Windshield Mount User Manual English French Italian German Spanish... -
Page 3: Getting Started
Qi Wireless Charging in Vehicle Dual Car Charger with Use the included iOttie car charger and micro USB cable. If you use a third Micro USB cable party car charger, ensure that it is Qualcomm Quick Charge 2.0 or above. -
Page 4: Installation
Installation Option B Windshield Installation or Curved Glass Installation 1. Assembling the Mount Choose a location on the windshield and wipe any dust or debris from the surface. STICKY SUCTION CUP A. Connect the Mount Cradle with B. Then, tighten the Cradle Knob. the Ball Joint. -
Page 5: Adjusting The Mount
Using the Auto Sense Mechanism Adjusting the Mount Once it is unplugged or car is turned off, the Auto Sense’s internal battery keeps a charge for up to one hour. Mounting and Charging 90% Charged Foot Knob Out of box, the foot knob is set to Move the knob down until laser regular sized phones. -
Page 6: Charging Indicator
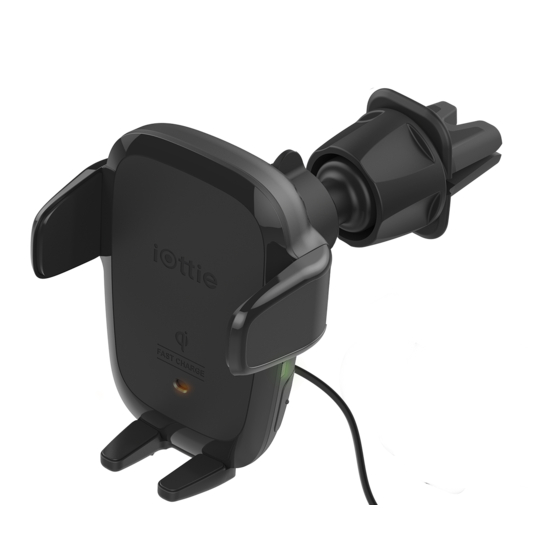
4.8" with Qi coils. WIDTH 3" The Qi coil on the mount is located at the top, above the iOttie logo. Please follow the guide below to line up your phone with the device for an optimal wireless charging. HEIGHT 4"... - Page 7 Compatibilité Compatible avec la charge rapide sans fil Apple, Google & Samsung. Le « Auto Sense » offre une charge rapide sans fil 4 tous les smartphones Pied réglable compatibles avec Qi (la vitesse Qi dépend de la marque et du modéle du téléphone).
-
Page 8: Connexion De L'alimentation
Installation Option B Installation sur pare-brise ou installation sur verre incurvé 1. Assemblage du montage Choisissez un emplacement sur le pare-brise et éliminez toute poussière ou débris de la surface. 1. Connectez le support de montage 2. Serrez ensuite le bouton avec la rotule d’attelage. - Page 9 L’utilisation du mécanisme de Ajustement de l’assemblage détection automatique Le montage et le chargement Une fois que le mécanisme de détection automatique est débranché ou que la voiture est allumée, la batterie interne de ce mécanisme garde une charge pendant une période allant jusqu’à une heure 90% Charged Vis du pied Hors de la boîte, le bouton de pied...
-
Page 10: Indicateur De Charge
à un bon alignement avec les bobines Qi. LARGEUR 7.62 cm La bobine Qi sur le support se situe en haut, au-dessus du logo iOttie. Veuillez suivre le guide suivant pour aligner votre téléphone avec le HAUTEUR 10.2 cm... - Page 11 Micro USB Caricabatteria Wireless Qi per auto Utilizzare il caricabatteria per auto e il cavo Micro USB di iOttie in dotazione. Si vous utilisez un chargeur de voiture tiers, assurez-vous qu’il s’agit de Qualcomm Quick Charge 2.0 ou supérieur.
-
Page 12: Installazione
Installazione Opzione B L’Instalazione sul parabrezza o vetro curvo 1. Il montaggio del supporto Scegliere una posizione sul parabrezza e asciugare la polvere e detriti dalla superficie. 1. Collegare la base del supporto 2. Stringere la manopola con il giunto sferico. della base. - Page 13 Rilascio del dispositivo I tasti ai lati del dispositivo possono aprire e chiudere le braccia. E’ possibile premerne uno o entrambi. L’Auto Sense funziona tramite cavo micro USB Manopola telescopico Manopola girevole o a batteria. Non vi è alcun tasto di accensione...
- Page 14 Guida di allineamento della Qi Specifiche del Caricatore Wireless DC 9.0V-1.67A La bobina del ricevitore del Qi si trova di solito nella parte centrale del telefono. INPUT DC 5.0V-2.0A Verifica con il produttore del telefono la posizione della bobina Qi. Di seguito sono riportati alcuni esempi dei telefoni più...
-
Page 15: Erste Schritte
Erste Schritte Auf einen Blick Rückansicht Befolgen Sie für einen optimalen Einbau die detaillierten Anweisungen in diesem Handbuch, wenn Sie das Auto Sense verwenden. iOttie haftet nicht Wiegeknopf für mögliche Schäden, die auf Grund einer unsachgemäßen Verwendung des Produkts entstehen. -
Page 16: Anschließen Der Stromversorgung
Installationsanweisungen. Option B Windschutzscheibeninstallation oder gebogene 1. Montage der Halterung Glasinstallation Wählen Sie einen Ort an der Windschutzscheibe und wischen Sie Staub oder Schmutz von der Oberfläche ab. A. Verbinden Sie die Montagehalterung B. Dann ziehen Sie den mit dem Kugelgelenk. Wiegeknopf fest. - Page 17 Verwendung des Auto Sense- Einstellung der Halterung Mechanismus Sobald die Vorrichtung vom Stromnetz getrennt oder das Auto gestartet wird, ist der interne Akku von Auto Sense ungefähr eine Stunde lang geladen. Montieren und Aufladen 90% Charged Fußknopf Der Standfußregler ist standardmäßig Den Fuß...
- Page 18 Qi-Ausrichtungshilfe Drahtloses Ladegerät-Spezifikationen Die Qi-Empfängerspule befindet sich in der Regel im mittleren Bereich des DC 9.0V-1.67A EINGABE Telefons. Informieren Sie sich beim Hersteller Ihres Mobiltelefons über die DC 5.0V-2.0A Position der Qi-Spule. LADEANSCHLUSS MICRO USB Bei größeren (Plus)-Smartphones oder größeren Hüllen muss der Knopf an der Halterung entsprechend der Markierung auf der Rückseite eingestellt LÄNGE 12.2 cm...
- Page 19 De un vistazo Vista Posterior Para conseguir un fijación ideal, siga atentamente las instrucciones que se incluyen en este manual al usar el Auto Sense. Ottie no es responsable por Perilla de la horquilla posibles daños debidos al uso incorrecto del producto.
-
Page 20: Instalación
Instalación Opción B Instalación en parabrisas o vidrio curvo 1. Colocación del soporte Elija un lugar en el parabrisas y limpie el polvo o residuos de la superficie. 1. Conecte la horquilla a la 2. Apriete la perilla de junta esférica. la horquilla. -
Page 21: Ajuste Del Soporte
Uso del Mecanismo de Autodetección Ajuste del soporte Luego de haber desenchufado el dispositivo o de haber apagado el vehículo, la batería interna de autodetección conserva la carga por hasta una hora. Montaje y Carga 90% Charged Perilla de la base Si se desea colocar teléfonos de La perilla de ajuste del pie viene mayor tamaño o con fundas más... -
Page 22: Indicador De Carga
ANCHO 7.62 cm La bobina de carga Qi esta localizada sobre el logo iOttie. Siga las ALTURA 10.2 cm instrucciones que aparecen más abajo para alinear su teléfono con el dispositivo y optimizar la carga inalámbrica. -
Page 23: Operational Warnings
FCC Part 15 Compliance Operational Warnings This device complies with Part 15 of the FCC Rules. Operation is subject to the During the charging process, the transfer of electricity gives off heat. Your following two conditions: device may become warm, but should not become exceedingly hot. (1) This device may not cause harmful interference, and (2) this device must If the device gets wet, please cease charging immediately. - Page 24 *All measurements are based on FCAR Car Models as described by the ACRISS Class Clode system. EU Declaration Hereby, iOttie declares that the radio equipment type HLCRIO164 is in compliance with Directive 2014/53/EU.The full text of the EU Declaration of Conformity is available at the following web address: https://www.iottie.com/wp-content/uploads/2023/05/doc-hlcrio161_164_165.pdf...
Need help?
Do you have a question about the Auto Sense and is the answer not in the manual?
Questions and answers