Table of Contents
Advertisement
Quick Links
The uScope – Getting started
Introduction
The uScope! A single channel, pocket-sized,
digital storage oscilloscope that ¡s small, quick,
and powerful. Automotive presets get you going
quickly. Ideal for the Flat Rater that wants the
ultimate run and gun lab scope for pin point
testing. Ideal for the student that is ready to
start scope'n.
The uScope is powered by an easy to use
interface enhanced with automotive presets and
reference waveforms.
Put the power of the uScope in your hand (and shirt
Secondary ignition, injectors, mass air flow, crank,
cam, TPS, 02, CTS you name it it'll scope it. The
uScope is also perfect for your low amp probe,
secondary ignition pickup and pressure transducers.
www.AESwave.com
AES uScope Manual
(fw 4.19 October 1, 2011)
pocket).
Copyright 2011 by Automotive Electronics Services, Inc.
When you just need to run a quick
test to verify the "signal" is working
as the engineer intended, why spend
time pulling out and setting up your
"big boy Scope" when you can do it
faster with the uScope?
Page 1
Advertisement
Table of Contents

Subscribe to Our Youtube Channel
Related Manuals for AES uScope


Summary of Contents for AES uScope
- Page 1 When you just need to run a quick Put the power of the uScope in your hand (and shirt test to verify the "signal" is working pocket). as the engineer intended, why spend...
-
Page 2: First Time Use
Test Lead Connection The test lead connects to the uScope via an audio plug. The signal rides on the tip of the audio plug. If the tip of the test lead plug touches ground while the test lead is connected to a circuit, the circuit will short. -
Page 3: Memory Card (Microsd Card)
USB to PC Connection and Charging Port The USB connector is a standard micro USB and is located in the middle left side of unit. This port is used for PC and uScope communication and for charging the uScope. Memory Card – microSD Card The uScope incorporates a microSD memory card. -
Page 4: Main Buttons
AES uScope Manual Main Buttons [On/Off] Turn uScope on or off Slide switch located on bottom right side of uScope Two actions 1. Quick press A quick Press of “A” will switch between “stop” or “run” of the waveform. 2. Long Press... - Page 5 Waveform Capture not using a PreSet: 1. Turn on the uScope by sliding the switch located on the top right of unit to the right. 2. Use the UP | DOWN arrow keys and highlight the “Tr” (Trigger) menu item.
- Page 6 AES uScope Manual 9. To see more of the signal or less of the signal: a. Use the UP | DOWN arrow keys and highlight the “.T” (Time Settings) menu item. b. Press “OK” and the menu will open c. Use the UP | DOWN arrow keys and highlight “T/Div”...
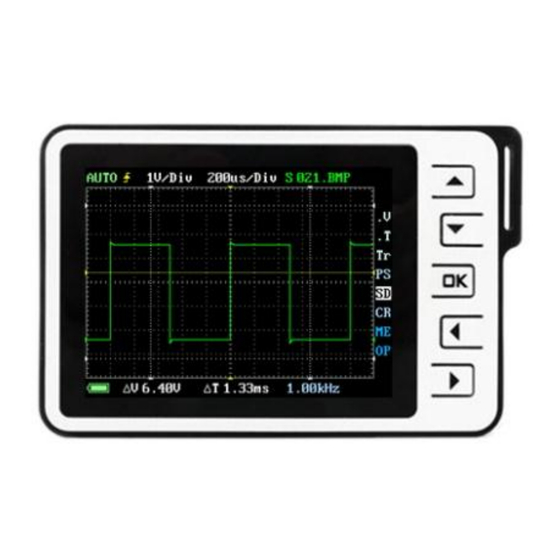
- Page 7 AES uScope Manual Switching between MENU and Grid Values Display with Menu Display with Grid Values To switch between GRID VALUES and the MAIN MENU press and hold the “A” button for approximaely .5 seconds. (Please note: Tapping the “A” button for less than .5 seconds will hold the signal) Page 7 www.AESwave.com...
- Page 8 Highlight “Tr.” Mode Use LEFT/RIGHT to select the desired trigger display mode Trigger mode is indicated at the top Left of uScope screen Press “OK” to exit menu Page 8 www.AESwave.com Copyright 2011 by Automotive Electronics Services, Inc.
- Page 9 Trigger Slope will be indicated by a yellow or red arrow just to the right of the trigger mode at top left of the uScope screen Note: When the trigger is red, this indicates the trigger is out of range.
-
Page 10: Cursor Values
Highlight Probe Cal At the top right of the screen, the uScope will specify what attenuation setting you are currently on (Note: 10x does not change anything within the scope other than the voltage settings will be 10x larger – 1volt per division will read 10 volt per division. - Page 11 Message will appear on the upper right confirming the save “Save ok” Press “OK” to exit menu Reset Factory Default To reset your uScope to factory default settings. Use UP/DOWN to select “Reset Factory Default” Press and hold “OK”...
-
Page 12: Firmware Updates
Connect your uScope to any active USB port on a PC or charging station. Note: to verify the uScope is charging, turn on the uScope and look at the bottom left of the screen, you should see the word “USB.” If you see a battery icon, then the uScope is connected to an inactive USB port or not properly connected.
Need help?
Do you have a question about the uScope and is the answer not in the manual?
Questions and answers