Table of Contents
Advertisement
Quick Links
Advertisement
Table of Contents

Related Manuals for Hydro Mist Pro Series


Summary of Contents for Hydro Mist Pro Series
- Page 1 Pro Series Misting Pump Table 1 Operating Manual...
-
Page 2: Table Of Contents
Table Of Contents 1 - Overview ----------------------- 01 1.1. Specifications and Basic Functions 1.2. Dimensions ------------------------------------------------------- 02 1.3. Identifying the Components ------------------------------- 03 2 - Quick Set-up ------------------------------------- 04 2.1. Installing the Machine ----------------------------------------------- 04 2.2. Pro II Diagram 2.3. Infrared Remote Control ---------------------------------- 05 ---------------------------------------------------------- 06 3 - Correct Use... -
Page 3: Overview
1 - Overview 1.1 Secifications and Basic Functions Model Pro 75 (F10-04-007) Pro 100 (F10-04-008) Max. Pressure 1000 PSI / 70 BAR Pro 75 Pro 100 Flow Rate 0.72 gpm @ 1750rpm 0.95 gpm @ 1750rpm Single Phase Induction Motor 120V/60Hz Electric Motor Pro75 = 3/4HP Pro 100 = 1 HP... -
Page 4: Dimensions
1.2 Dimensions (inches) 22.5... -
Page 5: Identifying The Components
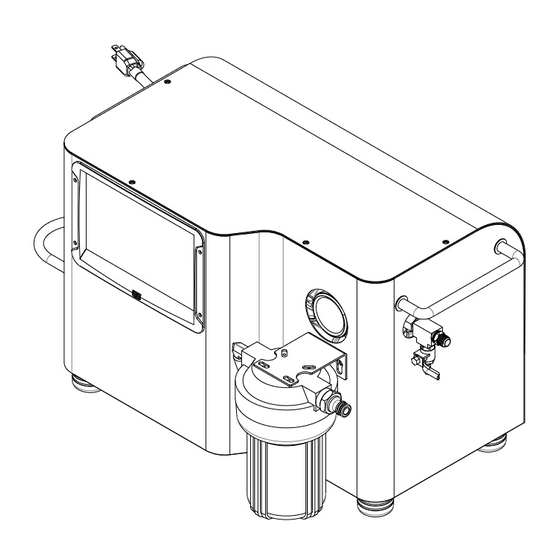
1.3 Identifying the Components Table LCD control Panel Pressure Gauge Carry Handle 1/4" Connector, Outlet Sensor for Temp. & Humidity Hose Coupler, Inlet Power Cable with Plug 5”Inlet Water filter Housing Table Motor Overload Breaker Reset Power Cable Port Main Power Button CAUTION: The Power Cable provides electricity into the pump housing. -
Page 6: Quick Set-Up
2 - Quick Set-up 2.1 Installing the Machine 2.1.1 Unpack the Machine 2.1.1.1 Remove the pump from the box and verify all accessories present. Check the machine to see if there is any damage. 2.1.2 Install the water supply line 2.1.2.1 Connect a garden hose to the inlet fitting securely. -
Page 7: Infrared Remote Control
2.2 Misting System Diagram A Basic Diagram of Misting System Power Cable Water Supply Hose PRO II Misting Pump Misting Nozzle Circuit 2.3 Infrared Remote Control Function Keys for Remote Control Stop START key STOP key 2.3.1 Attach the provided remote control holder onto a wall or other location with the included screw. -
Page 8: Correct Use
3 - Correct Use 3.1 Attention 3.1.1 The pump should not be powered on during adverse weather conditions (such as rain, electrical storm, flood, or other dangerous weather). 3.1.2 Only trained operators should use the pump. Children and adults who are not trained should be restricted from operating the machine. -
Page 9: Operating Guide
3.3 Operational Notices 3.3.1 The water supply hose must be at least 3/8" size garden hose. 3.3.2 Extension cables should not be used to power the unit. If necessary, keep the cable length below 25 feet, and use an adequately rated cord designed for outdoor use. 3.3.3 Verify the flow rate for water supply is at least 1 gpm. -
Page 10: Control Panel Functions
4.2 Control Panel Functions Mode Enter Time Temp Mist Rest Humidity Guide of Function Keys Humidity ON/OFF Control Panel Power Humidity Control Button RUN/STOP Current Program Mode Change Button Mode Temp Temperature Control Button Enter Enter Button Mist Mist ActivateTime Setting Up Button Button Rest... -
Page 11: Overview Of The Lcd Monitor
4.3 Overview of the LCD Monitor Introduction of the LCD Monitor Week Schedule Display Units (Celsius/Fahrenheit) Displays the Mode Selected Numerical Value (Humidity/Time) Display for 1st Time Interval % (When Humidity Value) Displayed When Display for 2nd Time Interval Maintenance is Required Displays During Running Insufficient Water Supply Symbol Weekday Selection... -
Page 12: Misting Controller Operation
4.4 Misting Controller Operation 4.4.1 Remote Controller, Buzzer, Function Keys 4.4.1.1 Push the ON/OFF button once to turn on the control screen (the water sensor alarm will sound until water is supplied to the pump inlet). Push the button again to turn off the control screen. 4.4.1.2 With the control screen on, pressing the RUN key on the remote control will activate the current program. - Page 13 4.4.6 Enter ENTER, UP, and DOWN Keys 4.4.6.1 Select a function key to set the mode/function, push UP key and/or DOWN key to adjust the value, then push ENTER key to confirm the selection. 4.4.7 TEMP-Key:( The default setting is off ) 4.4.7.1 When the machine is in STOP status, push the key one time to activate or disable temperature monitoring function.
- Page 14 4.4.8.2 Humidity monitoring display is shown as follows: When users activate the humidity monitoring function, the numerical value is shown and the“%” indicator flashes. When users disable the humidity monitoring function, the“%”indicator will be steady (not flashing). 4.4.8.3 When the machine is in STOP status, push the key for 3 seconds and the numerical value and the“%”indicator will will flash on the LCD.
- Page 15 4.4.10 REST-Key 4.4.10.1 When the machine is in STOP status, select mode 4 to set the rest time. 4.4.10.2 Set “Minute” by pushing UP or DOWN keys. Push UP key:00 -> 01 …->57->58->59 Push DOWN key :59 -> 58 …-> 02-> 01-> 00 4.4.10.3 After setting the “Minute”, push ENTER for“Second”...
- Page 16 Definition of Misting Modes 1 to 4.4.12 Mode 4.4.12.1 Mode 1:Misting 15 sec. and rest 20 sec. 4.4.12.2 Mode 2:Misting 25 sec. and rest 30 sec. 4.4.12.3 Mode 3:Misting 40 sec. and rest 40 sec. 4.4.12.4 Mode 4:Programmable, refer to 4.4.9. and 4.4.10. 4.4.12.5 Mode 5:Weekly cycle set by user.
- Page 17 4.4.13.10 The setting RUN and STOP data will not be saved, until both periods are set. Any time, when users push TIME key or wait for 15 seconds without setting new value during the setting procedure, system will neglect current setting. In order to save current settings, the time of weekday RUN and STOP periods must be set.
- Page 18 4.4.14 Insufficient Water Supply Warning 4.4.14.1 When water supply is insufficient, the warning icon will flash and the alarm will sound. The alarm will continue to sound and the pump will stay stopped until water is supplied to the inlet. 4.4.14.2 In order to relieve the WARNING, please check and eliminate the insufficient water supply condition.
-
Page 19: Troubleshooting
5 - Troubleshooting Problem Probable Cause Solution • Clean the nozzle, If it doesn't • The misting nozzle is blocked. work, change the nozzle. • Air exists in the system. • Purge air from system. • Tighten all joints connected to the water inlet. -
Page 20: Maintenance Guide
6 - Maintenance Guide In order to avoid any possibility of getting electric shock, please power off the machine before doing any maintenance and/or inspection. UNPLUG the power cable. 6.1 Open the discharge valve at the end of the pump outlet, and clean off the unit. 6.2 Remove the water supply hose and high pressure misting hose, keep the unit dry. - Page 21 6.6.2 Close the drain valve, then add 6.6.3 Tighten the top refill screw. 150 c.c. oil through the top refill hole using the provided squeeze bottle. 6.6.4 After maintenance, please recheck all bolts, screws and connectors are all tighten and fixed firmly, and check that there is no oil leaking when the pump is running..
-
Page 22: Periodic Checks And Inspection
7 - Periodic Check and Inspection Period Before Items 100h 200h 300h operation Main Pump Unit ◆ Check All Components Tightened ◆ Check Water Lines for Leakage ◆ Check Pump for Oil leakage ◆ ◆ ◆ ◆ ◆ Abnormal Sound and Vibration Check ◆... -
Page 23: Product Warranty
- Product Warranty 8.1 Warranty Content Hydromist USA (Hydromist) Warrants this product to be free from manufacturing defects in material and workmanship as follows: For a period of one (1) year from the date of shipping (whether or not actual use begins on that date). Hydromist will repair or replace defective parts at no charge. - Page 24 Except for commentaries or academic purposes, neither full manual nor partial segment of the document are allowed to be quoted and/or duplicated without written permission from Hydromist USA. Telephone : +1 (512) 225-0923 Website : www.HydroMistUSA.com E-mail : info@hydromistusa.com Hydromist reserves the right to make changes to products, specifications, and this manual without notice.
Need help?
Do you have a question about the Pro Series and is the answer not in the manual?
Questions and answers