
Related Manuals for Norelco 7865XL


Summary of Contents for Norelco 7865XL
- Page 1 7865DFU.qxd 8/2/04 05:41 PM Page 1 (Black plate) UADRA SHAVING SYSTEM 7865XL Rechargeable Tripleheader ® Cordless/Cord Razor...
- Page 2 7865DFU.qxd 8/2/04 05:41 PM Page 2 (Black plate)
- Page 3 7865DFU.qxd 8/2/04 05:41 PM Page 3 (Black plate) ENGLISH 4 ESPAÑOL 25...
-
Page 4: English
2. Use this razor for its intended household use as described in this manual. Do not use attachments not recommended by Philips Electronics North America Corporation. 3. Never operate this razor/charging stand if it has a damaged cord or charging plug, if it is not working properly, if it has... - Page 5 7865DFU.qxd 8/2/04 been dropped or damaged, or dropped into water while plugged in. Return the razor/charging stand to an Authorized Norelco Service Location for examination and repair. 4. Keep the razor, charging stand, cord and charging plug away from heated surfaces. 5.
-
Page 6: Day Money-Back Guarantee
Send dated sales slip, your complete name and address as indicated below, and the razor, prepaid to: Norelco Consumer Products Company A Division of Philips Electronics North America Corporation 450 North Medinah Rd, Dock 16 Roselle, IL 60172-2329 Please allow 4-6 weeks for delivery of check. (Please Print) -
Page 7: Table Of Contents
7865DFU.qxd 8/2/04 05:41 PM Page 7 (Black plate) ENGLISH Table of Contents Features...8-9 5 LED Battery Level Indicators ...10 Charging Stand Clock ...10-11 Before First Use...12 Charging ...12-14 Recharging...14 Quick Charge...15 Put It To The Test & Shaving Tips ...15-16 How To Shave With An Electric Razor...16 Trimming...17... -
Page 8: Features
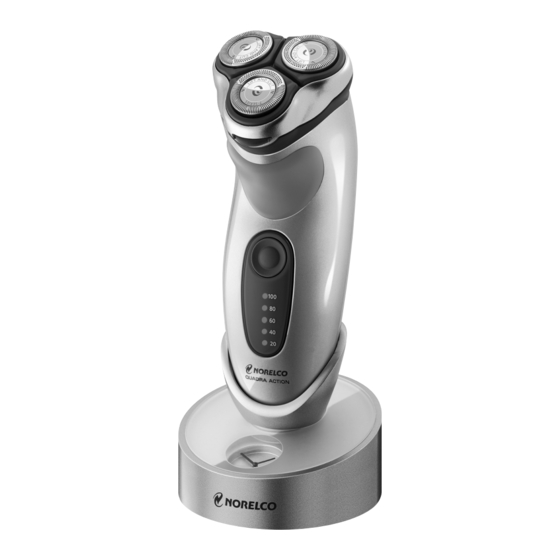
7865DFU.qxd 8/2/04 ENGLISH Features Quadra Shaving System Razor Head Assembly Protective Razor Head Cap Individually Floating Heads Razor Head Release Button • Hair Chamber captures shaven hair Electronic ON/OFF Button 5 LED Battery Level Indicators • Indicates the amount of charge remaining in batteries 05:41 PM Page 8... - Page 9 7865DFU.qxd 8/2/04 How the Unique Shaving System Makes Close Comfortable: Groove channels beard closer to cutting system 05:41 PM Page 9 (Black plate) Automatic Worldwide Voltage100V to 240V AC Storage/Travel Pouch Rechargeable - Initial cordless shave time 1-Hour Quick Charge Cordless/Cord - To shave with or without a cord Full 2-Year Warranty...
-
Page 10: Led Battery Level Indicators
7865DFU.qxd 8/2/04 ENGLISH 5 LED Battery Level Indicators The Meter provides the following information: w LED Battery Charge Meter The number (percentage) on the display indicates approximately how much power is left in the batteries. ◗ Low Battery Indicator If the batteries run low, the "20" Light on the display lights up red.When you turn the razor OFF, the "20"... - Page 11 7865DFU.qxd 8/2/04 To replace clock battery 05:41 PM Page 11 Press small, left button to set correct time. Replace clock module into underside of stand.Turn clockwise to secure in place. Turn clock module counterclockwise and remove from stand. Remove battery cover and then use a flat- bladed screwdriver to lift out the battery.
-
Page 12: Before First Use
7865DFU.qxd 8/2/04 ENGLISH Before first use ◗ Charge the razor before you start using it (see ‘Charging’). Important ◗ Only use the power plug and/or charging stand provided to charge the razor. ◗ The charging plug transforms 100 – 240V AC to 12V DC. - Page 13 7865DFU.qxd 8/2/04 Placing or removing razor from charging stand: ◗ Always place razor in stand in an upright position making sure charging contacts in bottom of stand fit into recess in bottom of razor. ◗ Always remove razor from stand by lifting straight up.
-
Page 14: Recharging
7865DFU.qxd 8/2/04 ENGLISH ◗ An adaptor plug may be necessary for charging plug usage in some foreign countries. Use an attachment plug adaptor of the proper configuration for the power outlet. The charging plug will automatically convert to work on 100V to 120V AC systems. When batteries are fully charged, all the “lights”... -
Page 15: Quick Charge
7865DFU.qxd 8/2/04 Quick Charge When batteries are totally depleted, recharging the razor for approximately 6 minutes gives enough energy for a 3-minute cordless shave. Put It To The Test & Shaving Tips ◗ 21 Day Trial and Conversion Process. It is a fact that your skin and beard need time to adjust to a new shaving system. -
Page 16: Trimming
7865DFU.qxd 8/2/04 ENGLISH Replace Quadra razor heads (model # HQ6) once a year for optimal shaving results. Trimming To groom sideburns and moustache: The trimmer can be activated while the razor is running. 05:41 PM Page 16 Turn razor ON. Shave against the direction of beard growth using both straight and circular movements. -
Page 17: Cleaning
7865DFU.qxd 8/2/04 Cleaning ◗ Regular cleaning guarantees better shaving results. ◗ Always switch Razor OFF and remove from charging stand before cleaning. ◗ Never clean, remove or replace head assembly while motor is on. ◗ Do not apply pressure to combs. Do not touch razor heads with hard objects as this may dent or damage precision-made slotted combs. - Page 18 7865DFU.qxd 8/2/04 ENGLISH NOTE: Do not wipe or dry the shaving heads with a towel or tissue.This could damage the shaving heads. Once A Month: Razor Heads Do not mix up the cutters and combs as the shaving performance may be adversely affected for several weeks before optimal shaving performance is restored.
- Page 19 7865DFU.qxd 8/2/04 Do not clean more than one cutter and comb at a time, since they are all matching sets. If you accidentally interchange the cutters and combs, it could take several weeks before optimal shaving performance is restored. The set will only fit into the Razor Head Assembly if the ‘wings’...
- Page 20 7865DFU.qxd 8/2/04 ENGLISH ◗ If the razor heads have been properly inserted, a shiny circle is visible in the middle of the razor head assembly. Once A Month: Razor Heads For optimum performance, razor cutters and combs should be cleaned in a degreasing liquid (e.g.
-
Page 21: Storage
7865DFU.qxd 8/2/04 This razor has no other user-serviceable parts. Any other service should be performed by an Authorized Service Location. Storage ◗ The razor can be placed in the charging stand for safe storage. If storing razor in stand, remove the plug from outlet as soon as the razor is fully charged. -
Page 22: Assistance
7865DFU.qxd 8/2/04 ENGLISH Assistance ◗ For assistance or the Authorized Norelco Service Location nearest you, call toll free: 1-800-243-3050 or visit our website: www.norelco.com ◗ Authorized Norelco Service Location information is available 24 hours a day, 7 days a week. Accessories ◗... -
Page 23: Battery Removal
7865DFU.qxd 8/2/04 Battery Removal ◗ This Norelco Razor contains rechargeable Nickel-Cadmium batteries, which must be disposed of properly. ◗ Batteries should only be removed when razor is to be discarded. ◗ Refer to Battery Removal instruction sheet for directions on removing the rechargeable batteries. -
Page 24: Warranty
Damage occurring during shipment is not covered by this warranty. NOTE: No other warranty, written or oral, is authorized by Philips Electronics North America Corporation. This warranty gives you specific legal rights, and you may also have other rights which vary from state to state. -
Page 25: Spanish
7865DFU.qxd 8/2/04 IMPORTANTES INSTRUCCIONES DE SEGURIDAD Cuando use una afeitadora eléctrica, debe seguir siempre las precauciones básicas incluyendo lo siguiente: Antes de usar el aparato lea todas las instrucciones. PELIGRO Para reducir el riesgo de choque eléctrico: 1. No alcance para una afeitadora corded o un soporte de carga que ha caído en el agua. - Page 26 2. Utilice esta afeitadora para el uso doméstico para el cual está destinada, tal como se describe en este manual. No utilice accesorios no recomendados por Philips Electronics North America Corporation. 3. No utilice nunca esta afeitadora o soporte de carga si la clavija o el cable cargador de red están deteriorados, si no...
- Page 27 7865DFU.qxd 8/2/04 05:41 PM Page 27 (Black plate) ESPAÑOL GUARDE ESTAS INSTRUCCIONES IMPORTANTE: La clavija adaptadora incorpora un transformador. No quite la clavija adaptadora para sustituirla por otro enchufe, ya que podría producírse una situación de peligro. IMPORTANTE SU AFEITADORA CONTIENE BATERÍAS RECARGABLES DE NIQUEL-CADMIO.
-
Page 28: Dias De Garantia De Devolución Del Dinero
Envíe el tíquet de compra con la fecha, su nombre y dirección completos tal como se indica más adelante, junto con la afeitadora a portes pagados a: Norelco Consumer Products Company A Division of Philips Electronics North America Corporation 450 North Medinah Rd, Dock 16 Roselle, IL 60172-2329 Por favor, espere entre 4 y 6 semanas a recibir el cheque. - Page 29 7865DFU.qxd 8/2/04 05:41 PM Page 29 (Black plate) ESPAÑOL Indice de Contenidos Características .....30-31 5 LED Indicador de La Batería...32 Reloj De Carga Del Soporte .
-
Page 30: Características
7865DFU.qxd 8/2/04 ESPAÑOL Características Sistema de Afeitado Quadra Montaje del Cabezal de la Afeitadora Cubierta protectora del Cabezal de la Afeitadora Conjuntos Cortantes que flotan individualmente Botón de apertura del Cabezal de la Afeitadora • La Cámara del Pelo recoge el pelo afeitado Botón electrónico de encendido/apagado 5 LED Indicador... - Page 31 7865DFU.qxd 8/2/04 El Sistema de Afeitado de Norelco "Levanta y Corta" proporciona un confortable apurado: El surco dirige la barba más cerca del sistema de corte 05:41 PM Page 31 ESPAÑOL Adaptación automática a cualquier voltaje de Cepillo de limpieza Soporte para guardarla Recargable: Carga completa inicial durante...
-
Page 32: Led Indicador De La Batería
7865DFU.qxd 8/2/04 ESPAÑOL 5 LED Indicador De Batería El Medidor proporciona la siguiente información: ◗ LED Medidor de Carga de la Batería El número (porcentaje) de la pantalla indica, aproximadamente, cuánta carga queda en las baterías. ◗ Indicador de Baterías Bajas Si las baterías están bajas, la Sección "20"... - Page 33 7865DFU.qxd 8/2/04 Para cambiar la pila 05:41 PM Page 33 ESPAÑOL Presione el botón izquierdo para ponerlo en hora. Vuelva a colocar el módulo del reloj bajo el soporte y gírelo en el sentido de las agujas del reloj para fijarlo en esa posición. Gire el módulo del reloj en el sentido contrario a las agujas del reloj para sacarlo del soporte.
-
Page 34: Antes Del Primer Uso
7865DFU.qxd 8/2/04 ESPAÑOL Antes del primer uso ◗ Cargue la afeitadora antes de comenzar a utilizarlo (véase 'Carga’). Importante ◗ Para cargar la afeitadora, utilice únicamente la clavija del enchufe y el soporte de carga suministrados. ◗ La clavija del enchufe transforma la entrada de 100-240 V de CA a 12 V de CC. - Page 35 7865DFU.qxd 8/2/04 afeitadora no se recargará mientras la use con el cable de red. ◗ No carge la afeitadora dentro de la bolsa. ◗ Regárguela sólocuando el bloque “20” se torne rojo. Colocando o quitando la afeitadora de soporte de carga: ◗...
- Page 36 7865DFU.qxd 8/2/04 ESPAÑOL Cuando cargue la afeitadora, la luz "20" de la pantalla se tornará roja. Después de unos 3 minutos se tornará verde y parpadeará. Conforme se vaya efectuando la carga, más y más secciones de luces de la pantalla del medidor parpadearán brevemente en verde y se encenderán para indicar que nivel (porcentaje) de carga se ha alcanzado.
-
Page 37: Recarga
7865DFU.qxd 8/2/04 Recarga Regarguela solo cuando el bloque “20” se torne rojo. No mantenga la afeitadora o el soporte de carga tapado permanentemente en el enchufe. Si usa el soporte de carga, quite siempre la afeitadora de hacen una pausa la elevación derecho para arriba. No incline la afeitadora. -
Page 38: Cómo Afeitarse Con Una
7865DFU.qxd 8/2/04 ESPAÑOL ◗ Al principio puede que no obtenga un afeitado tan apurado como esperaba, o incluso es posible que su cara se irrite ligeramente. Esto es normal, ya que su barba y su piel necesitarán tiempo para adaptarse. Emplee 3 semanas y podrá... -
Page 39: Cortapatillas
7865DFU.qxd 8/2/04 Para unos óptimos resultados en el afeitado, sustituya los conjuntos cortantes Quadra (modelo HQ6) una vez al año. Cortapatillas Para recortar las patillas y el bigote: El cortapatillas puede ponerse en marcha mientras la afeitadora está en funcionamiento. 05:41 PM Page 39 ESPAÑOL... -
Page 40: Limpieza
7865DFU.qxd 8/2/04 ESPAÑOL Limpieza ◗ Una limpieza regular garantiza los mejores resultados en al afeitado. ◗ Siempre apague la afeitadora y retírela de la soporte de carga antes de limpiarla. ◗ Nunca limpie, retire ni vuelva a colocar el conjunto de los cabezales mientras la afeitadora está... - Page 41 7865DFU.qxd 8/2/04 NOTA: No limpie o seque los conjuntos cortantes con una toalla o servilleta de papel. Esto puede dañar los conjuntos cortantes. Una vez al mes: Conjuntos cortantes No mezcle las cuchillas y los protectores, ya que el funcionamiento en el afeitado puede verse adversamente afectado durante varias semanas antes de que se restablezca el óptimo funcionamiento en el afeitado.
- Page 42 7865DFU.qxd 8/2/04 ESPAÑOL No limpie más de una cuchilla y un protector a la vez, ya que forman juego. Si, accidentalmente mezcla las cuchillas y los protectores, pueden ser necesarias varias semanas para recuperar el rendimiento óptimo en el afeitado. Asegúrese de que los dos bordes puntiagudos del protector encajen exactamente en los huecos.
- Page 43 7865DFU.qxd 8/2/04 ◗ Si los conjuntos cortantes han sido adecuadamente colocados, será visible un círculo brillante en el centro del bloque del cabezal afeitador. Una vez al mes: Conjuntos cortantes Para un resultado óptimo, las cuchillas y los protectores de la afeitadora deberán limpiarse en un líquido desengrasante (por ejemplo, Norelco Razor Head Cleaner, tipo RC1776, o alcohol) y lubricarse con Norelco Razor Lubricant, tipo...
- Page 44 7865DFU.qxd 8/2/04 ESPAÑOL Esta afeitadora no tiene mas partes que sean usadas por el usuario para se reparadas. Cualqier otro servicio debe ser realizado por un Servicio de Asistencia Técnica Norelco. 05:41 PM Page 44 Lubrique el cortapatillas con Norelco Razor Lubricant (tipo AL80) o con una gota de aceite mineral.
-
Page 45: Almacenamiento
7865DFU.qxd 8/2/04 Almacenamiento ◗ La afeitadora se puede colocar en el soporte de carga para el almacenaje seguro. Si almacena la afeitadora en soporte, quite el enchufe del enchufe tan pronto como la afeitadora se cargue completamente. ◗ Sea seguro que la afeitadora de ajuste está dado vuelta apagado. -
Page 46: Asistencia
7865DFU.qxd 8/2/04 ESPAÑOL Asistencia ◗ Para asistencia o para hallar el Servicio de Asistencia Técnica Norelco más cercano, llame (sin cargo) al teléfono: 1-800-243-3050 o visite nuestra página web: www.norelco.com ◗ La información sobre los Servicio de Asistencia Técnica Norelco está disponible 24 horas al día, 7 días a la semana. -
Page 47: Cómo Quitar Las Baterías
7865DFU.qxd 8/2/04 Cómo Quitar Las Baterías ◗ Esta afeitadora Norelco incluye baterías recargables de Niquel-Cadmio que deben ser desechadas adecuadamente. ◗ Las baterías sólo deben quitarse cuando la afeitadora vaya a ser desechada. ◗ Consulte en la hoja de instrucciones Cómo Quitar las Baterías recargables. -
Page 48: Garantia
(con la certificación pagada). Los deterioros producidos durante el envío no están cubiertos por esta garantía. NOTA: Ninguna otra garantía, escrita o de palabra, está autorizada por Philips Electronics North America Corporation. Esta garantía le da derechos legales específicos y también puede tener otros derechos que varían de un estado a otro.
Need help?
Do you have a question about the 7865XL and is the answer not in the manual?
Questions and answers