
Related Manuals for Smartwares C794IP


Summary of Contents for Smartwares C794IP
- Page 1 Wireless Pan/Tilt APP Camera Installation and Operating Instructions Model: C794IP PLEASE READ THESE INSTRUCTIONS CAREFULLY BEFORE USING THIS PRODUCT AND KEEP THIS MANUAL FOR FUTURE REFERENCE.
-
Page 2: Table Of Contents
CONTENTS Overview ......................2 Please Read Before You Start ..................3 Wireless Device Operating Range ................3 Important Safety Precautions ..................3 Getting Started ....................5 Kit Content ........................5 Safety and Installation Tips ..................6 Product Overview .....................7 Installation ........................8 Setup Your Camera ..................9 APP Introduction .................. -
Page 3: Overview
OVERVIEW The C794IP camera is capable of delivering high quality Digital High Definition (HD) video to your smart-mobile device(s), which would require higher internet bandwidth. Due to your local internet environment condition, your mobile device(s) may display black-screen or temporary disconnect to the C794IP camera. -
Page 4: Please Read Before You Start
PLEASE READ BEFORE YOU START Always use discretion when installing CCTV equipment, especially when there is perceived policy. Enquire relevant local regulations applicable to the lawful installation of video recording/surveillance. Third party consent may be required. WIRELESS DEVICES OPERATING RANGE Ensure the signal reception viewed from the wireless camera(s) is the best possible reception between the camera(s) and the Wi-Fi router. - Page 5 FCC Compliance Statement: This Products with CE Marking comply device complies with Part 15 of the with EMC Directive (2004/108/EC); FCC rules. Operation is subjected to Low Voltage Directive (2006/95/ the following two conditions: (1) this E C ) ; R E D ( 2 0 1 4 / 5 3 / E U ) ; R O H S device may not cause harmful interference, and (2) this Directive (2011/65/EU) issued by the Commission device must accept any interference received, including...
-
Page 6: Getting Started
KIT CONTENT Wireless App Camera Ethernet cable Camera Antenna Power Adapter Quick Start Guide Tools Required: ‧Electric drill ‧5mm masonry drill bit ‧15mm masonry drill bit ‧No. 2 Philips screwdriver For best system performance: - iOS: iPhone5 / iPad2 / Mini iPad with iOS 7.0 or above. - Android: 1.5G dual core processor dual core procesor with 1G Ram or above. -
Page 7: Safety And Installation Tips
SAFETY AND INSTALLATION TIPS Do not attempt to open the units with the power adaptor plug connected to avoid any risk of personal injury. When installing CCTV camera(s), always follow manufacturer's advice when using power tools, steps, ladders, etc. and wear suitable protective equipment (e.g. safety goggles) when drilling holes. -
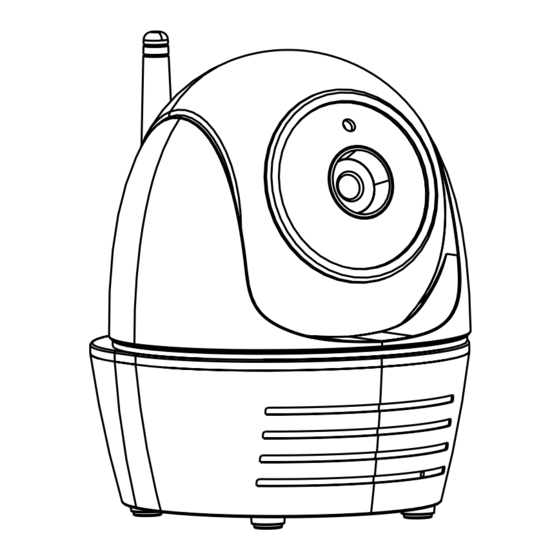
Page 8: Product Overview
PRODUCT OVERVIEW Light Sensor LENS Microphone Lan Port Reset Micro SD Card Slot Power LED Power Jack Antenna LED INDICATOR STATUS DESCRIPTION Power On Power on the camera and wait until the GREEN LED indicator becomes steady on. This process would be finished within 45 seconds and make sure the LED is flashing in GREEN. -
Page 9: Installation
INSTALLATION 1. Place the mounting bracket on the mounting surface as a pattern to mark the holes. 2. Drill the mounting holes and use the wall plug screws to secure the bracket to the wall. 3. Fasten the camera to the bracket using the tapping screws. 4. -
Page 10: Setup Your Camera
SETUP YOUR CAMERA Follow the instructions below to help configure your camera for initial use. 1. APP download Download and install the "OMGuard HD" APP to your device. For iOS For Android 2. Power on the camera Power on the camera and wait until the GREEN LED indicator becomes steady on. This process would be finished within 45 seconds and make sure the LED is flashing in GREEN. - Page 11 (iOS) (Android) 5. In the Wi-Fi setting section, enter default password:123456. Choose the appropriate Wi-Fi router on your local network. The Camera will offline for around 40 seconds to reboot for Wifi connection. When camera connects to Wi-Fi router correctly, the Green LED will stay ON.
- Page 12 In most cases, you can successfully add the camera according to the steps above. However, the camera will not find the network if Wi-Fi router turns off the SSID broadcasting function. Please enable the SSID broadcasting to complete the settings. Note: In soft AP mode, the GREEN LED long flashes once followed by 2 short flashes.
-
Page 13: App Introduction
LIVE VIEW / SNAPSHOT / RECORDING Tap to take snapshot image(s) of the video. The captured snapshots will be stored in your mobile device. Tap to turn ON/OFF the volume. Tap to Start/Stop recording. The recorded video file will be stored in the memory card of your camera. - Page 14 Control camera direction via finger swipe. Record the point When event triggered, the camera will immediately rotate to the scene. This fuction allows you record the camera position. You're able to select the record point you saved that the camera will go to the position.
- Page 15 The APP allows users to have access to live video. User can take snapshot image(s) and record the live video. If you’re using the indoor model, you can also choose the color tone according to the lighting condition. By default, the APP applies the ‘indoor’ option with warm-yellow color tone for the indoor models.
-
Page 16: View Your Videos
VIEWING YOUR SNAPSHOTS For iOS Your snapshots will be named with the time stamp and saved into the Camera Roll location of your mobile device. For Android Your snapshots will be named with the time stamp and saved into the Photo Gallery > snapshot folder on your mobile device. - Page 17 Tap EVENT LIST icon and the Date-Time filter would appear. User may define the period for system to display all available recorded file(s) for playback. During the playback, you can tap the PAUSE icon to pause / resume the video, MUTE to deactivate/activate the audio function and GO BACK icon to return to the event list section.
- Page 18 This function helps user to easily transfer the recorded file(s) from the memory card. It is strongly suggested to download the file(s) at your home Wi-Fi network (WLAN), meaning the mobile device(s) is connecting to the same Wi-Fi router as the camera. Minimum bandwidth requirment is 1Mbps (upload/ download).
- Page 19 To Download / Delete the video file(s) in the EVENT LIST section, please follow the steps below: DOWNLOAD Long press the video clip to download the file onto your movbile device. Note: During the download process, system will stop both the live view and recording functions.
-
Page 20: Main Page Overview
MAIN PAGE OVERVIEW The MAIN PAGE section offers user an overview for all registered camera(s), including camera status (connected/disconnected). User can quickly access the camera(s) in the list. When multiple cameras are registered, scroll down to locate the registered camera for access. (iOS) (Android) ADD CAMERA... - Page 21 4. Enter the default password 123456 in the Security Code column. (iOS) (Android) 5. Click SAVE to complete the camera settings. The APP attempts toestablish camera connection. Once the camera is successfully connected, the “Connected” status will be shown on the left upper corner.
- Page 22 In the CAMERA SETTING section you will allow to (1) configure system setting, (2) unregister camera from the APP and (3) enter event list for recorded video file(s) playback. Tap the CAMERA SETTING icon to enter/exit CAMERA SETTING. Tap the CAMERA SETTING icon. The following icons appear on the panel. (iOS) (Android) Tap the ADVANCED SETTING icon to setup camera configuration.
- Page 23 If you forgot your PIN code, please uninstall the APP and reinstall it on the mobile device. NOTIFY (PUSH NOTIFICATION) The C794IP camera supports motion detection function. When any event is detected in the camera site, you’ll receive push notification on the mobile devices for the event recognized by the camera.
- Page 24 For Android If you want to enable/disable it, please follow the steps below. Note: The internet connection and wireless network interference may influence the performance of push notification service. ABOUT APP/API Version Info Tap the ABOUT icon to check the APP Version when necessary. (iOS) (Android) Note:...
-
Page 25: Advanced Setting
This chapter explains the advanced settings for administrator. Administrator is the one who owns the administration password and has the full control to the C794IP camera. The administrator can access all C794IP functions and settings, while general users can receive the surveillance images for live view/screen capture/video recording and may not manage the camera settings. - Page 26 ADMIN PASSWORD The Admin Password is a specific security code for administrator to change the advanced settings. The default admin password is 123456. Please use this function to change the default admin password into your personal admin password. For the protection of your system configuration, every time you change the advanced settings, you need to enter the admin password.
- Page 27 The Environment Mode settings allows you to select the power line frequency used at the location of C794IP camera. The power line frequency varies depending on geographic region. It may cause image flicker if wrong frequency is selected. Please check with local authorities for proper setting.
- Page 28 APP when you see the green signal indicator lights up. 2. The C794IP camera is designed to work with the legal Wi-Fi channels in your region. Please refer to your Wi-Fi router manual to choose an appropriate channel for C794IP camera.
- Page 29 MOTION MASK This fuction allows you quickly select motion mask from 3 default model. In addition to, the user is able to tap screen which area you don’t want to be detected. 1. Tap the area where you don’t want to detect the motion.
- Page 30 EMAIL SETTING The email setting allows you to configure the email environment, email account and password. Gmail account is suggested. Click the “Use SSL” check box will transmit the data in encryption. This setting requires the Simple Mail Transfer Protocol (SMTP) configuration. Most ISPs use the SMTP method to transfer outbound mail via the internet.
- Page 31 PROFILE SETTING This function allows you to save the following customized settings of camera. This is useful if you want to apply the same settings to another C794IP camera quickly. You won’t have to make all settings for each camera manually.
-
Page 32: Trouble Shooting
TROUBLE SHOOTING SOLUTION The APP can not find ‧ Make sure your network supports the DHCP protocol. the camera ‧ Make sure the camera and your mobile device connect to the same Wi-Fi router for the first setting. ‧ Make sure the Wi-Fi router is activated. ‧... - Page 33 The APP can not ‧ Make sure the SD card has been correctly inserted record any video clips ‧ Make sure the motion detection function has been enabled. (please refer to the Sensitivity Setting section). ‧ Please format the SD card when it is used for the first time (please refer to the SD Card Format section) ‧...
-
Page 34: Product Specification
PRODUCTION SPECIFICATION Networking Parameter Wireless Technology IEEE 802.11 b/g/n Network Connection Ethernet (10/100 Base-T/Base -TX); Wi-Fi Network Protocols TCP/IP, UDP, SMTP, NTP, DHCP, ARP Simultaneous Viewers 3 concurrent sessions Security WPA /WPA2/WPA2-PSK (TKIP, 128 bit AES) Camera Parameter Image Sensor 2 MegaPixel, 1/3”... -
Page 35: Storage Media Management
STORAGE MEDIA MANAGEMENT Micro SD Card Capacity Event Minutes (Class 10) 1600 3200 128G 6400 1440 CAMERA SIREN TEST REPORT Siren Volume Piezo Siren distance Piezo Siren distance 1 Meters 0.1 Meters 0 (Max) 74.9dB 92.9dB 72.5dB 90.5dB 67.5dB 87dB 62.5dB 79.5dB 4(Min) -
Page 36: Appendix: Compatible List
APPENDIX: COMPATIBLE LIST WiFi Compatible Router List Brand Product Name ASUS RT-N53 BUFFALO WIR-HP-C300NH2 BUFFALO WZR-HP-G450 Cisco ERT120 D-Link DIR-816L Huawei WSR20 INTELBRAS WRN300 NETGEAR Wndr3700v4 NETGEAR WGR614 Tenda FS395 TP-link TL-WR941N...
Need help?
Do you have a question about the C794IP and is the answer not in the manual?
Questions and answers