Table of Contents
Advertisement
Quick Links
Advertisement
Table of Contents

Related Manuals for AUDAC Atellio NWP300


Summary of Contents for AUDAC Atellio NWP300
- Page 1 Hardware Manual NWP300 & NWP400 audac.eu...
- Page 2 This manual is put together with much care, and is as complete as could be on the publication date. However, updates on the specifications, functionality or software may have occurred since publication. To obtain the latest version of both manual and software, please visit the Audac website @ audac.eu. NWP300 & NWP400 - Quick Start Manual...
-
Page 3: Table Of Contents
Table of contents Introduction Networked audio in- & output wall panels ........... . . 05 Precautions Chapter 1 Connections and connectors . - Page 4 NWP300 & NWP400 - Quick Start Manual...
-
Page 5: Introduction
XLR input connectors for powering condenser microphones. Various further integrated DSP functions such as EQ, automatic gain control, and other device settings can be configured through the AUDAC Touch™. The IP-based communication makes it future-proof while also being backward compatible with many existing products. -
Page 6: Precautions
Precautions READ FOLLOWING INSTRUCTIONS FOR YOUR OWN SAFETY ALWAYS KEEP THESE INSTRUCTIONS. NEVER THROW THEM AWAY ALWAYS HANDLE THIS UNIT WITH CARE HEED ALL WARNINGS FOLLOW ALL INSTRUCTIONS NEVER EXPOSE THIS EQUIPMENT TO RAIN, MOISTURE, ANY DRIPPING OR SPLASHING LIQUID. AND NEVER PLACE AN OBJECT FILLED WITH LIQUID ON TOP OF THIS DEVICE NO NAKED FLAME SOURCES, SUCH AS LIGHTED CANDLES, SHOULD BE PLACED ON THE APPARATUS DO NOT PLACE THIS UNIT IN AN ENCLOSED ENVIRONMENT SUCH AS A BOOKSHELF OR CLOSET. - Page 7 NWP300 & NWP400 - Quick Start Manual...
- Page 8 Chapter 1 Connections CONNECTION STANDARDS The in- and output connections for AUDAC audio equipment are performed according to international wiring standards for professional audio equipment 3.5 mm jack: For unbalanced line input connections Tip: Left Ring: Right Sleeve: Ground RJ45 (Network, PoE)
-
Page 9: Network Settings
Network settings STANDARD NETWORK SETTINGS DHCP: ON IP Address: Depending on DHCP Subnet Mask: 255.255.255.0 (Depending on DHCP) Gateway: 192.168.0.253 (Depending on DHCP) DNS 1: 8.8.4.4 (Depending on DHCP) DNS 2: 8.8.8.8 (Depending on DHCP) NWP300 & NWP400 - Quick Start Manual... -
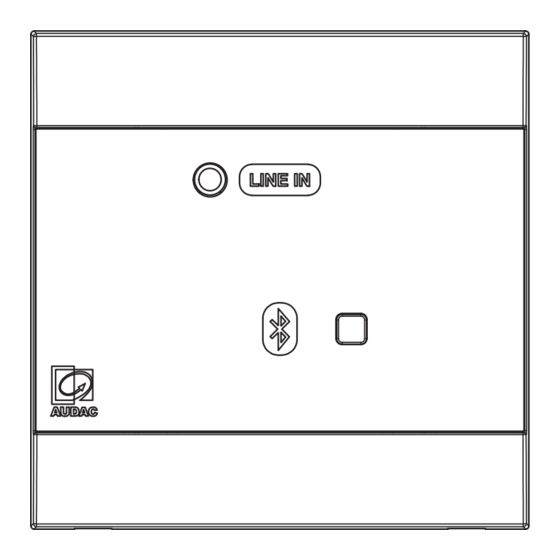
Page 10: Overview Front Panel
Pressing and holding both buttons enables Bluetooth pairing when both LEDs blink in blue color. The brightness of LED indicators is adjustable from the AUDAC Touch™. The Bluetooth name and number of known devices can be set from the AUDAC Touch™. Overview rear panel The rear of the NWP series contains an ethernet connection port which is used to connect the wall panel to the RJ45 connector. -
Page 11: Rear Panel Description
Rear panel description Ethernet connection The Ethernet connection is the essential connection for the NWP series. Both audio transmission (Dante/AES67), as well as control signals and power (PoE), are distributed over the Ethernet network. This input shall be connected to your network infrastructure. The LEDs accompanied by this input are indicating the network activity. - Page 12 Removing the front cover The front panel of the NWP series can be removed by using a flat head screwdriver in 5 steps. Step 1: Step 2: Step 3: Step 4: Step 5: NWP300 & NWP400 - Quick Start Manual...
-
Page 13: Quick Start Guide
Quick start guide This chapter guides you through the setup process for a NWP series wall panel where the wall panel is a Dante source connected to the network. The control of the system is done through the NWP or Audac Touch... - Page 14 2) NWP series settings Once the Dante routing settings are made through the Dante Controller, other settings of the NWP series wall panel itself can be configured using the Audac Touch platform, which can be freely downloaded and operated from various platforms. This is very intuitive to be operated and automatically discovers all available compatible products in your network.
-
Page 15: Technical Specifications
Compatible devices All Dante compatiable devices *Input and output sensitivity levels defined are referred to a -13 dB FS (Full Scale) level, which is consequent through digital Audac devices and can be digitally gained when interfacing with 3rd party equipment. ... - Page 16 Discover more on audac.eu...
Need help?
Do you have a question about the Atellio NWP300 and is the answer not in the manual?
Questions and answers