
Related Manuals for Samsung HW-K950


Summary of Contents for Samsung HW-K950
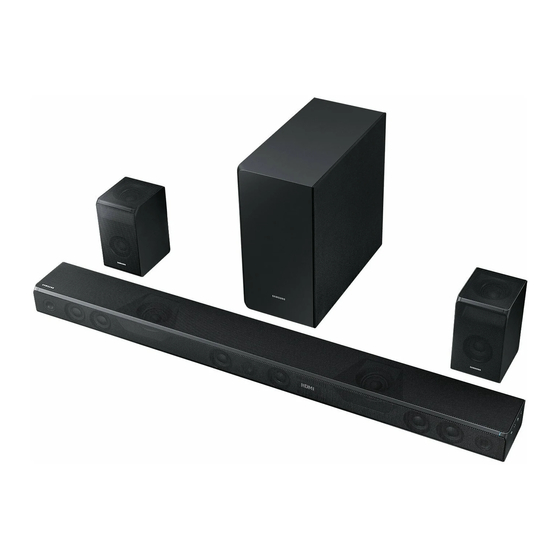
- Page 1 HW-K950 User manual Imagine the possibilities Thank you for purchasing this Samsung product. To receive more complete service, please register your product at www.samsung.com/register...
-
Page 2: Getting Started
GETTING STARTED GeTTInG STarTeD SafeTy InformaTIon Safety WarningS To reDUCe THe rISK of eLeCTrIC SHoCK, Do noT remoVe THe CoVer (or BaCK). no USer-SerVICeaBLe ParTS are InSIDe. refer SerVICInG To QUaLIfIeD SerVICe PerSonneL. This symbol indicates that high voltage is CaUtiOn present inside. - Page 3 GETTING STARTED PreCaUtiOnS 68.6 mm 99.1mm 99.1mm 99.1mm ensure that the aC power supply in your house complies with the power requirements listed on the identification sticker located on the back of your product. Install your product horizontally, on a suitable base (furniture), with enough space around it for ventilation (7~10 cm).
-
Page 4: Dolby Atmos
GETTING STARTED DoLBy aTmoS® this product supports Dolby atmos®. * What is Dolby atmos®? atmos technology enhances existing 5.1 channel surround sound systems by adding an overhead speaker. This envelops the listener in 360 degrees of sound, delivering an immersive, high-definition, rich, detailed, and deeper experience. -
Page 5: Table Of Contents
GETTING STARTED ConTenTS getting StarteD 27 fUnCtiOnS Safety information input Mode Dolby atmos® Bluetooth What’s included Using the Multiroom app Using the network Standby On DeSCriPtiOnS function Software Update front / right Side Panel Bottom Panel 35 trOUBLeSHOOting remote Control troubleshooting 14 inStaLLatiOn 36 aPPenDiX... -
Page 6: What's Included
GETTING STARTED WHaT’S InCLUDeD BefOre reaDing tHe USer’S ManUaL note the following terms before reading the user manual. + icons used in this manual icon term Definition Caution Indicates a situation where a function does not operate or settings may be cancelled. note Indicates tips or instructions on the page that help you operate a function. -
Page 7: Descriptions
DESCRIPTIONS DeSCrIPTIonS fronT / rIGHT SIDe PaneL (Volume) Button Controls the volume level. The numeric value of the volume level appears in the front panel display. (Source) Button right Side Selects the D.In, aUX, HDmI1, HDmI2, or BT input. ● To turn on Bt Pairing mode, press and hold this button in BT mode. -
Page 8: Bottom Panel
See page 30.) SPK aDD DC 19V Press this button to connect the SerViCe Soundbar to a Samsung HUB (Power Supply in) (purchased separately) or a network. USB micro jack. To upgrade the Connect the aC/DC power (requires a smart device and the product's software. -
Page 9: Remote Control
(Default : On - anynet+ or Off - anynet+) The anynet+ function lets you control the Soundbar with the remote from an WOOFER anynet+ compatible Samsung TV. SOUNDBAR The Soundbar must be connected to the TV via an HDmI cable. - Page 10 DESCRIPTIONS SOUrCe Press to select a source connected to the Soundbar. * Bt Pairing mode To turn on BT PaIrInG mode in Bluetooth function, press and hold the SOUrCe button for more than 5 seconds. Play / Pause (BT / WIfI) Press the p button to pause a music temporarily.
- Page 11 DESCRIPTIONS (Sound Control) Press to select treBLe, BaSS, or aUDiO SynC. Then, use the Up/Down buttons to adjust the treBLe or BaSS volume from -3 ~ +3. (Sound Control) button for about 5 seconds to Press and hold the adjust the sound for each frequency band. 150Hz, 300Hz, 600Hz, 1.2KHz, 2.5KHz, 5KHz, and 10KHz are selectable (Left/right) and each can be adjusted to a setting between -6 ~ +6 (Up/Down).
- Page 12 DESCRIPTIONS inSerting BatterieS (aa Battery X2) Slide the battery cover in the direction of the arrow until it is completely removed. Insert 2 aa batteries (1.5V) in the correct +/- polarity. Slide the battery cover back into position. USing tHe HiDDen BUttOnS Hidden Button reference page remote Control Button...
- Page 13 DESCRIPTIONS OUtPUt SPeCifiCatiOnS fOr tHe Different MODeS Of SOUND SOURCE SOUnD effeCt input effect Output SOURCE SOUND 2 ch 5.1.4 ch 5.1 ch 5.1.4 ch SOUND SOURCE SOUND SOURCE 2 ch 2.1 ch STanDarD 5.1 ch 5.1 ch LEVEL EFFECT SOUND SOURCE 2 ch...
-
Page 14: Installation
INSTALLATION InSTaLLaTIon InSTaLLInG THe SoUnDBar inStaLLing tHe WaLL MOUnt + installation Precautions ● Install on a vertical wall only. ● for the installation, avoid a location with high temperature or humidity, or a wall that cannot sustain the weight of the set. - Page 15 INSTALLATION C TYPE : 700mm CENTER LINE Centre Line 2. align the Paper Template’s Centre Line with the centre of your TV (if you are mounting the Soundbar below your TV), and then fix the Wall Mount guide to the wall using tape. ●...
- Page 16 INSTALLATION 6. Install 2 Bracket-Wall Mounts in the right orientation on the bottom of the Soundbar, using 2 Screws (m4 x L12). rear of the Soundbar right end of the Soundbar ● When assembling, make sure the hanger parts of the Bracket-Wall Mounts are located behind the rear of the Soundbar.
-
Page 17: Detaching The Soundbar From The Wall
INSTALLATION 8. Slide the Soundbar down as shown above so that the Bracket-Wall Mounts rest securely on the Holder-Screws. ● Slide the Bracket-Wall Mounts down from the bottom to install it onto the Holder-Screws. DetaCHing tHe SOUnDBar frOM tHe WaLL 1. -
Page 18: Installing The Surround Speakers On A Wall
Wall mount Brackets and the speakers on the wall. ● for more information, please refer to the Wall mount's manual. ● Samsung electronics is not liable for any damage to the product due to the product being installed inappropriately. -
Page 19: Connections
CONNECTIONS ConneCTIonS ConneCTInG THe SUBWoofer anD SUrroUnD SPeaKerS ● Do not connect the power cord of this product or your TV to a wall outlet until all connections between components are complete. ● Before moving or installing this product, be sure to turn off the power and disconnect the power cord. ●... - Page 20 CONNECTIONS aUtOMatiC COnneCtiOn 1. Connect a power supply to the subwoofer and surround sound speakers. 2. Connect a power supply to the Soundbar, and then press the button on the remote control or on the right side of the Soundbar. 3.
- Page 21 CONNECTIONS 2. Turn off the Soundbar. 3. Press and hold the VOL button on the remote control for at least 5 seconds with the Soundbar turned off (off). 4. The ID SeT message appears on the display of the Soundbar for a short period of time, and then disappears. iD Set right Side of the Soundbar 5.
-
Page 22: Connecting To A Tv
CONNECTIONS ConneCTInG To a TV ● Important: Before you begin, put the batteries into the remote. See page 12 for instructions. COnneCting tO a tV USing an HDMi (DigitaL) CaBLe HDMi Cable (not supplied) AUX IN HDMI IN HDMI OUT (TV-ARC) DIGITAL AUDIO IN (OPTICAL) -
Page 23: Connecting To A Tv Using A Digital Optical Cable
CONNECTIONS COnneCting tO a tV USing a DigitaL OPtiCaL CaBLe Optical Cable (not supplied) OPTICAL OUT DIGITAL AUDIO IN (OPTICAL) AUX IN SOUND SOURCE DIGITAL AUDIO IN AUX IN SOUND SOURCE DIGITAL AUDIO IN (OPTICAL) (OPTICAL) HDMI OUT (TV-ARC) HDMI IN 1 DC 19V Wi-Fi SETUP SPK ADD... -
Page 24: Connecting To External Devices
CONNECTIONS ConneCTInG To eXTernaL DeVICeS HDmI is the standard digital interface for connecting to TVs, projectors, DVD players, Blu-ray players, set top boxes, and more. HDmI prevents any degradation to the signal due to conversion to analogue and maintains the video and audio quality of the original digital source. -
Page 25: Hdmi Cable
• make sure that "no encoding" is selected for bitstream in the audio output options. e.g., on a Samsung Player: Home menu Settings Sound Digital output: Select Bitstream (unprocessed). • If the audio output options include Secondary audio, make sure it is set to off. -
Page 26: Optical Or Analogue Audio Cable
CONNECTIONS OPtiCaL Or anaLOgUe aUDiO CaBLe This unit comes equipped with one digital optical in jack and one analogue audio (aUX) in jack, giving you two ways to connect it to external devices. Optical Cable (not supplied) DIGITAL AUDIO IN OPTICAL OUT audio Cable (OPTICAL) -
Page 27: Functions
FUNCTIONS FunCtIonS Input Mode button on the main unit’s right side or the SOURCE button on the remote control to select the mode press the you want. SOURCE SOUND Right Side of the Soundbar SOURCE SOUND Input mode display optical digital input D.IN ARC (HdMI out) input AuX input... -
Page 28: Bluetooth
• The device name can only be displayed in english. an underline " _ " will be displayed if the name is not in english. • If the Bluetooth device has failed to pair with the Soundbar, delete the previous "[aV] Samsung Soundbar Kxxx" found by the Bluetooth device, switch to Bt Pairing mode by pressing and holding the button on the main unit’s right side or the SOUrCe button on the remote control, and then have the Bluetooth device... - Page 29 ● you cannot connect the Soundbar to a Bluetooth device that supports only the Hf (Hands free) function. ● once you have paired the Soundbar to a Bluetooth device, selecting "[aV] Samsung Soundbar Kxxx" from the device's scanned devices list will automatically change the Soundbar to Bt mode.
-
Page 30: Using The Multiroom App
To use the Soundbar with the Samsung multiroom app, you must download and then install the Samsung multiroom app on your smart device. you can download the app from Google Play or the app Store. With the Samsung multiroom app installed, you can play music on your Soundbar that is stored on your smart device, located on other connected devices, provided by other content providers, or streamed from Internet radio stations. - Page 31 To launch the Samsung multiroom app, tap the multiroom app icon on your smart device. COnneCting tHe SOUnDBar tO yOUr netWOrK on your smart device, select the Samsung multiroom app. follow the directions on your smart device’s screen. you can use the following music sources with the Samsung multiroom app.
-
Page 32: Using The Network Standby On Function
Soundbar via Bluetooth or Wi-fi. If you turn the Soundbar on via a Bluetooth connection, its input mode is set to BT automatically. To turn the Soundbar on via Wi-fi, you must have the Samsung multiroom app installed on your smart device. -
Page 33: Software Update
2.0 USB jack (Type a) on the other end to the micro USB jack on your Soundbar. ● The micro USB to USB adapter cable is sold separately. To purchase, contact a Samsung Service Centre or Samsung Customer Care. - Page 34 FUNCTIONS + if UPDate was not displayed 1. Turn off the Soundbar, connect the USB storage device that contains update files to the Soundbar’s USB port. 2. Disconnect the power cord, reconnect it, and then turn on the Soundbar. ● Insert a USB device containing the firmware update into the USB port on the main unit. ●...
-
Page 35: Troubleshooting
TROUBLESHOOTING TroUBLeSHooTInG TroUBLeSHooTInG Before requesting service, please check the following. the unit will not turn on. • Is the power cord plugged into the outlet? ¼ Connect the power plug to the outlet. a function does not work when the button is pressed. • Is there static electricity in the air? ¼... -
Page 36: Appendix
Design, specifications and app screen are subject to change without prior notice. nominal specification Samsung electronics Co., Ltd reserves the right to change the specifications without notice. Weight and dimensions are approximate. for more information about the power supply and power consumption, refer to the label attached to the product. - Page 37 This equipment may only be used indoors. Wireless Models (excluding the frequency of 5.15gHz-5.35gHz) Hereby, Samsung electronics, declares that this equipment is in compliance with the essential requirements and other relevant provisions of Directive 1999/5/eC. The original Declaration of Conformity may be found at http://www.samsung.com, go to Support >...
- Page 38 EIRE UNITED KINGDOM EIRE his Samsung product is warranted for the period of twelve (12) months from the origi- s Samsung product is warranted for the period of twelve (12) months from the origi- beyond the control of Samsung. beyond the control of Samsung.
- Page 39 ©2016 Samsung electronics Co.,Ltd. all rights reserved Contact SaMSUng WOrLD WiDe If you have any questions or comments relating to Samsung products, please contact the SamSUnG customer care Centre. Country Contact Centre Web Site Country Contact Centre Web Site...
Need help?
Do you have a question about the HW-K950 and is the answer not in the manual?
Questions and answers