Table of Contents
Advertisement
Quick Links
UNDERWATER CAMERA
User Manual
FR : Un manuel dans votre langue est disponible sur Internet:
IT: Il manuale nella sua lingua può essere trovato su Internet:
ES: Puede encontrar un manual en su idioma en Internet:
PT: Um manual em seu idioma pode ser encontrado na Internet:
PL: Instrukcję w swoim języku możesz znaleźć na stronie:
SV: En handbok på ditt språk finns på Internet:
NL: Een handleiding in uw taal vindt u op internet:
bit.ly/3G7SOgk
EN
Advertisement
Table of Contents

Subscribe to Our Youtube Channel
Related Manuals for AquaPix W3027 WAVE


Summary of Contents for AquaPix W3027 WAVE
- Page 1 UNDERWATER CAMERA User Manual FR : Un manuel dans votre langue est disponible sur Internet: IT: Il manuale nella sua lingua può essere trovato su Internet: ES: Puede encontrar un manual en su idioma en Internet: PT: Um manual em seu idioma pode ser encontrado na Internet: PL: Instrukcję...
-
Page 2: Table Of Contents
Table of content General instructions................3 Explanation of symbols ................. 3 Product introduction................4 Declaration and proven safety .............. 4 Intended use ..................4 Restrictions ................... 5 Safety instructions ................6 Operating environment ................ 8 Storage environment ................9 Camera description ................10 First use .................... - Page 3 Disclaimer Easypix makes no representations or warranties with respect to this manual and, to the maximum extent permitted by law, expressly limits its liability for breach of any warranty that may be implied to the replacement of this manual with another. Furthermore, Easypix reserves the right to revise this publication at any time without incurring an obligation to notify any person of the revision.
-
Page 4: General Instructions
General instructions Read this manual and its safety instructions before using this product. Follow all the instructions. This will avoid fire, explosions, electric shocks or other hazards that may result in damage to property and/or severe or fatal injuries. The product shall only be used by persons who have fully read and understand the contents of this user manual. -
Page 5: Product Introduction
Product introduction Aquapix W3027 is a high quality digital still and video camera. Waterproof to 3M and featuring a 5MP sensor, it captures photos up to 30MP resolution and records video up to 1080P Full HD. Powered by rechargeable battery, W3027 utilizes a full colour LCD display and 4x digital zoom to ensure your photos and videos are framed and captured perfectly. -
Page 6: Restrictions
NOTICE WATERPROOF AND DUSTPROOF PERFORMANCE The waterproof and dustproof performance described do not guarantee that the camera will remain completely waterproof or free from damage and trouble under all conditions. Do not subject the camera to excessive shock, vibration or pressure by dropping it, hitting it or placing a heavy object on it. -
Page 7: Safety Instructions
• Do not use your camera in hot springs, hot tubs or jacuzzis where it can be exposed to extreme water temperature. Safety instructions WARNING This product is only suitable for the purpose described, the manufacturer is not liable for damage caused by abnormal use. - Page 8 WARNING • If you think this product is damaged in any way, please do not use the product. • Do not open this product without permission. • Contains small parts, in order to avoid swallowing, please ensure any use by children is undertaken with adult supervision.
-
Page 9: Operating Environment
WARNING • To avoid the risk of electric shock, do not insert the power cord with wet hands. The battery compartment should only be opened with clean, dry hands to also ensure that no dirt enters the camera when inserting, changing or removing the batteries or SD card. -
Page 10: Storage Environment
Precautions for waterproof use As your camera is waterproof, it can be used under water while playing and swimming etc. To prevent it from sinking or getting lost in the water, you can attach the included wrist strap to the camera before entering the water. -
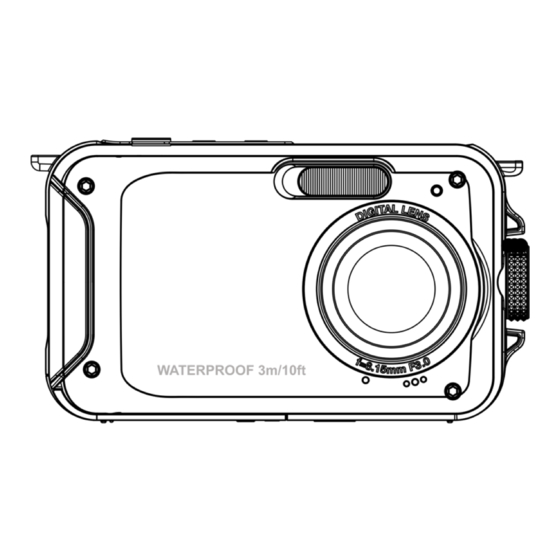
Page 11: Camera Description
Camera description 1. Power button 2. Display button 3. Shutter button 4. Rope hole 5. Flash light 6. Lens... - Page 12 7. Screen 8. Power indicator 9. Zoom in/Up 10. Zoom out/Down 11. Flash light/Right 12. Delete/Left 13. Mode button/Back 14. Menu button/OK 15. Battery cover...
-
Page 13: First Use
First use NOTICE Opening and closing the battery compartment: Always ensure the camera and your hands are dry. Ensure that there is no debris inside the battery-chamber or memory card slot. Always ensure that the battery cover is firmly closed and the security lock is in the lock position before using the camera. -
Page 14: Step 2: Charge The Battery
which confirms the SD card is correctly installed. • Slide the battery cover closed until it clicks to ensure it is securely locked. Step 2: Charge the battery • Open the battery compartment door and connect the camera to a USB AC adaptor using the Micro USB cable provided. -
Page 15: Step 3: Format The Memory Card
Step 3: Format the memory card NOTICE To ensure the optimal performance of your camera, please note the following important information: • Before using any micro SD card in your camera for the first time, please ensure your memory card is formatted in the camera. -
Page 16: Camera Functions
• Memory cards with a speed class rating of 6 or faster are recommended for recording videos. When using a memory card with a lower speed class rating, video recording may stop unexpectedly. Camera functions Turning on the camera: Press the power key on the top of camera to turn on the camera. - Page 17 To continue, please transfer all data on the SD card to your computer or insert a new memory card. Digital zoom: Your camera features a digital zoom. Press the up button to zoom in and the down button to zoom out. Built-in flash: Press the ‘Flash’...
-
Page 18: Photo Mode
Photo mode While in Photo mode press the menu key to access the various settings menu items as follows: Scenes Several scene modes are available to facilitate photo capture in different environments. If required, you can select a mode that matches the condition best that you are shooting in. - Page 19 3. Press the up/down keys to review the self-timer options. 4. Press the OK key to confirm your selection. Anti-shake Your camera features an anti shake function to deliver better photo quality when a tripod is not being used. 1. Press the menu key. 2.
-
Page 20: Video Mode
on/off. 4. Press OK key to confirm your selection. Please Note: When using the ‘Continuous Shooting’ function, the photo resolution automatically changes to VGA. Video mode Press the mode key to activate the video recording mode. Press shutter key to start recording. The video icon will show on top the left of the LCD screen. -
Page 21: Playback Mode
Playback mode Press the mode key to enter playback mode. Using playback mode you can view photos and video files currently saved on the memory card. You can also rotate, protect and delete files. Press the menu button in playback mode to access the following options: Delete: To delete one or all unprotected images or videos. -
Page 22: Other Menu Settings
1. Press the menu key in playback mode. 2. Press the left/right keys to select the “Protect” function 3. Press the up/down keys to select: lock/unlock individual files or all files at once. 4. Press the OK key to confirm. 5. - Page 23 Image sharpness: The function permits the user to adjust the sharpness of the photo so that the edge is clearer or softer. 1. Press the left/right key to select the sharpness option under setting menu. 2. Press the up/down keys to make your selection. 3.
- Page 24 Metering: Metering evaluates the light of a scene to determine the correct shutter speed, aperture, or ISO. Center-weighted metering - evaluates the light in the middle of the frame and its surroundings and ignores the corners Multi metering - uses light information from the entire scene and creates an average for the final exposure setting, giving no weighting to any particular portion of the metered...
- Page 25 2. Press the up/down keys to select the preferred option. Select ON to place a time and date stamp on your photos and video recordings. Select OFF if no time and date stamp is required. 3. To set the time and date use the left/right keys to select the parameter to adjust.
- Page 26 Frequency: Set the frequency according to your local power supply. 1. Press the left/right key to select the Frequency [HZ] option. 2. Press the up/down keys make your selection. 3. Press the OK key to confirm and save your selection. Format memory card: See ‘Format Memory Card’...
-
Page 27: File Transfer To Pc
File transfer to PC 1. Turn on the camera. 2. Select playback mode. 3. Connect the camera to a computer via a USB cable. 4. The removable disc image will pop up on the screen as shown below 5. Click the removable disk to view the photos, which will be stored in the sub file of DICM. - Page 28 7. Do not disconnect the cable during transfer. Doing so will cancel the current transfer of any files to your computer. 8. When finished, ensure the camera’s connection with Windows is properly terminated before disconnecting the cable. MAC OS: 1. Use the USB cable that came with your camera to connect your camera to your computer.
- Page 29 Then select a folder and choose Paste from the Edit menu. 7. Do not disconnect the cable during transfer. Doing so will cancel the current transfer of files to your computer. 8. When finished, ensure the device icon is dragged to the bin before disconnecting the cable.
-
Page 30: Troubleshooting
Troubleshooting If the camera fails to function as expected, please check the list of common problems below before consulting your retailer. Problem Cause/Solution The camera cannot be turned - The battery is exhausted. - Battery installation error. - The camera automatically turns off to save power (Auto Power Off function activated in camera settings). -
Page 31: Cleaning
such as to shoot movies, or used in a hot environment. This is not a malfunction. Cleaning After use in water, turn off the camera, ensure the battery compartment is tightly closed, and rinse the camera with fresh water within 30 minutes. •... -
Page 32: Technical Specifications
Technical specifications Sensor 5MP CMOS sensor (30MP*) 6400x4800 (24M*) 5600x4200 Photo resolution (20M*) 5200x3900 (16M*) 4608x3456 (12M*) 4000x3000 (8M) 3264x2448 (7M HD) 3648x2048 (5M) 2592x1944 (3M) 2048x1536 (2M HD) 1920x1080 Video resolution FHD 1920x1080 HD 1280x720P VGA 640x480 Displays 2.7” LCD Display External memory Micro SD cards max. -
Page 33: Box Contents
File format JPEG/AVI Anti-shake Flash light Auto/force flash light/flash off/ Anti red eye Face detection Continuous shooting Microphone Built-in Interface USB Type-CE Battery 650mAh Lithium Battery Working temperature 0-40°C *by interpolation Box contents • Camera • Pouch • Hand strap •... -
Page 34: Disposal
Disposal Disposal of packaging: Dispose of the packaging according to its type. Add cardboard and paperboard to the waste paper, foils and plastic wrapping to the recyclable waste collection. Waste electrical and electronic equipment and/or batteries disposed of by users in private households in the European Union: This symbol on the product or on its packaging indicates that it cannot be disposed of with household waste. - Page 35 batteries. For more information on recycling this device and/or battery, contact your local council, the shop where you purchased the device or your household waste disposal service. Recycling materials helps to conserve natural resources and ensures that it is recycled in a way that protects human health and the environment.
-
Page 36: Declaration Of Conformity
Declaration of conformity EU Declaration of conformity We hereby declare that the product is in conformity with the essential requirements and other relevant provisions of Directives 2014/30/EU and 2011/65/EU & (EU) 2015/863. The full text of the EU Declaration of Conformity can be found in German and English at: www.easypix.info/download/pdf/doc-w3027.pdf UKCA Declaration of conformity...
Need help?
Do you have a question about the W3027 WAVE and is the answer not in the manual?
Questions and answers