Table of Contents
Advertisement
Quick Links
Advertisement
Table of Contents

Related Manuals for Doro 6621


Summary of Contents for Doro 6621
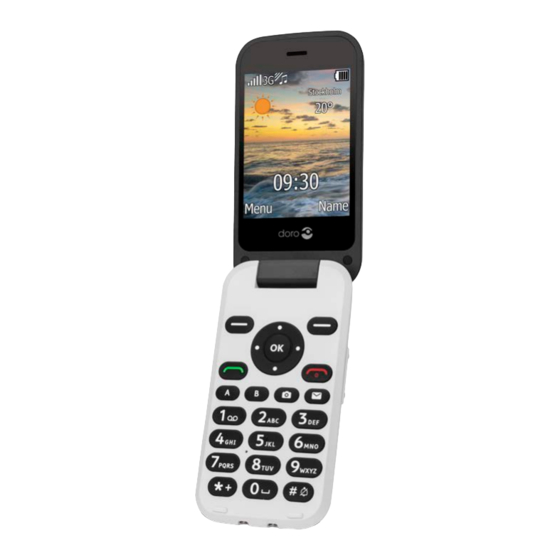
- Page 1 Doro 6621 English...
- Page 2 21 22...
- Page 3 The items supplied with your phone might vary depending on the software and accessories available in your region or offered by your service provider. You can obtain additional accessories from your local Doro dealer. The sup- plied accessories provide the best performance with your phone.
-
Page 4: Table Of Contents
English Contents Congratulations on your purchase ..............1 Get started ..................... 1 Insert SIM card, memory card and the battery........1 Charge the phone................... 2 Get to know your phone................3 Assistive functions.................. 3 Turn the phone on and off..............3 Start-up wizard.................. - Page 5 Text size ..................42 Idle display ................... 42 Themes ..................42 LCD backlight..................43 Brightness ..................43 Response by Doro ..................43 File manager....................43 Organiser ...................... 44 Alarm ....................44 Calendar ....................45 Daily reminder..................46 Notes ....................46...
- Page 6 English More......................46 FM radio ....................46 Calculator ..................... 48 Games....................48 Status......................49 Weather ....................... 49 Additional functions ..................50 Display status symbols ................. 50 Display main symbols................50 Reset settings ..................51 Troubleshooting ................... 51 Safety instructions..................54 Network services and costs ..............
-
Page 7: Congratulations On Your Purchase
English Congratulations on your purchase With the Doro 6621 you'll enjoy an ever better sound experience thanks to HD voice, technology that makes it easier for you to hear and to be heard. Calling, messaging and taking pictures are all made easier thanks to the widely separated, high contrast keys and a large 2.8"... -
Page 8: Charge The Phone
English 3. Optional: Locate the SD card holder and gently slide the card in the holder. The device works with or without a SD card installed. Compati- ble card type: microSD, microSDHC. 4. Insert the battery by sliding it into the battery com- partment with the contacts facing downwards to the right. -
Page 9: Get To Know Your Phone
English Note! To save power the LCD backlight goes off after a while. Press any button to illuminate the display. Full battery capacity will not be reached until the battery has been charged 3–4 times. Batteries degrade over time, which means that call time and standby time will normally decrease with regular use. -
Page 10: Start-Up Wizard
English Start-up wizard When starting the phone for the first time, you can use the Start-up wizard to set some basic settings. Press Yes to change or No if you do not want to change. • The default language is determined by the SIM card. See Phone settings, p.8 on how to change language, time and date. -
Page 11: Enter Text
English Step-by-step instructions The arrow ( ) indicates next action in step-by-step instructions. To con- firm an action, press Ok. To select an item, scroll or highlight the item using and then press Ok. Example: Press Menu • Phonebook -New contact- Add. -
Page 12: Volume Control
English Enter text with predictive text In some languages you can use the Smart ABC (eZiType ™ ) input method which uses a dictionary to suggest words. • Press each key once, even if the displayed character is not the one you want. -
Page 13: Hearing Aid Compatible
English Silent Silent is a fixed profile with Keypad tone, Message tone and Ringtone dis- abled, while Vibration, Tasks, Daily reminder and Alarm are unchanged. • Press and hold shortcut button # to activate or deactivate silent mode. Headset When a headset is connected, the internal microphone in the phone is au- tomatically disconnected. -
Page 14: Phone Settings
English receiver slightly below or in front of the ear may result in better performance. See also Audio setup , p.40 on how you can adjust the audio settings. Phone settings Time & date Set the time and date Press Menu Settings General Time &... - Page 15 English Press Done to confirm. PIN code options Press Menu Settings Security SIM lock: On to activate the PIN code. You need to enter the PIN code • every time the phone is started. Off to deactivate the PIN code. •...
-
Page 16: Calls
English Press Ok to confirm. Calls Make a call Enter the phone number including the area code. Delete with Clear. Press to make a call. Press Abort to cancel the call. Press to end the call. Tip: For international calls, always use + before the country code for best operation. -
Page 17: Call Options
English Call options During a call the selection buttons ) give access to additional functions. Options (left selection button) Volume to adjust the volume. • Hold/Retrieve to hold/retrieve the current call. • End single call to end the current call (same as •... -
Page 18: Sos Calls
English SOS calls As long as the phone is switched on, it is always possible to place an SOS call by entering the main local emergency number for your present loca- tion followed by Some networks accept calls to emergency numbers without a valid SIM card. - Page 19 English • Received calls to show the elapsed time of all received calls. Yes to reset all. • Reset all Press Ok to confirm. Answer mode Press Menu Settings Calls Answer mode: • On to answer incoming calls by opening the Open to answer flip.
- Page 20 English Call divert You can divert calls to an answering service or to another phone number. Set up which calls should be diverted. Select a condition and press Ok, then select Activate, Deactivate or Query status for each. Press Menu Settings Calls Call setup...
-
Page 21: Phonebook
English Note! The PIN2-code is needed to apply fixed dial. Contact your service provider to get the PIN2-code. Press Menu Settings Security Fixed dial: On to enable or Off to disable. • Mode Add and enter the first allowed number. •... -
Page 22: Manage Phonebook Contacts
English Tip: For international calls, always use + before the country code for best operation. Press * twice for the international prefix +. Manage phonebook contacts Press Menu Phonebook. Select a contact, then press Options: • View to show details for the selected contact. Phone = storage set to Phone and SIM = storage set to SIM, see Phonebook stor-... -
Page 23: Phonebook Settings
English Press Ok to confirm. Phonebook settings Owner number The phone number assigned to your SIM card is saved as Owner number if this is allowed by the card. Add numbers Press Menu Phonebook Owner number Empty Add. Enter name and number, see Enter text , p.5. -
Page 24: Ice (In Case Of Emergency)
English Press Menu Settings Phonebook Voice mail: Select Empty Add: Phonebook to add a contact from the Phonebook. Press Ok to • confirm. • Manual and enter name and number. Press Ok to confirm. To edit or delete an existing entry, select it and press Options Edit or Delete. -
Page 25: Assistance Button
Response by Doro, then the below descriptions are not valid. Response by Doro is a new easy-to-use service from Doro that is designed to give seniors and your relatives extra security in everyday life. Read more at www.doro.com. -
Page 26: Make An Assistance Call
English The assistance button allows easy access to contact your predefined help numbers (Number list) should you need help. Make sure that the assis- tance function is activated before use, enter recipients in the numbers list and edit the text message. Make an assistance call When help is needed, press and hold the assistance button for 3 sec- onds, or press it twice within 1 second. -
Page 27: Activation
English Activation Select how to activate the assistance function using the assistance button. Press Menu Settings Assistance Activation: • On Normal to press and hold the button for approximately 3 sec- onds, or press it twice within 1 second. • On (3) to press the button 3 times within 1 second. -
Page 28: Position Sms
This function sends a text message with the users position to the recipients in Number list when an assistance call occurs. The message contains date, time, and the positioning information of the Doro user. The message is not editable. If no position can be found the message contains the latest known position. -
Page 29: Messages
English • High to use loud signals (default). Low to use one low signal. • Silent no sound indication, like a normal call. • Press Ok to confirm. Messages Create and send text message (SMS) Note! Before you can send any text messages, you need to save your message centre number. -
Page 30: Create And Send Voice Message
English or press Menu Messages Create new MMS. Write your message, see Enter text , p.5. Press Options Add picture: My pictures to select a file. • Take picture to use the camera to take a picture. • Note! If you add more than one picture, the following pictures are increasingly compressed by the phone (scaled down). -
Page 31: Create And Send E-Mail
English Create and send e-mail IMPORTANT! Using data services can be costly. We recommend that you check your data rates with your service provider. You can send or view e-mail messages using your personal or company e- mail account. See E-mail settings, p.30 on how to setup your e-mail. Press the shortcut button or press Menu Messages... -
Page 32: Inbox, Outbox And Sent
Gmail / Yahoo ac- count. Please use the following process to activate the use of your account on your Doro phone or you may receive a ‘pop up’ message that the ‘au- thentication process has failed’. -
Page 33: Message Settings
English • Forward to forward the message. Edit the message (if desired), then press Send. • Use address to display e-mail addresses contained in the message. Create new or Update. • Options Save • Send mail to write a new e-mail. Options Use number to display all phone numbers contained in the mes- •... - Page 34 English SMS settings Press Menu • Settings Messages SMS settings. Memory status From SMS settings, select Memory status to display the memory space used on the SIM card and in the phone memory. Phone memory can store up to 450 messages. Press Back to return.
- Page 35 English Memory status From MMS settings, select Memory status to display the memory space used on the memory card (if inserted) and in the phone memo- ry. Phone memory can store up to 8 MB. Press Back to return. Storage Picture messages are saved by default in the phone memory.
- Page 36 E-mail settings Enables you to review and create e-mails using your personal or company e-mail account. In order to utilize the e-mail service on your Doro 6621 you need to have an already configured e-mail account such as Google Mail, Ya- hoo or Hotmail.
- Page 37 English • Gmail • Hotmail • Yahoo Enter your E-mail address and your Password. Press Ok to confirm. Set up other accounts Follow the steps below if your service provider is not in the list. Contact your service provider for correct settings. From E-mail Select: Select Other e-mail accounts.
-
Page 38: Camera
English Press Menu Settings Messages Vibration. Select Messages: Short (4 seconds) • Long (12 seconds) • Press Ok to confirm. Note! If Alert type is set to Ring only the phone will not vibrate. Reminder The reminder alerts you once if you haven't checked your messages or lis- tened to your voice mail within 10 minutes from receipt. -
Page 39: Video Camera
English Press Options: Send by MMS, see Create and send picture message • Send (MMS), p.23. Send by Bluetooth, see Bluetooth ® , p.35. • Send Send by e-mail, see Create and send e-mail, p.25. • Send Delete to delete. Press Yes to confirm or No to return. •... -
Page 40: Picture Gallery And Video Gallery
English Note! Zoom may reduce video quality. For more video camera settings, see Camera settings, p.34. Picture gallery and Video gallery View your saved pictures or videos Press Menu Picture gallery or Video gallery. Camera Select a picture or video. Press Options: View for single view. -
Page 41: Connectivity
Note! With higher quality, less pictures or videos can be stored in the internal memory. If you insert a compatible external memory (micro SD) card into your Doro 6621, you can change the default storage location, see Storage, p.29. This allows you to save more files on your device, like pictures and videos. - Page 42 English Device name Press Menu Settings Connectivity Bluetooth Device name. Enter the name your Doro 6621 should appear with for other Blue- tooth devices. Press Done to confirm. Search device Search for available Bluetooth audio devices. Press Menu Settings Connectivity...
-
Page 43: Internet Profile
English • High (Confirmation may be needed for full access for paired devices.) • Information Press Ok to confirm. Internet profile The Internet settings are used by services that communicates using Inter- net. The Internet settings for most major service providers are already in- serted from start. -
Page 44: Mobile Data, Data Counter And Data Roaming
English Mobile data, data counter and data roaming IMPORTANT! Using data services can be costly. We recommend that you check your data rates with your service provider. Function on or off Restricts features like Weather, MMS and e-mail. Select Off to avoid data charges. -
Page 45: Network Setup
English Network setup Press Menu Settings General Network setup: Select network New search to perform new search if connection is lost. • • Select network to view available network, a list of available net- work operators is displayed (after a short delay). Select desired operator. -
Page 46: Sound & Display
English Drag and drop content between phone and a computer Connect your phone to a computer using a USB cable. Wait until the phone or memory card appears as external disks in the file explorer. Drag and drop selected files between the phone and the computer. Note! You can transfer files using a USB cable on most devices and operating systems supporting a USB Mass Storage interface. -
Page 47: Ringtone Volume
English • System to select from preinstalled files. User to select from your downloads. • Select one of the available melodies, the melody will be played. Press Ok to confirm or Back to discard changes. Tip: Set up the Alarm, Message tone, Keypad tone, E-mail tone, Closing tone, Opening tone, Power on and Power off in the same way. -
Page 48: Main Menu
Press Done to save. Main menu You can select different styles for the main menu. Tip: Doro's unique Action based menu allows you to navigate your phone, by just asking yourself, What do I want to do? Press Menu Settings... -
Page 49: Lcd Backlight
By pressing the assistance button on the Doro phone, the user can easily call for help. First the alarm contacts the relatives, and if no relative is able to answer it is automatically sent to one of our alarm centres, where there is staff on duty 24/7. -
Page 50: Organiser
English • View (photos/images) for single view. Send by MMS to send as picture message (Create and • Send send picture message (MMS), p.23)/Send by Bluetooth to send to a Bluetooth device (Bluetooth ® , p.35)/Send by e-mail (Create and send e-mail, p.25). •... -
Page 51: Calendar
English • For a repeated alarm, select Repeated. Scroll through the list of days and press On to enable or Off to disable the alarm for each day. Press Save to confirm. Snooze or turn off When the alarm goes off a signal will sound. Press Stop to turn off the •... -
Page 52: Daily Reminder
English Daily reminder Press Menu Organiser Daily reminder Add. Enter time, then press V. Enter subject, see Enter text , p.5 Press Ok to confirm. Snooze or stop When the alarm sounds: Select Stop to stop. • Select Snooze to repeat after 9 minutes. •... - Page 53 English Turning the radio on Connect a headset to the headset socket Press Menu FM radio. The radio is turned on. The tuned More frequency is displayed. Select channel using V or v. Tip: Press to return to standby mode. The radio will continue to play. Volume Press Menu More...
-
Page 54: Calculator
English Press Yes to confirm. Manual input (change the search mode) Press Menu More FM radio Options Manual input: Fine tune to tune manually with V or v. • Auto search to use automatic station search with V or v. •... -
Page 55: Status
English • Sound effect to enable or disable by using the side Settings buttons +/- to select On or Off. Volume to adjust the sound volume using the side • Settings buttons +/–. Press Ok to confirm. Status Scroll through the Status list to get further information about the icons shown on top of your display. -
Page 56: Additional Functions
English Additional functions Display status symbols Signal strength No network coverage Ring only Data transmission Ring + vibration Alarm active Vibration only Battery level Silent Call divert activated Bluetooth on, visible to Roaming (in other network) others Bluetooth on, invisible to Missed call others Headset connected... -
Page 57: Reset Settings
English Processing, please wait Assistance button call SMS/MMS unread SMS/MMS read SMS/MMS unsent SMS/MMS sent E-mail without and with at- E-mail without and with at- tachment unread tachment read Reset settings Press Menu Settings Security. Select Reset settings to reset the phone settings. All the changes that you have made to the phone settings will be reset to default settings. - Page 58 English Failure to charge the battery Battery or charger Check the battery and charger. damaged Improve the charging environment. Battery should only be charged in temperatures between 0 °C and 40 °C Check the charger connections. Charger incorrectly con- nected to phone or power socket Standby time decreases Install a new battery.
- Page 59 English Weak signal Try again from another location. Too far from base station Try calling at a later time. Network congestion Echo or noise Hang up and redial. This may switch to another Regional problem from network relay. bad network relay Sound Ensure that you do not cover the built-in Others cannot hear you...
-
Page 60: Safety Instructions
English Safety instructions CAUTION The unit and the accessories can contain small parts. Keep all of the equipment out of the reach of small children. The mains adapter is the disconnect device between the product and mains power. The mains socket outlet must be close to the equipment and easily accessible. Network services and costs Your device is approved for use on the WCDMA 900/2100 MHz, GSM 900/1800/1900 MHz networks. -
Page 61: Areas With Explosion Risk
English Areas with explosion risk Always turn off the unit when you are in an area where there is a risk of explosion. Follow all signs and instructions. There is a risk of explosion in places that include areas where you are normally requested to turn off your car engine. -
Page 62: Gps/Location Based Functions
English GPS/Location based functions Some products provide GPS/Location based functions. Location determining functionality is provided “As is”. No representation or warranty are made as to the accuracy of such lo- cation information. Use of location-based information by the device may not be uninter- rupted or error free and may additionally be dependent on network service availability. -
Page 63: Malware And Viruses
English Malware and viruses To protect your device from malware and viruses, follow these usage tips. Failure to do so may result in damages or loss of data that may not be covered by the warranty service. • Do not download unknown applications. •... -
Page 64: Warranty
Please note that this is a voluntary manufacturer’s warranty and provides rights in addi- tion to, and does not affect statutory rights of end-users. This guarantee does not apply if batteries other than DORO original batteries are used. Specifications Network bands (MHz) -
Page 65: Copyright And Other Notices
Doro reserves the right to revise this document or withdraw it at any time without prior notice. -
Page 66: Hearing Aid Compatibility
Malmö, Sweden. To be valid, such a request must be made within three (3) years from the date of the distribution of this product by Doro AB, or in the case of code licensed under the GPL v3 for as long as Doro AB offers spare parts or customer support for this product model. -
Page 67: Specific Absorption Rate (Sar)
English Specific Absorption Rate (SAR) This device meets applicable international safety requirements for exposure to radio waves. Your mobile device is a radio transmitter and receiver. It is designed not to exceed the limits for exposure to radio waves (radio frequency electromagnetic fields) recommen- ded by international guidelines from the independent scientific organization ICNIRP (In- ternational Commission of Non-Ionizing Radiation Protection). -
Page 68: Correct Disposal Of Batteries In This Product
Declaration of Conformity Hereby, Doro declares that the radio equipment type DFC-0260 (Doro 6621) is in compli- ance with Directives: 2014/53/EU and 2011/65/EU including delegated Directive (EU) 2015/863 amending Annex II. - Page 69 English...
- Page 70 DFC-0260 (Doro 6621) (2011) English Version 1.0 ©2019 Doro AB. All rights reserved. www.doro.com REV 19475 — STR 20180522...
Need help?
Do you have a question about the 6621 and is the answer not in the manual?
Questions and answers