Advertisement
USER'S MANUAL
CONTENT
BRIEF INTRODUCTION.............................................................................................01-02
IMPORTANT SAFETY PRECAUTIONS.....................................................................03-05
ASSEMBLY INSTRUCTIONS.....................................................................................06-08
EXERCISE GUIDE.....................................................................................................08--09
OPERATION INSTRUCTIONS....................................................................................09-13
MAINTENANCE INSTRUCTIONS..............................................................................14-15
Advertisement

Summary of Contents for Jaxpety Sandinrayli TY91G0276
-
Page 1: Table Of Contents
USER’S MANUAL CONTENT BRIEF INTRODUCTION.....................01-02 IMPORTANT SAFETY PRECAUTIONS..............03-05 ASSEMBLY INSTRUCTIONS..................06-08 EXERCISE GUIDE.....................08--09 OPERATION INSTRUCTIONS..................09-13 MAINTENANCE INSTRUCTIONS................14-15... -
Page 2: Brief Introduction
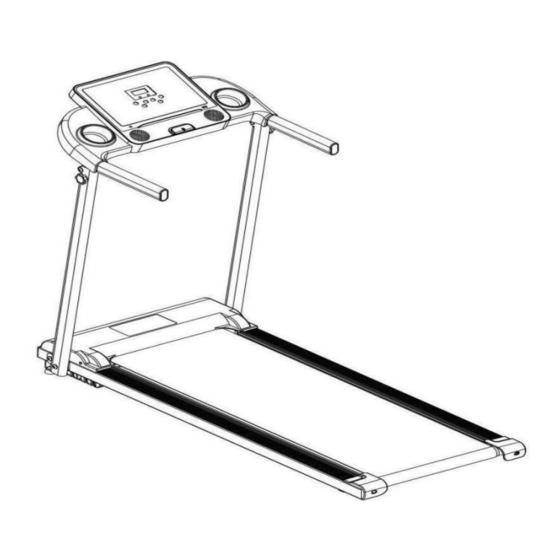
BRIEF INTRODUCTION (all parts are indicated in the diagram) Digital Meter Safety Key Handrail Right Column Left Column Motor Upper Cover Running Belt Edge Bar Motor Bottom Cover Right Rear Corner Guard Body Frame Left Rear Corner Guard... - Page 3 ATTENTION: 1.Please definitely read the guide for operations carefully before assembly. If anything goes wrong during the assembly process, please contact us for customer service. 2.Please be aware that the return of the treadmill is not available in case of product failure due to improper or forced assembly! 3.The main commodity and its accessories are required together with the original package intact when the return is reasonable.Otherwise it must be paid at the price if the damage is...
-
Page 4: Important Safety Precautions
TECH SPECS working voltage AC110V~50Hz maximum safety weight load 100kg overall dimension 1270mm*570mm*1070mm motor peak power 2.0 HP effective area 1050mm*383mm continuous output 500W function walk/run Protection Level Against Electric Shock 1 Class PLEASE READ ALL THE INSTRUCTIONS IN THE MANUAL CAREFULLY BEFORE ASSEMBLY AND USE. - Page 5 WARNING: IN ORDER TO REDUCE ACCIDENTS AND INJURIES, PLEASE OBSERVE THE FOLLOWING RULES. 1.Please check if your garment is buttoned or zipped before using the treadmill. 2.Please wear appropriate clothes that would not be easily hooked or caught in the treadmill. 3.Make sure the power cord is far away from hot objects.
- Page 6 (20)Please don’t forget to confirm whether there are people and pets (back,bottom, front)or not during operation and when you load and take out the product. PROHIBITON! 1.Do not use the product if the housing is cracked and shed (internal structure leaks) or there are welding parts fell off---otherwise you may get injured by accident.
-
Page 7: Assembly Instructions
properly grounded. Do not modify the plug provided with the product – if it does not fit the outlet, please find a proper outlet installed by a qualified electrician. Please make sure that the product is connected to an outlet having the same shape and configuration as the plug. And no change-over adapter socket is approved. - Page 8 4.Place the security key at the correct position and connect it to the digital meter. Once the installation is done, this treadmill could be plugged in and start on.
-
Page 9: Exercise Guide
EXERCISE GUIDE WARM-UP 5 to 10 minute warm-up is required before exercise on the treadmill. BREATH Do not hold your breath while exercising. Generally we recommend inspiration by nose and expiration by mouth in accordance with your movements. Please cease your exercise instantly when you are too short of breath. -
Page 10: Operation Instructions
like to run on.Then stop to do stretch exercise for 5 times as the methods shown below,10 seconds or more for both feet each time, and do it again after running. Reach Down Knees slightly bent and body slowly bent forward, back and shoulders relax, trying to touch toes. Keep 10-15 seconds and relax. - Page 11 ‘SPEED’ DISPLAY This display area could show the speed of running belt when the treadmill is in operation, ranging from 1~8 km/h, and the number signal of a countdown from 3 to 1 when the running is starting. ‘TIME’ DISPLAY This display area could show forward timing (from 0:00 to 99:59) which will be reset at 99:59 and the countdown from the set time to zero.
- Page 12 MANUAL MODE 1)Directly press ‘START’ in the standby state and the treadmill will start operating at the speed of ‘1’. Other indicators will count forward from zero and you could press ‘+’ and ‘-’ to change the speed. 2)Press ‘MODE’ to enter into time countdown mode and ‘TIME’ DISPLAY will flash showing ‘15:00’. Press ‘+’...
- Page 13 DISPLAY VALUE RANGE Parameters Initial Value Default Value Setting Range Indication Range Time(min.&sec.) 0:00 15:00 5:00~99:00 0:00~99:59 Speed(km/h) Distance(km) 0.00 1.00 0.5~99.9 0.0~99.9 Heart Rate(beat) Calories(KCAL) 50.0 10.0~990 0.0~990 Gradient(section) SAFETY LOCK At any state, pulling off the SAFETY KEY can stop the running of the treadmill urgently with the SPEED DISPLAY showing "E07".
- Page 14 ERROR CODES Fault Fault Fault Processing Description Communicatio Potential reasons: n anomaly: the The communication is blocked, please check each connection communication point from the digital meter to the under control and change the anomaly broken lines. between the under control and the digital meter Motor not...
-
Page 15: Maintenance Instructions
MAINTENANCE INSTRUCTIONS LUBRICATION After running tape is used for a period of time, it must be lubricated with special methyl-silicone oil. 1.Recommendations for Lubrication Frequency: The Running Time Lubrication Frequency less than 3 hours each week once for every 5 months 4-7 hours each week once for every 2 months over 7 hours each week... - Page 16 3.Uneven exertion of user's feet. Usually a few minutes of non-load running could fix the problem. If the deviation can not be automatically recovered, please use the attached 5#/6# inner hexagonal wrenches to turn the belt gradually, at a quarter circle as a unit. The deviation could severely damage the running belt, which is beyond the scope of warranty and must be repaired in time by the user following the instructions.
Need help?
Do you have a question about the Sandinrayli TY91G0276 and is the answer not in the manual?
Questions and answers