
Related Manuals for Sears SG60


Summary of Contents for Sears SG60
- Page 1 Robotic Vacuum Cleaner Instructions Manual Before using this product, please carefully read this manual and keep it properly.
-
Page 3: Table Of Contents
Table of Contents About Robot..................................1 Installation..................................6 APP Connection................................. 9 Use Instructions.................................11 Routine Maintenance.................................14 Parameters................................15 Common Problems................................19 Troubleshooting.................................20 Safety Instructions................................22... -
Page 4: About Robot
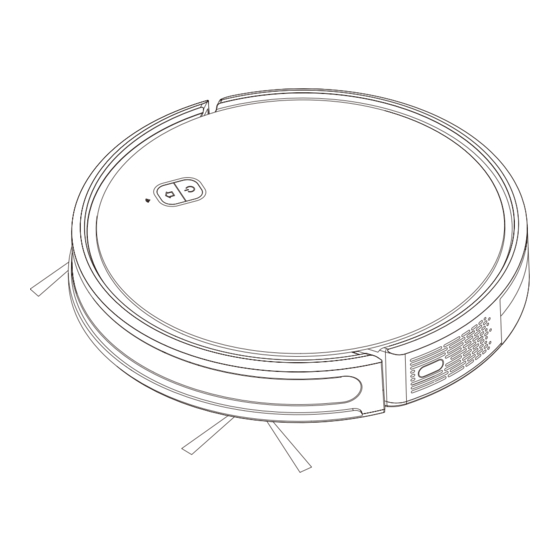
About Robot What's in the Box Robotic Vacuum Cleaner Charging Station Dust Bin Power Adapter Side Brush Spare HEPA Filter and Sponge (for Charging Station) Remote Controller with Battery(Optional) Magnetic Strip(Optional) Cleaning Brush... - Page 5 About Robot Main Unit Wi-Fi Status Light Home Button · ON: Wi-Fi Connected · Return to Charging Station: Short press · Flash: Wi-Fi not connected this button · Off: Sleep or Power off Clean/Power Button · Powe r on or Power off Robot Press and hold this button 3s Reset Button ·...
- Page 6 About Robot Sensor and Structure Cliff Sensor Charging Contact Universal Wheel Search Key Side Brush Battery Cover Bumper Drive Wheel Rolling Brush Dust Bin Anti-collision sensor Infrared receiver sensor...
- Page 7 About Robot Dust Bin Charging Station Power Status Light Filter Cover HEPA Filter Infrared Signal Emitter Sponge Pre-filter Power Socket Charging Dust Bin Contacts Open Button...
- Page 8 About Robot Remote Control Automatic cleaning Start recharging Direction buttons Pause/ start Spot cleaning Edge cleaning Mop Water Control: Suction level High/Middle/Low Note Set High,robot says 3“Di” Set Middle,robot says 2“Di” Set Low,robot says 1“Di”...
-
Page 9: Installation
Installation Precautions Before starting the vacuum cleaner, clean up wires and sundries scattered on the ground, and remove easy-to-fall, fragile, valuable and potentially dangerous items. Avoid being entangled,jammed, dragged, or knocked down by the main unit; otherwise, personal or property damage may be caused. Do not use the robot to clean liquid. - Page 10 Installation 3. Connect the power line and keep it in a proper length. 1. Remove the protection material from both sides of the robot 4. Place the charging dock on a flat ground against the wall; connect to the power supply. .
- Page 11 Installation 5. Do not move the charging dock randomly; avoid direct 6. Power on and charging sunlight on the dock. Hold the button to power on the machine. When the indicator is on, put the main unit against the charging dock for charging. The voice of “start charging”...
-
Page 12: App Connection
APP Connection 1. Download the “Smart Life” app from Google Play 4. Make sure your Smartphone or tablet is connected to a or Apple App store. Or You can access the App by 2.4GHz Wi-F1 Make sure Bluetooth on your scanning the QR codes below. - Page 13 APP Connection 8. Added the devices successfully, enter the operation interface Choose Wi-Fi and enter password, go to the next step Waiting to added devices...
-
Page 14: Use Instructions
Use Instructions Charging Power on and off the machine Tap and hold the button for 3 seconds to power on the machine. Auto mode: After cleaning, the main unit automatically returns to Then, the power indicator is on, and the vacuum cleaner enters the the dock for charging. - Page 15 Use Instructions Spot cleaning Automatic cleaning Upon power on, the machine plans its cleaning route in a Use the button on the controller so that the machine will take zigzag way and finishes cleaning the whole room in an orderly itself as a center to sweep a round zone with the diameter of 1.2 m.
- Page 16 Use Instructions DND mode Edge cleaning No voice prompt in DND mode. Use the smart APP to enable or For indoor cleaning, the machine normally sweeps along a fixed disable the DND mode. object (such as walls). Once cleaning finishes along all sides, it returns to the charging dock.
-
Page 17: Routine Maintenance
Routine Maintenance Side brush (Recommended cleaning frequency: weekly) Roller brush (Recommended cleaning frequency: weekly) 1.Flip the machine, press the buckle on the roller brush cover, and remove the roller 1.Flip the machine, and pull out the side brushes vertically. brush cover. 2.Remove the entangled hair and dirt, and then reinstall the side brushes. - Page 18 Routine Maintenance Clean the dust box Dust box and filter (Recommended cleaning frequency: after each cleaning) 1.After the machine is used for a long time, remove the filter gauze and HEPA filter. 2.Put the removed prefilter and dust box under the faucet for washing (the HEPA 1.Remove the machine cover, lift the handle of the dust box, and take out the dust box.
- Page 19 Routine Maintenance Clean the infrared anti-collision sensor Clean the charging contact (Recommended cleaning (Recommended cleaning frequency:monthly) frequency: monthly) Clean the cliff sensor (Recommended cleaning frequency: monthly)
- Page 20 Routine Maintenance Battery Clean the signal transmission zone (Recommended cleaning frequency: monthly) ·The machine is equipped with a high-performance rechargeable lithium battery pack. To maintain battery performance, keep the machine in charging state in daily use. ·If you do not use the machine for a long time, power it off and store it properly. Charge the machine at least once every 3 months to avoid damage to the battery due to excessive discharge.
-
Page 21: Parameters
Parameters Main unit Specification SG50 Product Model Dimensions 320X320X76mm 2600 mAh rechargeable lithium battery Battery 14.4V Rated voltage Rated power Charging time 300min 600ml Dust box capacity Docking station Specification 158X147X84mm Dimensions 0.6A Rated input Rated output 0.6A... -
Page 22: Common Problems
Common Problems Problem Solution ·The battery power is insufficient. Please place the machine on the docking station, and align with the charging electrode. The machine will be automatically powered on. Failed to power on the machine ·The ambient temperature is below 0°C or above 40°C. Please use the machine when the ambient temperature is 0°C to 40°C. -
Page 23: Troubleshooting
Troubleshooting Error Prompt Solution Cleaning is triggered when the dust box is taken out. Please Error 1: Insert dustbin reinstall the dust box. You may pick up the machine, or the machine is suspended Error 2: Put the vacuum on the floor before starting in the air. - Page 24 Troubleshooting Error Prompt Solution The wheels may be stuck or entangled with foreign objects. Error 8: Wheels are Stuck Please check the wheels and remove the foreign objects. The roller brush may be stuck or entangled with foreign objects. Error 9: Main Brush is Stuck Please check the roller brush and remove the foreign objects.
-
Page 25: Safety Instructions
Safety Instructions Use Restrictions • This machine is only used for floor cleaning at home. Please do not use it outdoors (such as an open balcony), non-ground area (such as a sofa),and commercial or industrial environment. • Do not use the machine in suspended environments without protective fences, such as duplex floors, open balconies, and top of the furniture. - Page 26 Safety Instructions Battery and Charging • Do not use any third-party batteries, docking stations, or chargers. • Do not disassemble, repair, or modify the battery or docking station without permission. • Do not place the docking station near heat sources, such as radiators. •...
Need help?
Do you have a question about the SG60 and is the answer not in the manual?
Questions and answers