Advertisement
Roderick
System Installation Guide
1
Yo, here we go! Position the rst
bracket on your wall, ideally on a stud
or blocking. See Rad Tip #1 below if
you don't know what blocking is.
Mark top-most screw hole with the
screw tip. Remove bracket from wall.
Grab a can of cola, crack it open.
5
Screw holes that are not on studs or
blocking require a wall anchor.
Remove the brackets from your wall
then predrill applicable screw
locations with a 1/4" bit to install wall
anchors. Take a swig of your brew.
Toggler® Anchors
Recommended
9
Ceremoniously place your dungeon
master guild (and all 50 hand painted
characters) on shelf, stand back, and
take that last sweet swig of carbon-
ated goodness. You did it, long
distance high- ves!
Tools You'll Need
Drill/Driver
Measuring Tape
Level
Pencil
Painters Tape
⁄ " Drill Bit
O P T I O N A L T O O L S
¼" Drill Bit
2
Measure the bracket spacing from
screw hole mark and righteously
apply painters tape to general
mounting area of second bracket.
Measure again and draw a short
vertical line on the tape. See Rad
Tip #2 below.
Bracket 2
Bracket 1
Bracket Spacing
See Rad Tip
#2 below.
6
Position the brackets, install all wall
screws. Use a level to check each
bracket for sag. See Rad Tip #4 to
remove sag. Con rm the brackets
are secure to wall.
10
Post your sweet Roderick shel e on
Instagram. Warning: Rad prizes may
apply to shel e of the week.
@shelfology #radshel e
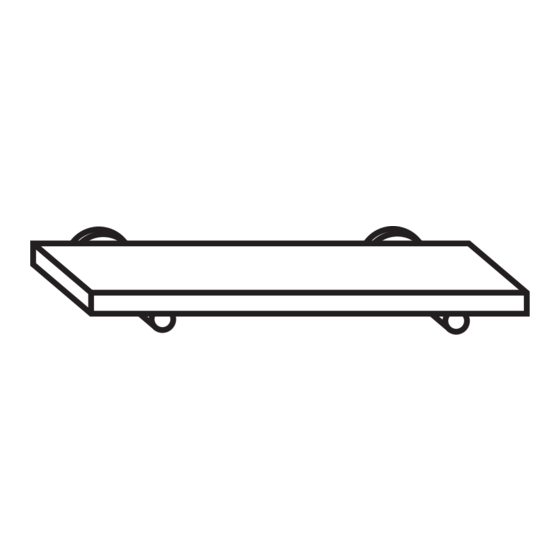
What's Included
1x
Finished Shelf Slab
2x
Shelf Bracket
4x
1 ¼" Shelf set screws
3
Place a level on rst screw hole. Find
the intersection at level and vertical
line. If you do not have a long
enough level, see Rad Tip #3 below.
Use a wall screw to punch a hole into
the wall behind painters tape.
Remove the tape.
7
Slide the magnetic coverplates onto
the rods to cover the screw holes.
Lay the top shelf on your brackets
and position as desired. See Rad Tip
#5 below.
Rad Tip #1 The more studs you
drill into, the better. Utilize all
studs and blocking available.
Blocking refers to pieces of
wood or other material that run
between wall studs in order to
provide support and attachment
sites for brackets.
Rad Tip #2 Bracket spacing is
up to you. It's part of Roderick's
insanely cool aesthetic. With
that said, these brackets should
never be more than 48" apart.
Saggy shelves suck!
Rad Tip #3 You can turn a short
level into a long one by laying it
on a straight object like a yard
stick. Just hold it against the
wall with your bullet level on top
and measure!
Still need help? Speak with a
Shelfologist today or see back of
installation guide for further
motivational support.
C A L L A S H E L F O L O G I S T
949.244.1083
C H A T W I T H A S H E L F O L O G I S T
hello@shelfology.com
V I S I T U S O N L I N E
www.shelfology.com
How did we do?
You'll get an email soon asking for a
product review, and we'd be stoked if
you oblige. You rock in advance!
4
Install the top screw locations.
Vertically level each bracket to
ensure set screw holes in rods are
pointing straight up. Punch a hole in
all remaining screw locations with
screw tip.
Set
screw holes
levelled vertically
8
Hold the shelf steady and use a set
screw to poke a hole on the shelf.
Remove shelf. Then, using your ⁄ "
drill bit, predrill set screw locations
(Don't drill through the top of your
shelf!) before installing set screws
into the shelf.
Rad Tip #4 To remove sag, a
shim can be used. If you do not
have a wood shim, something
solid like a dime or washer can
be placed between the wall and
the bracket edge to raise or
lower the rod elevation.
Rad Tip #5 If you want our
opinion, brackets should be set
3"
3"
3½" OC (on center ) from each
OC
OC
end of the shelf, with an
additional centered bracket for
shelves over 48".
*WARNING: Shelf hardware
must be correctly installed into
studs, wall blocking, sheetrock
or anchors. Failure to do so may
result in sagging shelves,
falling objects, or serious
injury.
Advertisement
Table of Contents

Related Manuals for Shelfology Roderick


Summary of Contents for Shelfology Roderick
- Page 1 Toggler® Anchors Recommended Ceremoniously place your dungeon Post your sweet Roderick shel e on Rad Tip #1 The more studs you Rad Tip #4 To remove sag, a Instagram. Warning: Rad prizes may master guild (and all 50 hand painted drill into, the better.
- Page 2 KEEP ON SMILING Collect ’em all! Visit www.shelfology.com for more shelf radness...
Need help?
Do you have a question about the Roderick and is the answer not in the manual?
Questions and answers