Advertisement
Quick Links
Clark
Hardware Installation Guide
Wood Preparation
A. Choose your preferred wood species and
dimensions. We recommend:
1"- 5" thick x 8½"-10½" D x up to 48" L for 4½" kit
1"- 5" thick x 10"-12" D x up to 48" L for 7½" kit
1"- 5" thick x 12½"-14½" D x up to 48" L for 10½" kit
B. For shelves longer than 48" add additional
turnbuckles.
Wood Drilling
A. Layout all holes.
B. Drill the 1" diameter holes (if thicker than 1").
C. Drill the ⁄ " Diameter holes.
D. Drill pocket holes or cut dado for cleat.
E. Install hardware per installation guide.
Note: A ½" x ½" piece of c-channel aluminum, or
equivalent, may be used as a cleat.
2
Fix washers and nut onto J-bolt and
tighten with socket wrench until just
barely snug. Overtightening the nut will
damage the wood!
6
Measure from shelf top equal to
distance B -2" then mark.
Dist. B
2 "
Tools You'll Need
Drill
1" forschner/paddle bit
" drill bit
Pocket hole bit + jig OR
½" router dado bit for cleat
Square
Bullet level
Pencil
Socket wrench
Silicone glue
WA L L P L AT E
T U R N B U C K L E
D I S T. B M I N U S 2 "
J B O LT
" H O L E
> 1 "
P O C K E T H O L E
1 " H O L E
O R C L E AT
F R O N T
WA L L
" H O L E
< 1 "
2 " 6 "
6 " 1 8 "
3
With help, hold shelf up to wall in
desired position and level with bullet
level. Lightly draw lines on top edge of
level shelf and ends of shelf, mark
pocket screw holes. Hold cleat and mark
holes if using cleat. Tip: Use blue
painters tape to draw on wall.
7
Center wall plate on line with bottom
edge on mark, then mark screw holes.
What's Included
2x
Turnbuckle Body
2x
Wall Plate
2x
J Bolt
6x
Wall Fastener Set
2x
Nut and Washer Set
P O C K E T
H O L E
D I S T. B
T O P O F
B O T T O M O F
S H E L F
S H E L F
" H O L E
1 " H O L E
2 " 6 "
D I S T.
D I S T.
A
A
1 6 "
4 8 ", P E R 2 T U R N B U C K L E S
4
Mark top edge equal to distance A
inward from edges of shelf.
Dist. A
8
Install wall anchors if not mounting into
studs. Or install wall plates and cleat (if
using a cleat).
Toggler® Anchors
Recommended
Still need help? Speak with a
Shelfologist today or see back of
installation guide for further
motivational support.
C A L L A S H E L F O L O G I S T
949.244.1083
C H A T W I T H A S H E L F O L O G I S T
hello@shelfology.com
V I S I T U S O N L I N E
www.shelfology.com
How did we do?
You'll get an email soon asking for a
product review, and we'd be stoked if
you oblige. You rock in advance!
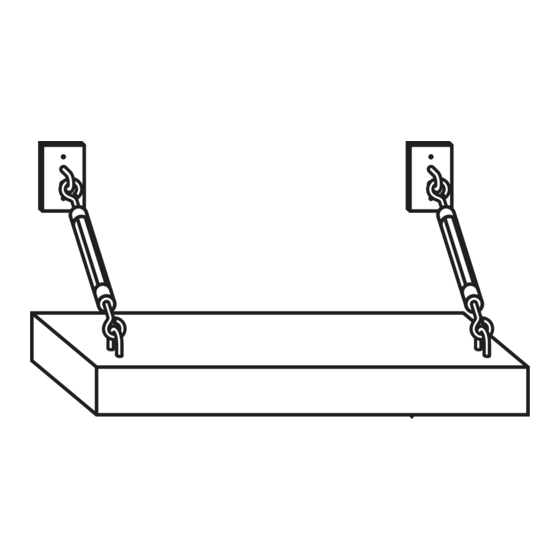
1
Twist the turnbuckle eyebolts until
exposed threads are symmetrical. Loop
turnbuckle through the J-bolt and push
threaded portion of J-bolt through the
shelf, yo.
5
Using marks made in step 4, draw
vertical lines using square.
9
Attach shelf/turnbuckle bolts to wall
plate hooks and set onto cleat or loosely
fasten pockethole screws through shelf.
Using a bullet level, make the shelf level
front to back by twisting turnbuckles.
Tighten pockethole screws or secure
shelf to cleat with silicone glue.
Advertisement

Related Manuals for Shelfology Clark


Summary of Contents for Shelfology Clark
- Page 1 Clark Tools You’ll Need What’s Included Still need help? Speak with a Shelfologist today or see back of installation guide for further Hardware Installation Guide Turnbuckle Body motivational support. Drill C A L L A S H E L F O L O G I S T 1”...
- Page 2 BE BOLD Collect ’em all! Visit www.shelfology.com for more shelf radness...
Need help?
Do you have a question about the Clark and is the answer not in the manual?
Questions and answers