
Subscribe to Our Youtube Channel
Related Manuals for Jikel Saturn


Summary of Contents for Jikel Saturn
- Page 1 Saturn Stroller F R A N C E D E S I G N E D USER MANUAL IMPORTANT www.jikelbaby.com Retain for Future Reference & Read Carefully E N 1 8 8 8...
- Page 2 Thank you for trust to our company and products! For parents: Welcome to use Satourn car seats. Please read user manual carefully before installing and using. 1. ISOFIX SEMI-UNIVERSAL 0+I (0-18KG): ISOFIX+TOP TETHER+HARNESS Notice 1. This is ISOFIX CHILD RESTRAINT SYSTEM. It is approved to Regulation No.44,04 series of amendments for general use in vehicles fitted with ISOFIX anchorages systems.
- Page 3 Notice 1.This is a“Universal”child restraint. It is approved to Regulation No.44, 04 series of amendments, for seneral use in vehicles and it will fit most, but not all, car seats. 2. A corrcet fit is likely if the vehicle manufacturer has declared in the vehicle handbook that the vehicle is capable of accepting a“Universal”child restraint for this age group.
- Page 4 3.This child restraont has been classified as“Universal”under more stringent conditions than those which applied to earlier designs which do not carry this notice. 4.If in doubt, consult either the child restraint manufacturer or the retailer. Only suitable for use in the listed vehicles fitted 3 point/with retractor safety-belts, approved to ECE Regulation No.16.
-
Page 5: Table Of Contents
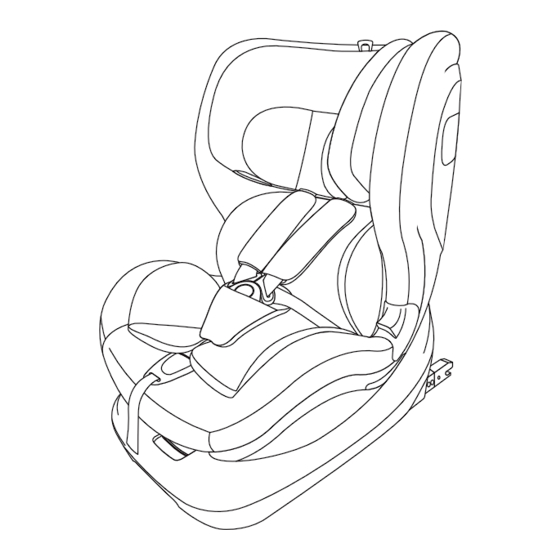
Table Of Contents Know Your Car Seat (Front) Know Your Car Seat (Opposite) Selection Criteria for Baby Car Seat Car Seat Function Introduction Group 0+I (0-18kg) Installation (Rearward facing placement) Group I (9-18kg) Installation (Forward facing placement) 5-Point Harness Removal Group II+III (15-36kg) Installation and Using method Removing the Cover Cleaning and Maintenance... -
Page 6: Know Your Car Seat (Front)
Know Your Car Seat (Front) Headrest setting handle Group I Cushion (Using Harness Guider for by baby from 9-12kg) Group II and III Headrest Central Adjuster Gear Indicator for Setting posture Pillow (Using by baby < 9 kg) Harness Adjustment Rotation Control Handle Strap Guide hook for Group II+III... -
Page 7: Know Your Car Seat (Opposite)
Know Your Car Seat (Opposite) Rear cover ISOFIX release status ISOFIX access status Top Tether Hook ISOFIX Connector(G0+I) Harness Shaft ISOFIT Connector(GII+III) Shoulder Harness Top Tether Adjuster Guiding slot for rearward facing Strap X2 Rear Cover Button Side protection Manual Storage Slot Installation Instruction Shoulder Connection Harness... -
Page 8: Selection Criteria For Baby Car Seat
Selection Criteria for Baby Car Seat This type baby car seat is applied to Group0+/I/II/III and the requirement for weight is from 0 to 36kg. It is suitable for around 0 to 12 year-old children. The vehicle should have ISOFIX system that meet the requirement of ECE R14. -
Page 9: Car Seat Function Introduction
Car Seat Function Introduction 1. The Function of Rotation Forward Facing Placement Pull Rearward Facing Placement As shown in figure 1, using thumb pull the Rotation Control Handle to rotate the car seat. Both of two sides can be adjusted (See figure 1, 2, 3, 4, 5). When finishing rotation, release the Rotation Control Handle, it will show "OK"... - Page 10 Group 0+I (0-18kg) Installation (Rearward facing placement) ATTENTION: 1. Only suitable use in the listed vehicles fitted with ISOFIX anchorages systems and approved to ECE Regulation No. 14. 2. The installation for Group 0+I is rearward facing and is applied to children from 0 to 18kg. 3.
- Page 11 Car Seat Function Introduction Pull click Push Step 6: Step 5: As shown in figure 6, one hand pull As shown in figure 5, insert the two ISOFIX Setting Handle and the other hand ISOFIX connectors firmly into the ISOFIX fixed push the baby car seat base to make it fix.
- Page 12 Step 3: As shown in figure 3 and 4, pull out the top tether to go through the middle of car seat headrest and hook the tether anchorage behind (Refer to the User Manual from automaker). Step 4: As shown in figure 5, tighten the top tether until Top Tether Adjuster shows green.
- Page 13 Step 3: As shown in figure 3, pull out both of the shoulder belt to both sides of the seat. Step 4: As shown in figure 4, have your child sit on the seat to ensure the lap belt restrict the position of pelvis.
- Page 14 Group I (9-18kg) Installation (Forward facing placement) ATTENTION: 1. Only suitable use in the listed vehicles fitted with ISOFIX anchorages systems and approved to ECE Regulation No. 14. 2. The installation for Group I is forward facing and is applied to children from 9 to 18kg. 3.
- Page 15 Pull click Push Step 5: Step 6: Step 7: As shown in figure 5, before As shown in figure 6, insert the As shown in figure 7, one hand insert the two ISOFIX connectors into the two ISOFIX connectors firmly into the pull ISOFIX Setting Handle and the other ISOFIX fixed point, ISOFIX indication ISOFIX fixed point in the car seat with a...
-
Page 16: Group I (9-18Kg) Installation (Forward Facing Placement)
Group I (9-18kg) Installation (Forward facing placement) 3. Harness Installation for Group I Step 1: As shown in figure 1, pull out some top tether strap. Step 2: As shown in figure 2, rotate the car seat to the 90 degree ((Please refer to P8 -The Function of Rotation). - Page 17 Methods to use harness buckle: guide the two buckle latches together and engage them before putting them into the harness buckle with a click nose. Pull the buckle latches to check whether it is locked well. The buckle latches will be released if you press the red button. Step 7: As shown in figure 7, pull harness adjustment strap outward to fix child and avoid harness strap to constrict child too much.
-
Page 18: 5-Point Harness Removal
5-Point Harness Removal Step 1: Step 2: Step 3: As shown in figure 1, loose the As shown in figure 2, press the As shown in figure 3, tighten top tether strap and rotate the car seat to central adjuster and loose the shoulder the top tether and put it in the headrest the 90 degree (Please refer to P8 -The belt. - Page 19 Step 6: As shown in figure 6, separate the harness buckle and car seat. Step 7: Shoulder strap storage: As shown in figure 7 (1-2-3), roll up the strap and place into the groove in the base. Front Step 8: Attention: Put the top tether into the rear cover and close it.
-
Page 20: Group Ii+Iii (15-36Kg) Installation And Using Method
Group II+III (15-36kg) Installation and Using method ATTENTION: 1. There is only one position level for Group II+III and it is level 2. 2. The installation for Group II+III is forward facing and is applied to children from 15 to 36kg. 3. - Page 21 2. SEMI-UNIVERSAL II+III (15-36kg): ISOFIT+3-POINT BELT Step 1: As shown in figure 1, rotate car seat to forward facing (Please refer to P8 -The Function of Rotation). Then, pull the Seat Position Adjustment Handle to the level 2. Step 2: As shown in figure 2, release ISOFIX connector.
-
Page 22: Removing The Cover
Removing the Cover 1. Removing the cover of car body 2. Removing the cover of headrest Step 1: As shown in figure 1, adjust the headrest to the right height firstly and then remove the headrest cover from the frame. Fabric hook Fabric hook Removing the cover of car body:...
Need help?
Do you have a question about the Saturn and is the answer not in the manual?
Questions and answers