Table of Contents
Advertisement
Quick Links
Advertisement
Table of Contents

Related Manuals for BenQ TK700 Series


Summary of Contents for BenQ TK700 Series
- Page 1 Digital Projector User Manual Home Entertainment Series I TK700 V 1.00...
-
Page 2: Warranty And Copyright Information
For other information, please visit www.BenQ.com. Copyright Copyright © 2021 by BenQ Corporation. All rights reserved. No part of this publication may be reproduced, transmitted, transcribed, stored in a retrieval system or translated into any language or computer language, in any form or by any means, electronic, mechanical, magnetic, optical, chemical, manual or otherwise, without the prior written permission of BenQ Corporation. -
Page 3: Table Of Contents
Table of Contents Warranty and Copyright information ................2 Important safety instructions ....................4 Introduction .......................... 7 Shipping contents ............................7 Projector exterior view ..........................8 Controls and functions..........................9 Positioning your projector ....................11 Choosing a location ..........................11 Obtaining a preferred projected image size.................. -
Page 4: Important Safety Instructions
Important safety instructions Your projector is designed and tested to meet the latest standards for safety of information technology equipment. However, to ensure safe use of this product, it is important that you follow the instructions mentioned in this manual and marked on the product. 1. - Page 5 9. Never replace the light source assembly or 13. Always place the projector on a level, any electronic components unless the horizontal surface during operation. projector is unplugged. - Do not use if tilted at an angle of more than 10 degrees left to right, nor at angle of more than 15 degrees front to back.
- Page 6 If the projector does become wet, - Locations where the altitudes are higher than 3000 m disconnect it from the power supply's power (10000 feet). outlet and call BenQ to have the projector serviced. 3000 m (10000 feet)
-
Page 7: Introduction
Introduction Shipping contents Carefully unpack and verify that you have all of the items shown below. If any of these items are missing, please contact your place of purchase. Standard accessories Projector Remote control with batteries Power cord Quick start guide Regulatory statements Warranty card* •... -
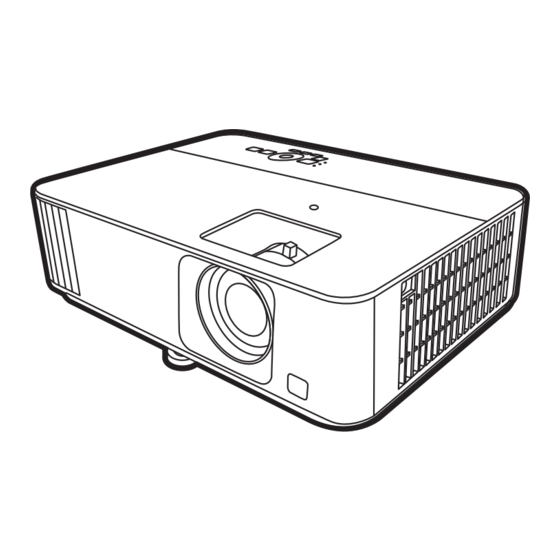
Page 8: Projector Exterior View
Projector exterior view 12 13 1. Focus ring and Zoom ring 11. RS-232 control port 2. Vent (air exhaust) 12. Audio output jack 3. Adjuster feet 13. USB Type A port (Power supply 1.5 A) 4. Projection lens 14. AC power jack 5. -
Page 9: Controls And Functions
Controls and functions Projector & Remote control All the key presses described in this document are available on the remote control or projector. /SOURCE POWER Displays the source selection bar. Toggles the projector between standby mode and on. 7. ECO BLANK Used to hide the screen picture. - Page 10 14. SOUND MODE KEYSTONE Selects an available sound mode. Displays the keystone menu. See Correcting 15. LUMIEXPERT BOOST keystone on page 15 for details. Displays the LumiExpert menu. MUTE Volume keys Toggles projector audio between on and off. Decreases or increases the projector volume. 13.
-
Page 11: Positioning Your Projector
Purchase the BenQ Projector Ceiling Note that a special rear projection screen and the Mount Kit from your dealer to mount your BenQ Projector Ceiling Mount Kit are required projector on the ceiling. for this installation location. After turning on the projector, go to Advanced menu - Installation > Projector Position, press OK and press to select a setting. -
Page 12: Obtaining A Preferred Projected Image Size
Obtaining a preferred projected image size The distance from the projector lens to the screen, the zoom setting (if available), and the video format each factors in the projected image size. Projection dimensions 16:9 Screen diagonal Screen Center of lens Vertical offset Projection distance •... -
Page 13: Mounting The Projector
If you use a non-BenQ brand projector mounting kit, there is a safety risk that the projector may fall down due to an improper attachment through the use of the wrong gauge or length screws. -
Page 14: Adjusting The Projected Image
Ceiling/Wall mount installation diagram Ceiling/Wall mount screw hole: M4 x 8 mm 113.54 Unit: mm Adjusting the projected image Adjusting the projection angle If the projector is not placed on a flat surface or the screen and the projector are not perpendicular to each other, the projected image becomes trapezoidal. - Page 15 Fine-tuning the image size and clarity • Adjust the projected image to the size that you • Sharpen the image by rotating the focus ring. need using the zoom ring. Correcting keystone Keystoning refers to the situation where the projected image becomes a trapezoid due to angled projection.
-
Page 16: Connection
Connection When connecting a signal source to the projector, be sure to: 1. Turn all equipment off before making any connections. 2. Use the correct signal cables for each source. 3. Ensure the cables are firmly inserted. A/V device Notebook or desktop computer HDMI HDMI RS-232... - Page 17 Connecting audio The projector has built-in mono speaker(s) which are designed to provide basic audio functionality accompanying data presentations for business purposes only. They are not designed for, nor intended for stereo audio reproduction use as might be expected in home theater or home cinema applications. Any stereo audio input (if provided), is mixed into a common mono audio output through the projector speaker(s).
-
Page 18: Operation
Operation Installing the QS01 HDMI Media Streaming (Optional) The QS01 HDMI Media Streaming is an Android TV (ATV) dongle to be used with the projector. For more information about this dongle, please contact the place you purchased this projector. If you already have the dongle, see the illustrations below to install the dongle. Make sure that the dongle cover is installed back correctly after the dongle is plugged. - Page 19 The Setup Wizard screenshots below are for reference only and may differ from the actual design. Step 1: Specify Projector Position. For more information about projector position, see Choosing a location on page Step 2: Specify OSD Language. Step 3: Specify 2D Keystone, and choose to activate Auto Vertical Keystone.
- Page 20 5. Switch all of the connected equipment on. The projector will search for input signals. The current input signal being scanned appears. If the projector does not detect a valid signal, the message “No Signal” will continue displaying until an input signal is found.
-
Page 21: Setting Up The Qs01 Hdmi Media Streaming (Optional)
Setting up the QS01 HDMI Media Streaming (Optional) Before you start Check that you have: • A Wi-Fi Internet connection • A Google Account Step 1: Press and hold OK for 5 seconds to pair your remote control. Step 2: Set up your device. - Page 22 • Using your phone or computer • Using your remote control Step 3: Display Android TV home screen. For more information, visit https://support.google.com/androidtv/. Operation...
-
Page 23: Using The Menus
Using the menus The projector is equipped with 2 types of On-Screen Display (OSD) menus for making various adjustments and settings. • Basic OSD menu: provides primary menu functions. (See Basic Menu on page • Advanced OSD menu: provides full menu functions. (See Advanced Menu on page To access the OSD menu, press MENU on the projector or remote control. -
Page 24: Securing The Projector
Please write down the recall code, and contact BenQ Customer Center. 2. Write down the number and turn off your projector. 3. Seek help from the local BenQ service center to decode Recall Code: the number. You may be required to provide proof of... -
Page 25: Switching Input Signal
Changing the password 1. Go to Advanced menu - System > Security Settings. Press OK. The Security Settings page appears. 2. Highlight Change Password and press OK. 3. Enter the old password. • If the password is correct, another message Input New Password appears. •... -
Page 26: Shutting Down The Projector
Shutting down the projector 1. Press and a confirmation message will appear prompting you. If you don't respond in a few seconds, the message will disappear. 2. Press a second time. The power indicator flashes orange, the projection light source shuts down, and the fans will continue to run for approximately 90 seconds to cool down the projector. -
Page 27: Menu Operation
Menu operation Please note that the on-screen display (OSD) menus vary according to the signal type selected and the projector model you are using. The menu items are available when the projector detects at least one valid signal. If there is no equipment connected to the projector or no signal detected, limited menu items are accessible. - Page 28 Bright/Living Room/Game/Sports/ Cinema From User Management Rename User Mode Brightness 0–100 Contrast 0–100 Sharpness 0–10 Brilliant Color 0–10 Gamma Selection 1.8/2.0/2.1/2.2/2.3/2.4/2.5/2.6/BenQ Color Normal/Cool/Native/Warm Temperature R Gain/ Color G Gain/ 0–200 Temperature B Gain Tuning R Offset/ Advanced Color G Offset/ 0–511...
- Page 29 Function descriptions Menu Descriptions The projector is preset with several predefined picture modes so that you can choose one to suit your operating environment and input signal picture type. • Bright Maximizes the brightness of the projected image. This mode is suitable for environments where extra-high brightness is required, such as using the projector in well lit rooms.
- Page 30 • Fast Mode Minimizes the response time between the input source and the displayed image. For the optimized latency, when Fast Mode is activated, 2D Keystone/Aspect Ratio will return to the default settings, and Auto Vertical Keystone will be turned off automatically. Game Settings *Fast Mode can only be enabled for below input timing adopted by most of popular games:...
- Page 31 • Gamma Selection Gamma refers to the relationship between input source and picture brightness. • 1.8/2.0/2.1/BenQ: Select these values according to your preference. • 2.2/2.3: Increases the average brightness of the picture. Best for a lit environment, meeting room or family room.
- Page 32 • Color Management The Color Management provides six sets (RGBCMY) of colors to be adjusted. When you select each color, you can independently adjust its range and saturation according to your preference. To make adjustments, press the / arrows to highlight an independent color from among Red (R), Green (G), Blue (B), Cyan (C), Magenta (M), or Yellow (Y), and press OK.
- Page 33 Returns all of the adjustments you’ve made for the selected Picture Mode (including the preset mode, User) to the factory preset values. 1. Press OK. The confirmation message is displayed. Reset Current 2. Use to select Reset and press OK. The current picture mode returns Picture Mode to the factory preset settings.
- Page 34 2. Main menu: Audio Structure Menu Options Sound Mode Cinema/Music/Game/Sports/User 100Hz/300Hz/ User Sound EQ -10 – +10 1kHz/3kHz/10kHz Mute Off/On Volume 0 – 20 Power On/Off Off/On Ring Tone Reset Audio Reset/Cancel Function descriptions Menu Descriptions This function utilizes treVolo and Bongiovi DPS (Digital Power Station) Technology, which incorporates its patented algorithms with 120 calibration points that optimizes any audio signal in real time to add depth, clarity, definition, presence and enhanced stereo field imaging for more immersive audio...
- Page 35 3. Main menu: Display Structure Menu Options Aspect Ratio Auto/4:3/16:9 Auto Source Off/On Search Source Rename HDMI-1/HDMI-2 3D Mode Auto/Frame Sequential/Off 3D Sync Invert Disable/Invert HDMI Format Auto/Limited/Full HDMI Equalizer HDMI-1/HDMI-2 Auto/1/2/3/4/5 HDMI-1/HDMI-2/ HDMI EDID Enhanced/Standard HDMI-3 Electronics Off/On HDMI Settings Control Audio Return + Off/LPCM/RAW...
- Page 36 (with 3D game discs), 3D Blu-ray players (with 3D Blu-ray discs), and so on. After you have connected the 3D video devices to the projector, wear the BenQ 3D glasses and make sure the power is on to view 3D contents. When watching 3D contents: •...
- Page 37 • HDMI Format Selects a suitable RGB color range to correct the color accuracy. • Auto: Automatically selects a suitable color range for the incoming HDMI signal. • Limited: Utilizes the Limited range RGB 16-235. • Full: Utilizes the Full range RGB 0-255. •...
- Page 38 4. Main menu: Installation Structure Menu Options Projector Position Front/Front Ceiling/Rear/Rear Ceiling H: -30 – +30 2D Keystone V: -30 – +30 Auto Vertical Off/On Keystone LumiExpert Off/On LumiExpert Level -1 – 0 – 1 LumiExpert Manual Calibration Status Manual Calibrate Calibration Reset Manual Calibration...
- Page 39 Adjusts the image size and focus and check Test Pattern that the projected image is free from distortion. We recommend you use the High Altitude Mode when your environment is between 1500 m–3000 m above sea level, and ambient temperature is between 0°C–30°C.
- Page 40 Off/On Direct Power On Off/On Operation Power On/Off Disable/3 min/10 min/15 min/ Settings Settings Auto Power Off 20 min/25 min/30 min BenQ HDMI Media Streaming Off/On Yes/Cancel (QS01) Panel Key Lock Off/On Yes/No Security Settings Change Password Power On Lock...
- Page 41 Settings signal is detected after a set period of time to prevent unnecessary waste of light source life. • BenQ HDMI Media Streaming (QS01) With the optional QS01 installed on your projector (see Installing the QS01 HDMI Media Streaming (Optional) on page...
- Page 42 Keystone, High Altitude Mode, Baud Rate, Light Source Information, BenQ HDMI Media Streaming (QS01), Security Settings. Returns all the settings on the System main menu to the factory default values. Reset System The following settings will still remain: Light Source Information, BenQ HDMI Media Streaming (QS01), Security Settings. Menu operation...
- Page 43 6. Main menu: Information Structure Menu Options Detected Resolution Source Picture Mode Light Source Mode 3D Format Color System Dynamic Range Light Source Usage Time Firmware Version Service Code Function descriptions Menu Descriptions Detected Shows the native resolution of the input signal. Resolution Source Shows the current signal source.
-
Page 44: Maintenance
Maintenance Care of the projector Cleaning the lens Clean the lens whenever you notice dirt or dust on the surface. Please be sure to turn off the projector and let it cool down completely before cleaning the lens. • Use a canister of compressed air to remove dust. •... -
Page 45: Light Source Information
Light source information Getting to know the light hour When the projector is in operation, the duration (in hours) of light source usage is automatically calculated by the built-in timer. The method of calculating the equivalent light hour is as follows: 1. - Page 46 Install a new lamp for optimal performance. Press Equivalent lamp hour > XXXX hours dismiss the message. Order a new lamp at www.BenQ.com Notice It is strongly recommended that you replace the lamp at this age. The lamp is a consumable item. The lamp brightness Replace lamp soon diminishes with use.
- Page 47 Notice Replace lamp now Equivalent lamp hour > XXXX hours Order a new lamp at www.BenQ.com The lamp MUST be replaced before the projector will operate normally. Press to dismiss the message. Notice Out of lamp usage time Replace lamp (Refer to user manual) then reset the lamp timer Order a new lamp at www.BenQ.com...
- Page 48 Indicators Indicator Status & Description Power events Stand-by mode Powering up Normal operation Normal power-down cooling Download CW start fail Light source life exhausted Case open Burn-In events Burn-in ON Burn-in OFF Light source events Light source error in normal operation Light source is not lit up Thermal events Fan 1 error (the actual fan speed is outside the desired speed)
-
Page 49: Troubleshooting
Troubleshooting The projector does not turn on. Cause Remedy Plug the power cord into the AC power jack on the projector, and plug the power cord into the power outlet. If There is no power from the power cord. the power outlet has a switch, make sure that it is switched Attempting to turn the projector on again during Wait until the cooling down process has completed. -
Page 50: Specifications
PC audio jack x 1 Repairing Control Please visit below website and choose your country to find your service contact window. Type-A power supply 5V / 1.5 A x 1 http://www.benq.com/welcome RS-232 serial control 9 pin x 1 IR receiver x 2 Specifications... -
Page 51: Dimensions
Dimensions 312 mm (W) x 246 mm (D) x 110 mm (H) Unit: mm Specifications... -
Page 52: Timing Chart
XGA_120 119.989 97.551 115.500 (Reduce Blanking) 1152 x 864 1152 x 864_75 75.00 67.500 108.000 1024 x 576 BenQ Notebook Timing 60.00 35.820 46.996 1024 x 600 BenQ Notebook Timing 64.995 41.467 51.419 1280 x 720 1280 x 720_60 45.000 74.250... - Page 53 The timings showing above may not be supported due to EDID file and VGA graphics card limitations. It is possible that some timings cannot be chosen. • Video timings Supported 3D Vertical Horizontal Pixel Frequency format Timing Resolution Frequency (Hz) Frequency (kHz) (MHz) Frame Sequential...
-
Page 54: Rs232 Command
RS232 command RS232 pin assignment Serial Serial RTSZ CTSZ Function Type Operation ASCII Write Power On <CR>*pow=on#<CR> Power Write Power Off <CR>*pow=off#<CR> Read Power Status <CR>*pow=?#<CR> Write HDMI(MHL) <CR>*sour=hdmi#<CR> Write HDMI 2(MHL2) <CR>*sour=hdmi2#<CR> Source Selection Write HDMI 3 <CR>*sour=hdmi3#<CR> Read Current source <CR>*sour=?#<CR>... - Page 55 Read Vertical Keystone value <CR>*vkeystone=?#<CR> Write Horizontal Keystone + <CR>*hkeystone=+#<CR> Write Horizontal Keystone - <CR>*hkeystone=-#<CR> Read Horizontal Keystone value <CR>*hkeystone=?#<CR> Picture Setting Write Brilliant color on <CR>*BC=on#<CR> (Continued) Write Brilliant color off <CR>*BC=off#<CR> Read Brilliant color status <CR>*BC=?#<CR> Write Reset current picture settings <CR>*rstcurpicsetting#<CR>...
- Page 56 Write High Altitude mode on <CR>*Highaltitude=on#<CR> Write High Altitude mode off <CR>*Highaltitude=off#<CR> Read High Altitude mode status <CR>*Highaltitude=?#<CR> Write Set BenQ gamma value <CR>*gamma=value#<CR> Read Gamma value status <CR>*gamma=?#<CR> Write Set HDR Brightness value <CR>*hdrbri=value#<CR> Read Get HDR Brightness value <CR>*hdibri=?#<CR>...
Need help?
Do you have a question about the TK700 Series and is the answer not in the manual?
Questions and answers