Advertisement
- 1 INTRODUCTION
- 2 TV BOX PANELS
- 3 CONNECTION GUIDE
-
4
SETTING UP YOUR DEVICE
- 4.1 Step 1: Language
- 4.2 Step 2: Set up with Android device
- 4.3 Step 3: Wi-Fi
- 4.4 Step 4: Google Account
- 4.5 Step 5: Terms of Service & Privacy Policy
- 4.6 Step 6: Location Settings
- 4.7 Step 7: Diagnostic Report Settings
- 4.8 Step 8: Meet your Google Assistant
- 4.9 Step 9: Get Started with Apps
- 4.10 Step 10: Welcome to Android TV
- 5 SETTINGS
- 6 DOWNLOADING APPS
- 7 GOOGLE CAST
- 8 GOOGLE ASSISTANT
- 9 SIMPLE TROUBLESHOOTING
- 10 TECHNICAL SPECIFICATIONS
- 11 SIMPLIFIED EU DECLARATION OF CONFORMITY
- 12 Documents / Resources
INTRODUCTION
Thank you for choosing the 4K Ultra HD Android TV Box supplied by STRONG. It has been produced with the latest new technology and offers extensive entertainment and great versatility. We wish you many hours of new great experiences exploring the Android world!
Safety Instructions
Read all of the instructions before operating the device. Keep these instructions well for later use.
- Only use attachments/accessories specified or provided by the manufacturer (such as the exclusive supply adapter, battery etc.).
- Please refer to the information on the product enclosure for electrical and safety information before installing or operating the apparatus.
- To reduce the risk of fire or electric shock, do not expose this apparatus to rain or moisture.
- The ventilation should not be impeded by covering the ventilation openings with items, such as newspaper, table-cloths, curtains, etc.
- The apparatus shall not be exposed to dripping or splashing and no objects filled with liquids, such as vases, shall be placed on the apparatus.
![shock hazard]() This mark indicates a risk of electric shock.
This mark indicates a risk of electric shock.- To prevent injury, this apparatus must be securely attached to the floor/wall in accordance with the installation instructions.
- Danger of explosion if the battery is incorrectly replaced. Replace only with the same or equivalent types.
- The battery (battery or batteries or battery pack) shall not be exposed to excessive heat such as sunshine, fire or the like.
- Excessive sound pressure from earphones and headphones can cause hearing loss.
Listening to music at high volume levels and for extended durations can damage one's hearing. - In order to reduce the risk of damage to hearing, one should lower the volume to a safe, comfortable level, and reduce the amount of time listening at high levels.
- The mains plug or appliance coupler is used as disconnect device, it shall remain readily operable. When not in use and during movement, please take care of the power cord set, e.g. tie up the power cord set with cable tie or something like that. It shall be free from sharp edges or similar which can cause abrasion of the power cord set. When put into use again, please make sure the power cord is not damaged. The absence of a light indication on the apparatus does not mean that it is fully disconnected from the mains. To disconnect the apparatus completely, the mains plug must be pulled out.
- Attention should be drawn to environmental aspects of battery disposal.
- No naked flame sources, such as lighted candles, should be placed on the apparatus.
![]() To prevent the spread of fire, keep candles or other open flames away from this product at all times.
To prevent the spread of fire, keep candles or other open flames away from this product at all times.![]() Equipment with this symbol is a Class II or double insulated electrical appliance. It has been designed in such a way that it does not require a safety connection to electrical earth.
Equipment with this symbol is a Class II or double insulated electrical appliance. It has been designed in such a way that it does not require a safety connection to electrical earth.
 This mark indicates a risk of electric shock.
 To prevent the spread of fire, keep candles or other open flames away from this product at all times.
 Equipment with this symbol is a Class II or double insulated electrical appliance. It has been designed in such a way that it does not require a safety connection to electrical earth.
Precautions
- Never try to open the device. It is dangerous to touch the inside of the device due to high voltages and possible electrical hazards. Opening the device will void the warranty of the product. Refer all maintenance or servicing to suitably qualified personnel.
- When you are connecting cables, be sure that the device is disconnected from the mains supply voltage. Wait a few seconds after switching off the device before you move the device or disconnect any equipment.
- It is a necessity that you only use an approved extension and compatible wiring that is suitable for the electrical power consumption of the installed equipment. Please ensure that the electrical power supply corresponds with the voltage on the electrical identification plate at the back of the device.
![caution]() Risk of explosion if the battery is replaced by an incorrect type.
Risk of explosion if the battery is replaced by an incorrect type.- Disposing of a battery into the fire or a hot oven, or mechanically crushing or cutting a battery can result in an explosion.
- Leaving a battery in an extremely high temperature surrounding environment can result in an explosion or the leakage of flammable liquid or gas.
- A battery subjected to extremely low air pressure may result in an explosion or the leakage of flammable liquid or gas.
 Risk of explosion if the battery is replaced by an incorrect type.
Operating Environment
- Do not install this equipment in a confined space such as a bookcase or similar unit.
- Do not use the set near damp, and cold areas, protect the set from overheating.
- Keep away from direct sunlight.
- Do not use the set near dust place.
- Do not place candles near the opening area, to avoid flammable foreign material from entering the device.
WEEE Directive
![]() Correct Disposal of this product. This marking indicates that this product should not be disposed with other household wastes throughout the EU. To prevent possible harm to the environment or human health from uncontrolled waste disposal, recycle it responsibly to promote the sustainable reuse of material resources. To return your used device, please use the return and collection systems or contact the retailer where the
Correct Disposal of this product. This marking indicates that this product should not be disposed with other household wastes throughout the EU. To prevent possible harm to the environment or human health from uncontrolled waste disposal, recycle it responsibly to promote the sustainable reuse of material resources. To return your used device, please use the return and collection systems or contact the retailer where the
product was purchased. They can take this product for environmental safe recycling.
Storage
Your device has been carefully checked and packed before shipping. When unpacking it, make sure that all the parts are included and keep the packaging away from children. We recommend that you keep the carton during the warranty period, to keep your device perfectly protected in the event of repair or warranty.
Equipment Set-up
Please follow the instructions below:
Use a high quality, well shielded HDMI cable to watch also in highest screen resolutions.
This user manual provides complete instructions for installing and using this product. The symbols will serve as follows:
WARNING: Indicates warning information.
TIPS: Indicates any other additional important or helpful information.
MENU: Represents a button on the remote control or the product. (Bold characters)
Move to: Represents a menu item within a window. (Italic characters)
Package content
- Android TV Box
- Voice Enabled Remote
- Power Adapter 12 V / 1 A
- HDMI Cable
- 2x AAA Batteries
- Installation instructions

The batteries should not be recharged, disassembled, electrically shortcircuited, be mixed or used with other types of batteries. If rechargeable accumulators instead of batteries are going to be used (e.g. NiMH), we recommend using types with low self-discharge to ensure long time operation of your remote control.
Usage of external USB devices
- It is recommended to use USB 2.0 storage devices or higher. If your device is not compatible to USB 2.0 specifications, playback and other functions of the product might not work properly.
- STRONG cannot guarantee compatibility with all types of USB devices such as web cams, keyboards, mouse devices, storage devices.
- STRONG cannot guarantee perfect operation when a HDD and a web cam are used at the same time.
- If you are going to use external USB HDDs (Hard Disk Drives), please consider that power specifications may exceed the supported output of your box (max. 5 V/500 mA). If so, please connect your USB HDD to an external power adapter.
- It is advised not to store important information on USB storage devices used with the box. Always make backups of data on your USB storage device before using it with this box. STRONG will not take responsibility for any loss of information or circumstances caused by loss of information.
TV BOX PANELS
Front Panel

- Remote Control Commands Indicator
If blinking when using the Remote Control: pair the Bluetooth Remote Control to have all Google Assistant functionalities working. See 5.0 Settings/Bluetooth pairing - Internet Connection Indicator
- Green: Connected
- Red : Not Connected
- On/Off Indicator
- Green: Box On
- Red: Box on Standby
Side Panel

- TF card slot
- USB 3.0 Port
- USB 2.0 Port
Rear Panel

- Power On/Off Switch
- 12 V Adapter
- Ethernet
- TV (HDMI)
- Audio/Video Output
- S/PDIF (optical)
- Infra Red eye (optional)
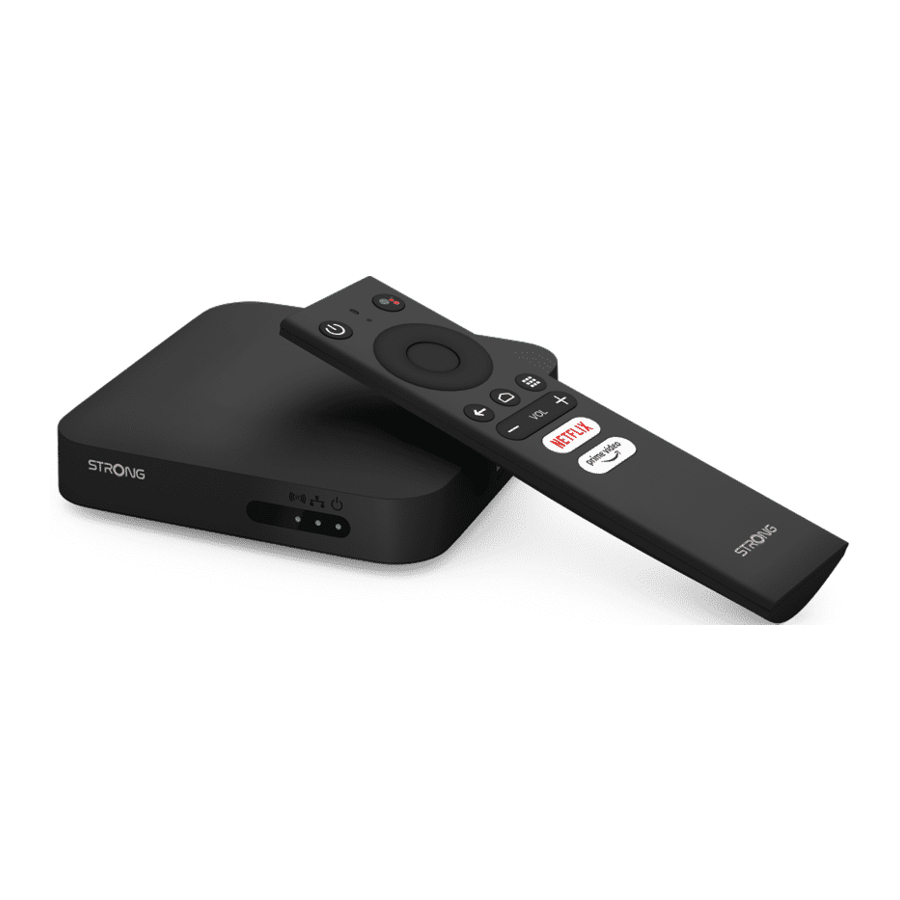
Remote control

- Power ON/OFF
- Microphone
- Google Assistant
![]()
- ENTER
- BACK
- HOME
- ALL APPS
- Volume
- Netflix, Prime Video

Installing the batteries
Open the cover on the remote control and insert 2x AAA batteries into the compartment.
The correct position of batteries polar diagram is shown inside the batteries compartment.
- Open the cover.
- Insert the batteries.
- Close the lid.
The batteries should not be recharged, disassembled, electrically shortcircuited, be mixed or used with other types of batteries.
CONNECTION GUIDE
Refer to the diagram below for connecting your Android TV Box to power, network and other devices.
( Note: Before getting started, please turn off all devices to be connected.)

NOTE: The LEAP-S1 box also supports Wi-Fi. To connect, go to Settings → Network.
- Connect the LEAP-S1 box to your television via the HDMI Cable.
- Using an Ethernet Cable, connect the LAN Port of the TV Box to the LAN Port of your router or home broadband network.
- Connect the TV Box to power using the power adapter provided. You can then power on your device and begin.
NOTE: Before turning on your device, please switch the signal input of the TV to the correct source
SETTING UP YOUR DEVICE
You may turn on your device after properly connecting all hardware.
To be able to use Google Assistant on your remote, you must first pair your Bluetooth Remote to your TV Box. Follow the pairing instruction on the screen.
To be able to use Google Assistant on your remote please pair the remote to your TV Box.

Step 1: Language
Select your preferred language on the Welcome Page.

Step 2: Set up with Android device
Choose whether to set up your TV box with another Android / computer device or skip this step. If you choose Continue, please follow the guide to finish the Google Quick Setup.
Step 3: Wi-Fi
Connect to your Wi-Fi Network. Skip this step if already connected via Ethernet.
Step 4: Google Account
Sign in with your Google Account.
Step 5: Terms of Service & Privacy Policy
Read and accept the Terms of Services & Privacy Policy.
Step 6: Location Settings
Choose whether to allow Google to use your location to improve the experience.
Step 7: Diagnostic Report Settings
Select whether to allow your TV box to send automatic diagnostic and usage data to Google.
Step 8: Meet your Google Assistant
Turn on the Google Assistant function for the functionality to work on your remote.

Step 9: Get Started with Apps
Select apps you would like installed.
Step 10: Welcome to Android TV
A walkthrough of the features of your device

Click on DONE after the walkthrough to start using your device. You are now ready to begin
SETTINGS
Select Settings to check the device information, add/remove accounts and make changes to the system settings.
Wi-Fi Settings
Under Network Settings, select and enable Wi-Fi in order to connect to the network.
Once the device scans and lists nearby Wi-Fi networks, select the appropriate network name, if required put in the password and select Connect.
Language Settings
Under Settings → Preferences, select Language to change the language previously set.
Bluetooth Pairing
- Select Settings in the Menu Launcher.
- From the Remote & Accessories menu, click "Add Accessory" then select the device to be connected.

Remove a Bluetooth Device
- Select Settings from the Menu Launcher.
- From the Remote & Accessories menu, click "Unpair", then select the Bluetooth device you want to remove.
Adding Accounts
For new Google users: sign up for a new Google account using the TV for easier login and payment security. Add an account or switch accounts under Accounts in the Settings Menu.

Factory Reset
Under Settings, select Device Preferences > About > Factory Reset.
- Click Factory data reset to erase everything.
- Once this option has been selected, all manually installed apps and user data information will be deleted.

About
You can check information about your device by clicking on ABOUT in the Settings Menu. This panel will show you the model of your device, version, firmware version and more. You can also update your system by clicking on System update from this menu.

DOWNLOADING APPS
All apps are available for download on the Google Play Store. Do not install apps via USB drive, Micro SD card or hard drive.


GOOGLE CAST
Cast from a Mobile Device
Certain apps allow you to cast to your TV. To cast, simply follow the following steps:
- Open a Google cast compatible app on your mobile device
- Navigate to the screen you wish to cast
Cast from Google Chrome
This device has Google Chromecast built-in. To cast from Google Chrome, click the Settings icon [ ]:
located on the top right corner of the browser, then click "Cast".
GOOGLE ASSISTANT
Say it to Play it.
Ask it to play your favorite show, video, or music. Or find the latest blockbuster to enjoy.
Movies & TV shows:
Play Stranger Things on Netflix. Video clips: Play cat videos.
Apps: Open YouTube. Search: Search for sitcoms. Info: Tell me about Game of Thrones.
Control
Playback: Pause. Stop. Resume
Volume: Louder. Softer. Power: Turn off.
Play music, news, or podcasts
Music: Play music by Sia. (Learn how to choose your music service provider.) News: Play the news. What's the latest news from BBC?
Ask Google
Sports: How did the Patriots do? When is the next Warriors game?
Calculations: What's 20% of 80? Dictionary: What does "ludic" mean?
Find answers: How far away is the moon? How do you remove stains in a rug?
Unit conversions: How many teaspoons in a cup?

- To get started, press the Google Assistant button on your remote.
- Speak into the microphone of your Voice Search remote. Learn more about the Google Assistant on assistant.google.com or say "What can you do?"
NOTE: To be able to use Google Assistant on your remote, you must first pair your Bluetooth Remote to your TV Box.
SIMPLE TROUBLESHOOTING
| Issue | Possible Reason | Solution |
| No LED of menu display after power on | The power adapter is not properly connected | Make Sure the device is connected to the power |
| No Sound |
|
|
| Failed to connect to network |
|
|
| Remote Control Failure |
|
|
| No Picture on Screen | HDMI cable is not connected | Make sure that HDMI/AV is selected as your TV input |
| Voice search on remote is not working | Remote is not paired to the TV Box | See the Pairing Bluetooth Device section in this guide |
| No Audio | Audio Settings not configured correctly for your TV | Settings → Device Preference → Sound → Select formats Press OK to select "None" or try a "Manual" selection. |
TECHNICAL SPECIFICATIONS
Video decoder
| Aspect ratio: | 16:9, Auto/Full screen |
| Video resolution: | 2160p, 1080p, 720p, 4Kp60 10-bit H.265, 4Kp60 VP9 Profile 2, 4Kp30 H.264 |
Audio decoder
| Audio decoding: | Dolby® Digital/ Dolby® Digital Plus*, MPEG-1 layer1/2 |
| Audio mode: | Mono, L/R, Stereo |
*Dolby Digital Plus, Dolby Digital and the double-D symbol are registered trademarks of Dolby Laboratories
System & Memory
| Android Version: | 10 |
| Chipset: | Amlogic S905X2 |
| CPU: | Amlogic S905X2 Quad Core ARM Cortex-A53, 1.8 GHz |
| GPU: | Quad Core ARM Mali-G31@1800 MHz |
| SDRAM: | DDR4: 2 GB |
| Flash: | eMMC: 8 GB |
Connectors
HDMI
Ethernet
1x USB 2.0 + 1x USB 3.0 ports
Micro SD port
S/PDIF (optical)
AV
IR
DC IN (12 V,1 A)
General data
| Wi-Fi: | IEEE 802.11b/g/n, 2.4 GHz IEEE 802.11a/n/ac, 5 GHz |
| Bluetooth: | 4.2 |
| Power supply: | 100 - 240 V AC, 50/60 Hz |
| Input voltage: | DC 12 V, 1 A |
| Power consumption working: | 7 W (max.) |
| Operating temperature range: | 0 ~ +40°C |
| Storage temperature: | -10 ~ +70°C |
| Dimensions (W x D x H) in mm: | 110 x 110 x 22 |
| Weight: | 170 g |
SIMPLIFIED EU DECLARATION OF CONFORMITY
Hereby, STRONG declares that the device LEAP-S1 is in compliance with Directive 2014/53/EU.
The full text of the EU declaration of conformity is available at the following internet address: https://www.strong.tv/en/doc
Subject to alterations. In consequence of continuous research and development technical specifications, design and appearance of products may change. Google, Google Play, YouTube, Android TV and other marks are trademarks of Google LLC.. Wi-Fi is a registered trademark of Wi-Fi Alliance®. Skype is a trade mark of Skype and STRONG is not affiliated, sponsored, authorised or otherwise associated by/with the Skype group of companies. The terms HDMI and HDMI High-Definition Multimedia Interface, and the HDMI logo are trademarks or registered trademarks of HDMI Licensing Administrator, Inc in the United States and other countries. Manufactured under licence from Dolby Laboratories. Dolby Audio and the double-D symbol are registered trademarks of Dolby Laboratories. All other product names are trademarks or registered trademarks of their respective owners.
© STRONG 2021. All rights reserved.

Documents / Resources
References

Download manual
Here you can download full pdf version of manual, it may contain additional safety instructions, warranty information, FCC rules, etc.
Advertisement


Need help?
Do you have a question about the LEAP-S1 and is the answer not in the manual?
Questions and answers