Table of Contents
Advertisement
Quick Links
C
RR Concepts
R R
S
tation aster -
Model Train Reverser
The StationMaster-SHUTTLE can perform hands-off back-and-forth operations using realistic
accelerations and decelerations. By using end of track sensing, no programming or adjusting
is needed. Just place the train on the track and power up.
The StationMaster.SHUTTLE can control DC trains or DCC trains set to linear mode.
Before we Start
transformer) to any other terminals except the designated input pins 1 and 2.
Your StationMaster will be damaged if power is put on any terminal other than 1 and 2.
ONLY ATTACH WIRES WHILE THE POWER IS OFF.
Quick-connect terminals allow easy swap-out and removal of the electronics while leaving
the wires in place. The RR Concepts Magnet/Screwdriver tool is recommended for wire-up
and testing of operations.
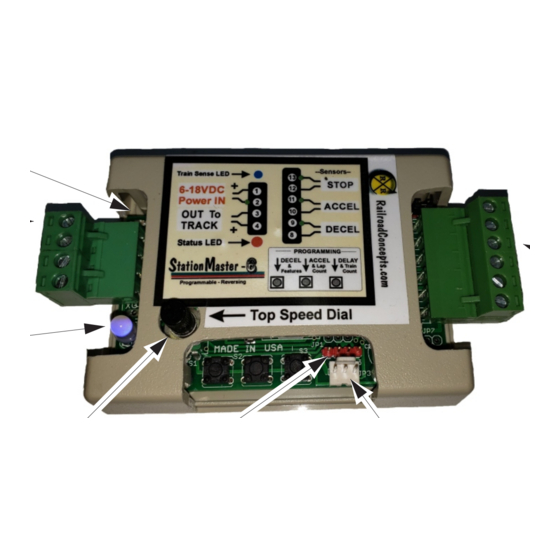
Train Sense LED
IN 8-24VDC
Out to Track
Status LED
Speed Adjust and
Programming Dial
Signal Light connector
M
- Please do not attach power wires (from your power pack or
See decal on bottom for optional programming information
4 AMP version shown
SHUTTLE
Programming
Pushbuttons
April, 2023
In-between
Stop sensor
Out to YardMaster data
cable connector.
1
Advertisement
Table of Contents

Related Manuals for RR-Concepts StationMaster-SHUTTLE


Summary of Contents for RR-Concepts StationMaster-SHUTTLE
- Page 1 - Model Train Reverser The StationMaster-SHUTTLE can perform hands-off back-and-forth operations using realistic accelerations and decelerations. By using end of track sensing, no programming or adjusting is needed. Just place the train on the track and power up.
- Page 2 RR Concepts Shuttle CONNECTIONS and CONTROLS Train Detected LED IN 8-24VDC tation aster In-Between Out to Track stop sensor SHUTTLE Status LED Quick Hookup Instructions Speed Adjust and Auxiliary Relay Manual Programming Dial Reset The StationMaster works with DC (out of the box) Mode SET connector or DCC trains set to linear mode.
- Page 3 RR Concepts Operations Fully Automatic Mode: Instructions: let the train run and watch. Learning Mode: After a factory reset the Shuttle will be set for Automatic mode. After each power up while in automatic mode the Shuttle will run the train back-and-forth for three times, measuring the distance between the ends.
- Page 4 RR Concepts Operations Manual Mode: Manual Mode allows complete control of deceleration operations and creeping speed and will operate with all trains. This could be used for super-realistic control if wanted, or if the train has extremely small motors which the SHUTTLE cannot reliably sense. When in Manual Mode, the Shuttle will stay in manual mode after each power up and never enter automatic mode until Automatic mode is reset by pressing button #1, or performing a factory reset.
-
Page 5: Input Power
RR Concepts Input Power The Shuttle is usually installed between the train transformer and the track, however a fixed DC power source could also be used. The Shuttle can accept voltages up to 24 volts. In all cases the voltage should be pure DC and not “pulsed” or PWM. Some electronic speed controllers use pulsed voltage which may not be compatible with the Shuttle. - Page 6 RR Concepts In-Between Station Stops For in-between stops, attach a sensor to terminals 10 and 11. When the magnet on the train triggers the sensor the train will pause at the station. For more than one stop add more sensors in parallel. Note that The deceleration rate is rapid and the time duration for the stop is fixed.
- Page 7 RR Concepts Top Speed and Programming Mode Dial The Top Speed dial provides 3 functions: 1: Adjust the top "cruising" speed of the train when in automatic mode. 2: Reduce the “creeping speed” when running in manual mode. 3: Enter programming mode. Automatic Mode Top speed adjustment “Full speed"...
-
Page 8: Led Indicators
RR Concepts LED indicators Blue Train Detected LED Red/Green/Blue STATUS LED Blue “twinkle”: Train is not sensed on power up. After 10 seconds the train will Status LED reverse. Blue Not Flashing: Manual Mode: Shuttle is performing the learn operations. Status LED Manual mode: button #3 must be pressed to set deceleration start location. -
Page 9: Deceleration Rate
RR Concepts Programming: Deceleration Rate Fully counter clockwise 1. Make sure all three sensor inputs are open. 2. If the top speed dial is not already at zero, then turn the top speed dial to zero. (fully counter-clockwise.) The Blue “Train Detected” LED will “twinkle” 3. -
Page 10: Acceleration Rate
RR Concepts Programming: Acceleration Rate Fully counter clockwise 1. Make sure all three sensor inputs are open. (Red LED is off) 2. If the top speed dial is not already at zero, then turn the top speed dial to zero. (fully counter-clockwise.) BlueTrain Detected LED will “twinkle”. -
Page 11: Pause Time
RR Concepts Programming: Fully Pause Time counter clockwise 1. Make sure all three sensor inputs are open. (red Led is off) 2. If the top speed dial is not already at zero, then turn the top speed dial to zero. BlueTrain Detected LED will “twinkle”... -
Page 12: Advanced Settings
RR Concepts Programming: BLUE Advanced Settings HOW TO PROGRAM: (A factory reset will clear everything) 1. Enter Secondary Programming mode: (Skip this step if already in secondary programming mode) * Turn the Top Speed dial fully counter-clockwise to enter programming mode (Skip this step if already in programming mode). -
Page 13: External Relay
RR Concepts Programming: External Relay BLUE External Relay / Signal Light Control The StationMaster SHUTTLE can control external devices when an Auxiliary relay is attached. The default setting is for a station stop signal light. When decelerating, creeping, or stopped, the relay will be ON; for all other cases the relay will be OFF. -
Page 14: Factory Reset
RR Concepts Programming: Factory Reset Fully counter clockwise To set the StationMaster back to factory defaults perform the following: 1: Enter programming mode by turning the top speed dial fully counter-clockwise. 2. Press and hold both button #1 AND button #3 at the same time. 3 Turn the top speed dial fully clockwise to exit programming mode. - Page 15 RR Concepts Programming: Train Count Blue The train count is needed for 2 reasons: 1. Manage different creeping speeds for up to 3 trains when wired in a siding hookup . 2. Send proper signals to attached YardMasters to correctly fire turnouts. A factory reset will set this to 1 train.
- Page 16 RR Concepts Manual Mode only Programming: BLUE Fixed Top Speed When in Manual Mode, (button #3 was pressed) the top speed dial is used to adjust the creeping speed into the stops. When a fixed voltage DC transformer is used, the top speed of the train can be programmed to slow down the train.
- Page 17 RR Concepts Automatic Shutdown Details The Shuttle has advanced electronics and software which will attempt to protect itself and also your trains when potentially disastrous events occur. Some transformers know their current capability and will shut down when a current threshold is reached but for sensitive electronics this is sometimes too late.
- Page 19 RR Concepts Electrical Details For reference only The locations of the common grounds could be useful for some wiring harnesses. tation aster + Voltage INPUT Common Ground Common Ground Sensor Input Common Ground Output Voltage to Track Sensor Input Output Voltage to Track Common Ground Sensor Input + 5V...
- Page 20 These smaller sensors can be used for N, HO, etc. Contact RR Concepts for these sensors. WARRANTY Your StationMaster is warranted, and guaranteed operational for 1 year. It will be repaired or replaced at no charge within that time period. Contact http://www.RR-Concepts.com for additional information.
Need help?
Do you have a question about the StationMaster-SHUTTLE and is the answer not in the manual?
Questions and answers