Table of Contents
Advertisement
Advertisement
Table of Contents

Related Manuals for TOMLOV DM03


Summary of Contents for TOMLOV DM03
- Page 1 Model:DM03 User Manual Please read this user manual carefully and keep it for future reference. Should you encounter any problem, please contact us by the e-mail below. Most technical questions can be answered through our knowledge base. Customer service: support@tomlov.com...
-
Page 2: Table Of Contents
Read Me First Packing List Installation Quick Start Parts Description Remote Control Detailed Operation 1. Save Photos/Video with SD Card 2. How to Get LED Lights to Work? 3. How to Install Light Barrier? 4. Switch Different Modes 5. Take Pictures 6. -
Page 3: Read Me First
Read Me First 1. Thank you for purchasing the TOMLOV DM03 HDMI digital microscope. Please read this instruction manual carefully before use. 2. The product contains tiny parts and is inedible, please avoid accidental ingestion by children. Also, this product is not intended for medical use. -
Page 4: Packing List
Packing List (DM03) 6 Inch Bracket 7”Monitor Metal Base USB C Cable USB Cable Remote Control HDMI Cable Light Barrier Fixed Ring 32GB SD Card Note: Accessories may be updated without prior notice, please refer to the actual receipt of the items. -
Page 5: Installation
Installation (1) Installation of the stand Step 1: Turn the black ring clockwise one turn or two. Step 2: Screw the stand clockwise. E-mail: support@tomlov.com... - Page 6 Step 3: Screw the black ring clockwise to fix the bracket tightly. Step 4: Put in the blackloop to make the microscope more stable. E-mail: support@tomlov.com...
- Page 7 (2) Installation of the monitor Step 1: Put the monitor in place and tighten the two small screws. Step 2: Adjust the monitor up and down and tighten this screw. E-mail: support@tomlov.com...
-
Page 8: Quick Start
HDMI cable when need (eg: PC) need (eg: TV) 4. Adjust the knob for 5. Turn the knob to 6. Press the appropriate zoom and focus. to take a picture. distance. Press once start and stop video recording. E-mail: support@tomlov.com... -
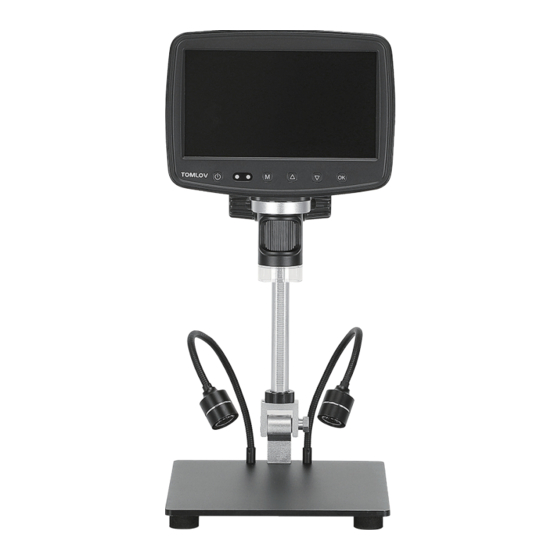
Page 9: Parts Description
Parts Description Monitor Focusing knob LED Light Bracket Fill Light Metal Base Turn on / Turn off Mode / menu Up / Zoom + Down / Zoom - Confirm E-mail: support@tomlov.com... - Page 10 PC/Charging (Microscope) Micro SD Card Slot HDMI LED Iight Base Light Charging(Base) E-mail: support@tomlov.com...
-
Page 11: Remote Control
Photo / Confirm press this button to stop you are watching recording; after entering on the screen. Record Video the menu, this button is the confirmation button E-mail: support@tomlov.com... - Page 12 2. The best distance between the remote control and microscope is 10cm-15cm. 3. Please wait a moment so that the microscope can follow and run the instruction after pressing the button on the remote control. Don't press the buttons too quickly. -10- E-mail: support@tomlov.com...
-
Page 13: Detailed Operation
2. How to get the LED lights to work? There are main LED lights (around the camera) and 2 side LED lights (on the base), they are powered and controlled separately. Main LED Lights Two Side Lights -11- E-mail: support@tomlov.com... - Page 14 (1) How do I adjust the main LED light? Turn on the device by long pressing the power button. Rotate the light dial to adjust the brightness. -12- E-mail: support@tomlov.com...
- Page 15 (2) How do I turn on the bottom lights? Adjust the light intensity by rotating the lower light control. Note: Adjust fill lights, support no power connection required Connect the power cord (Type-C) to charge the base when no power -13- E-mail: support@tomlov.com...
-
Page 16: How To Install Light Barrier
3. How to Install Light Barrier? The light barrier absorbs and softens the strong and dazzling light. It will be useful when lights are over bright or doing PCB soldering. Snap the light barrier up to the opening. -14- E-mail: support@tomlov.com... -
Page 17: Switch Different Modes
5. Take Pictures Press the OK button on the microscope or the photo capture button on the remote control to take a picture in photo mode. When a picture is taken, the photo icon on the screen turns Yellow. -15- E-mail: support@tomlov.com... -
Page 18: Record Videos
Long press the M button on the microscope or switch the button on the remote control to manage files After entering the file management, select a picture or video, short press the M button, you can choose to delete the file. -16- E-mail: support@tomlov.com... -
Page 19: Hdmi Connection
③ The microscope will display“Mass Storage”,“PC Camera”and charging mode, select“PC Camera”and confirm. ④ Start“Windows Camera”and your PC will recognize the microscope and display the real-time display. If not, an error occurs. Unplug the USB cable andplug it in again. -17- E-mail: support@tomlov.com... -
Page 20: Work With Mac/Imac
“Mass Storage”, “PC Camera” and “Charging Mode”, select “PC Camera” and confirm. ④ Launch "Photo Booth" (Finder > Application > Photo Booth) and select "USB PHY 2.0 (Default)" from "Camera" menu bar. Mass Storage PC Camera Charging Mode -18- E-mail: support@tomlov.com... - Page 21 ③ Then power on the microscope, the microscope will display “Mass Storage”, “PC Camera” and “Charging Mode”, select “PC Camera” and confirm. ④ Launch "HiView" (Finder > Application > HiView) and will automatically connect the microscope "USB PHY 2.0 (Default)". -19- E-mail: support@tomlov.com...
-
Page 22: Menu Settings
Default Settings: factory reset. Time Setting: Sets the date and time parameters. Language: Allows you to set the device language. Format SD Card: Format micro card storage. System Message: You can view the current firmware version of this device. -20- E-mail: support@tomlov.com... -
Page 23: Specifications
Specification Model DM03 Photo Resolution 10M, 8M, 5M, 3M Video Resolution 1920*1080, 1280*720, 864*480 The Max Pixel 1080FHD (1920*1080) Light Source PC Resolution 640*480/26fps 1280*720/26fps Lens 2G+IR Iris Diaphragm F4.5 Viewing Angle 16° Power 2.4W Current 620mA Interface Micro/USB 2.0/HDMI... -
Page 24: Faq
If you still cannot get a clear image, gently wipe the lens with a clean, dry cotton cloth or paper towel to ensure the lens is clean. -22- E-mail: support@tomlov.com... -
Page 25: Get Support
However, content of this manual and/or product specifications are subject to change without prior notice and with no direct or indirect liability on TOMLOV Electronics’ part concerning such change. Copyright and registered trademark TOMLOV, Tomlov are registered trademarks. - Page 26 More Than A Microscope...
Need help?
Do you have a question about the DM03 and is the answer not in the manual?
Questions and answers