Table of Contents
Advertisement
Quick Links
Advertisement
Table of Contents

Subscribe to Our Youtube Channel
Related Manuals for N-BIOTEK NB-203QS


Summary of Contents for N-BIOTEK NB-203QS
- Page 1 NB-203QS Operation Manual CO2 Incubator + 1 Shaker Model: NB-203QS...
-
Page 2: Table Of Contents
Table of Contents CONTENTS PAGE SAFETY AND GENERAL PRECAUTION TRANSPORTATION, STORAGE AND LOCATION OF INSTALLATION PREREQUISIT AND CONFIGURATION FEATURES AND SPECIFICATIONS OF THE UNIT Control Panel OPERATION Safety Switch Shaker Operation How to detach the Shaker Troubleshooting... -
Page 3: Safety And General Precaution
1. Safety and General Precaution 1. 1 General Information on Precaution This equipment must be operated as described in this manual. if operational guideline is not followed, equipment damage and personal injury can occur. Please follow this mark to prevent equipment damage of personal injury. If you don't keep this caution, you can get injured as well as a property loss. - Page 4 1.3 Precaution for ground connection Please ground before use the product, if you don't ground, you could get an electric shock when malfunction or an electric leakage occurs. At the place where you can't ground, * Please buy the equipment to prevent any electrical leakage. * An electric shock, electric leakage and fire can be occurred without electric leakage breaker.
-
Page 5: Transportation, Storage And Location Of Installation
Open and close the door softly and please use a door knob. (A heavy shock can damage the product and breakdown the operating part. Also, your hands can be stuck between the door and body.) Do not detach the built-in lamp and electrical devices. (It can cause an electric shock and a fire.) Please be sure to prevent foreign substances from getting into the sealing silicon of the door. - Page 6 2.3 Location of installation and ambient conditions Do not put flammable substances near the product. (It may cause a fire) When you install the product, you are required to keep the distance at least 30cm from the wall. To completely separate the unit from the power supply, power plug must be disconnected.
-
Page 7: Prerequisit And Configuration
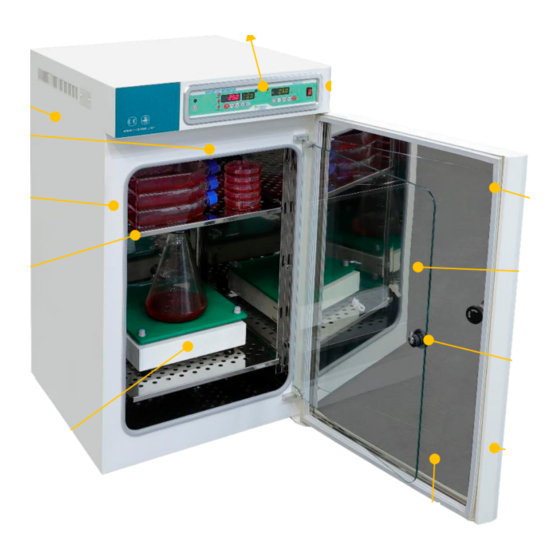
3. PREREQUISIT AND CONFIGURATION 3.1 PREREQUISIT Inspection of Boxes When you have received the instrument, which is packed on pallet, inspect the box carefully for any damages that may have caused any damages to product during shipping. Please report any damage to the carrier or to your local NBIOTEK distributor immediately. LOCATION The incubator is designed to operate at temperature 5℃... - Page 8 3.2 CONFIGURATION. Exterior Configuration of CO2 incubator. <Figure #1> Control panel Air jacket -6 side direct heating Power switch Ventilation fan Glass door heater -Prevent condensation Magnetic door seal Stainless steel shelve Glass door - Perforated to improve uniformity Inner door seal Door latch - Airtight to prevent leakage...
-
Page 9: Features And Specifications Of The Unit
4. Outer Heated Door ensures no condensation on glass door. 5. Microprocessor PID control for Temperature, CO₂ 6. Natural Humidification System by water tray and circulation fan. 7. Simple operation for Shaker apparatus. 4.2 Specification Items NB-203QS Temperature Range Ambient +5℃ to 60℃ Accuracy ±0.25℃ at 37℃... -
Page 10: Control Panel
5. Control Panel 15 14 1. Alarm Mute : Alarm mute switch 2. SAFETY ACTIVATION INDICATION LAMP: If Safety is activated, it will be ON 3. Heating Display : To show status of heating activation at 3 parts where is controlled by 3 each sensors. -
Page 11: Operation
6. OPERATION 6.1 POWER S/W ON Press the POWER S/W on the right side of the product. The CO2 Control Panel Display will be shown as follows 6.2 CO2 INCUBATOR 6.3 Connect CO2 Cylinder Note : Prior to connect the power plug, make sure that the POWER S/W is off. Before Switch ON, insert water tray filling with distilled water. - Page 12 * If you don't press "SET" key lastly after adjusting, the new set-up value will not be saved at all. * Set-up Temperature range is Ambient +5℃ ~ 60℃(Normal) Note: The initial set point for temperature is at 37C from N-BIOTEK facility. 6.5.2 SETTING CO DENSITY: Press "CO2SET"...
- Page 13 6.6 CALIBRATAION OF TEMPERATURE & CO₂: Please follow up below procedure for calibration in case of discrepancy between actual value (measured by reliable measurement device) in chamber and displayed value. Measure CO₂ density and Temperature after incubator is stabilized in which takes about more than 2 hours (you might want to perform this stabilization process at night before home) Please note that low deviation range such as ±0.1 ~ 0.3% may not be corrected precisely by this calibration.
- Page 14 b. Second Click “CAL/SET” ☞ Outer door’s Temp calibration Channel 2 is purposed to remove water condensing on glass door caused by high temperature difference between chamber and outside. Recommend to use calibration at Channel 2 in case of water condensing on glass door. Note Except water condensing on glass door, calibration of channel 2 and 3 is not recommendable.
- Page 15 NOTE Channel 5 is to set heating control point. If it is set at 3, then the heating control works from 34’C against setting value i.e. 37’C. This is in order to minimize overshooting and faster reaching time to setting value. Therefore, user is kindly required not to change this value.
-
Page 16: Safety Switch
6.7 Alarm 3 minutes after both temperature and CO2 density reach to set point, all alarm systems are activated as programmed. If the temperature or CO2 is not reached to set point, its alarm system is not stated at all. When turning off alarm switch {Location “l”}, all alarm system is not worked Alarm Activation Temperature: ±2℃... -
Page 17: Shaker Operation
8. Shaker Operation 8.1 Connecting the Shaker After cleaning the surface of chamber or separating the shaker, please connect it as below. (The shaker is already well fitted when released. it must be followed to turn off power when disconnect or connect the shaker as below) 8.2 RPM, TIME, PARAMETER Set up 8.2.1 TIME set up... -
Page 18: How To Detach The Shaker
* NOTE RPM MODE ➢ To set RPM is possible when not running. ➢ RPM range is from at from 30 to 300 RPM. ➢ Setting RPM below 30 can cause error. ➢ Press set button after changing setting value for saving new value. TIME MODE ➢... -
Page 19: Troubleshooting
Not proper engaged with axis Make sure to fix both axis and and shaft shaft in. Manufactured by : N-BIOTEK, Inc Techno park 402-803 Yakdae-Dong, Wonmi-Gu, Bucheon-si Gyeongi province Korea, Republic of Tel : +82 32 321 2100 E-mail : export@n-biotek.com...
Need help?
Do you have a question about the NB-203QS and is the answer not in the manual?
Questions and answers