
Related Manuals for All In 1 Gaming Phantom Series


Summary of Contents for All In 1 Gaming Phantom Series
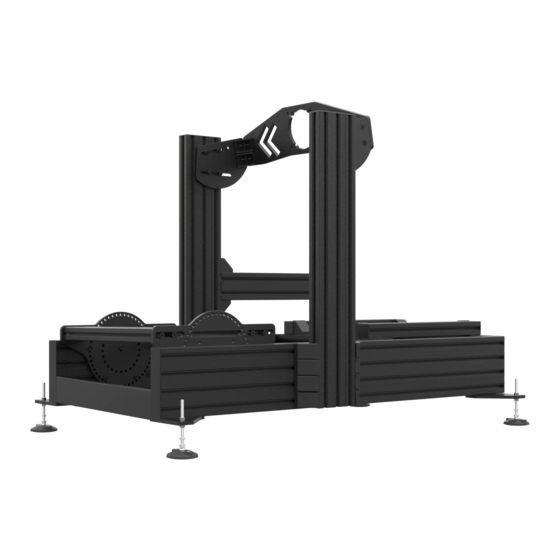
- Page 1 Phantom Series Phantom Elite Sim Frame Assembly Instructions Our Support Team is here for you. Feel free to reach out to us and we will be happy to help. WhatsApp Messenger Skype Web Chat Email Address : Info@allin1gaming.com...
- Page 2 Unboxing ■ Open every box first. Each group or section of the whole of a whole was seperatley packed. ■ Consider placing the flattened cardboard boxes on the floor under your components to prevent them from getting scratched during assembly. ■...
- Page 3 Step 1: Base Assembly Repeat the process for the positions below 16 x 16 x Long Profiles Spreader Profiles 15x15 Corner Brackets M8 16mm M8 T-Nuts...
- Page 4 Step 2: Feet Assembly repeat for other corners or with sim feet (optional) Please flip unit over to complete assembly. 12 x 4 4 4 4 x x x x 12 x 4 4 4 4 x x x x M12 Nut Base Plate M8 T-Nut...
- Page 5 Step 3: Wheel Upright Assembly Repeat the process for the positions below 32 x Wheel Upright M8 16mm 15x15 Bracket M8 T-Nut...
- Page 6 Step 4a: Side Mount Assembly Shifter Profile 15x15 Bracket 16mm M8 Bolt M8 T-Nut...
- Page 7 Step 4b: Side Mount Assembly Repeat for other side. 16mm M8 Bolt Shifter Upright 15x15 Bracket M8 T-Nut...
- Page 8 Step 4c: Side Mount Assembly Use 20mm bolts here (often this step already comes assembled) M8 Washer M8 T-NUT M8 16mm M8 20mm 15x15 Bracket DELUXE SIDE MOUNT OPTION Repeat step 1 for the remaining 4 brackets. Add 4 t- nuts into the slots of the 180mm profiles to match with the hole locations of your shifter (or other).
- Page 9 Step 5a: Front Mount Assembly 30mm 30mm 30mm 30mm M8 Nut MT-FW-001 MT-WH-002 M8 30mm MT-WH-001 Corner Braclet...
- Page 10 Step 5b: Wheel Dech Assembly HW-WD-001 HW-FN-001 HW-FN-008-0003 ST-GP-003-0001 HW-FN-015-0025 HW-FN-002...
- Page 11 Step 5c: Fanatec Mount Assembly M8 T-nut MT-PD-002 M8 25mm Flat Head MT-PD-001 ST-EXT-CSL/DD MT-WH-001 MT-WH-002...
- Page 12 Step 6: Wheel Side Mount Assembly M8 T-nut M8 20mm...
- Page 13 Step 7: Seat Mount Assembly Repeat step 1 for other side Optional -With Undermount Seating Kit 1515 Bracket M8 T-Nut M8 16mm Seat Rail...
- Page 14 Step 8a: Pedal Assembly - Pivot Method The pedal plates can be mounted either freestyle (step 7c) or using the center hole as a pivot if you want to easily rotate your pedal angle Place one T-nut in the center top slot with 1 on each side 12 inches from the center T-nut Align the center T-nut with the...
- Page 15 Step 8b: Pedal Assembly 2 ADD PEDAL MOUNT HARDWARE Align the 2 spreader bars into the slots as in the photo. Secure a flathead screw into center hole of each profile. Place the 2 pedal spreader anywhere along the counterunk slots so that the pedal mounting holes will align with the front and back profile slots.
- Page 16 Step 8c: Pedal Assembly 3 PEDAL MOUNT ASSEMBLY One you have the desired angle, Rotate the pedal assembly to the add additional bolts that align with desired angle using the 2 x center the t-nuts that were previously bolts as a pivot. installed.
- Page 17 Step 8d: Pedal Assembly - Freestyle Method PEDAL MOUNT - FREESTYLE METHOD To mount your pedals using any hole combination, angle, and height that you choose, follow the same steps above changing only the t-nut layout from step #4 from page 12 and screw positions from steps 2 & 3 from page 14. Examples of custom freestyle mounting options.
Need help?
Do you have a question about the Phantom Series and is the answer not in the manual?
Questions and answers