
Related Manuals for DigiVac SNAP


Summary of Contents for DigiVac SNAP
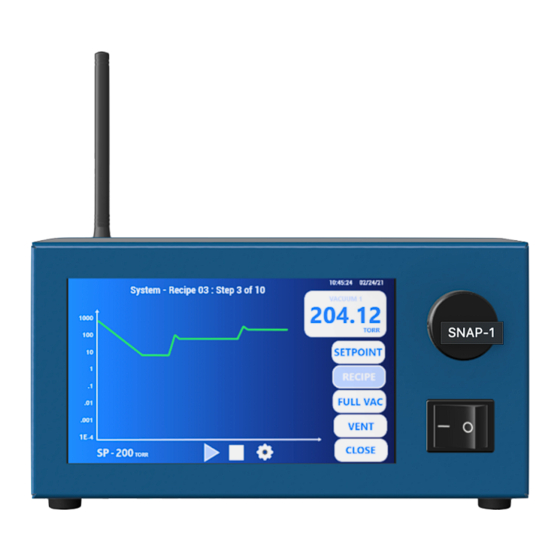
- Page 1 SNAP Vacuum Controller Vacuum Control and Pressure Regulation in One Operational Manual...
-
Page 2: Table Of Contents
Setting PID Variables to Optimize Performance Section 5. Troubleshooting Section 6. Servicing and Maintenance Section 7. Specifications Section 8. Understanding Torr Section 9. Terms of Use © 2021 DigiVac Company®Allrights reserved. | 1020 Campus Drive, Morganville,NJ 07751 | (732) 765-0900... - Page 3 Dashboard push button control allows you to automatically pump down, vent, or isolate your system with a push of a button Ideal for automating and simplifying vacuum chamber pressure control. © 2021 DigiVac Company®Allrights reserved. | 1020 Campus Drive, Morganville,NJ 07751 | (732) 765-0900...
-
Page 4: Section 2. Unpacking And Inspecting
USB output, analog in/out communication, and external sensor upgradability Power supply Quick start guide (optional) 10 Torr Capacitance Manometer (optional) Digivac Quantum DPP Sensor © 2021 DigiVac Company®Allrights reserved. | 1020 Campus Drive, Morganville,NJ 07751 | (732) 765-0900... -
Page 5: Section 3. Installation
Section 3. Installation Now, it’s time to connect the SNAP Vacuum Controller: The only required connections for operation are power, a vacuum pump, and a vacuum system. Hooking the SNAP up to a system is a simple process: 1.Mounting: Find a suitable location for mounting the SNAP. - Page 6 Operate the unit according to the directions in the next section just as you would with the internal sensor. © 2021 DigiVac Company®Allrights reserved. | 1020 Campus Drive, Morganville,NJ 07751 | (732) 765-0900...
-
Page 7: Section 4. Controlling With Thesnap Vacuum Controller
After installation, the unit is ready for immediate operation. This section will go over how to control channels with your SNAP, focusing on the different display buttons. SNAP is feature-rich with multiple control options. It is the 1st touch screen vacuum controller with onboard recipes. -
Page 8: Recipe Control
Atmosphere (ATM). This mode is very helpful to stop bumping in a rotary evaporator or when your process is complete. © 2021 DigiVac Company®Allrights reserved. | 1020 Campus Drive, Morganville,NJ 07751 | (732) 765-0900... -
Page 9: Controlling At A Setpoint
SNAP ships with PID variables that are optimized for average vacuum hose lengths for 20 and 50 liter vessels. The SNAP is capable of controlling much smaller and larger vessels, but may require some PID tuning to optimize the control. - Page 10 2.Select the recipe number to edit, then press EDIT RECIPE. 3.Customize the selected recipe by TIME (in minutes) and PRESSURE (in Torr)and whether you want to RAMP or HOLD © 2021 DigiVac Company®Allrights reserved. | 1020 Campus Drive, Morganville,NJ 07751 | (732) 765-0900...
- Page 11 RAMP: pressure will ascended for a duration of time expressed. Ex. You want to go from 60 Torr to 40 Torr in 2 minutes. SNAP will moderate pressure down to the new set- point so the pressure change is spread out linearly over the 2 minutes.
-
Page 12: Section 5. Troubleshooting
SNAP is performing as it should. If the last 2 tests are different, it means the SNAP is not performing optimally. Please consult your vendor for technical assistance. © 2021 DigiVac Company®Allrights reserved. | 1020 Campus Drive, Morganville,NJ 07751 | (732) 765-0900... - Page 13 This can be solved by resetting the PID. If SNAP is controlling too aggressively, try setting P=p/2. Want to learn more see our white paper on PID © 2021 DigiVac Company®Allrights reserved. | 1020 Campus Drive, Morganville,NJ 07751 | (732) 765-0900...
-
Page 14: Section 6. Servicing And Maintenance
In many cases, a sensor may become fouled with oil or other foreign matter. It is often possible to restore the functionality of contaminated probes with cleaning. If the contaminant is known, the SNAP plumbing should be filled with a fluid that is known to be a solvent to that contaminant. Ethanol/alcohol are very powerful solvents and are highly effective against some contaminants. -
Page 15: Section 7. Specifications
Program ramps and holds vacuum at different duration and vacuum Recipes levels Enclosure 9 ¼” width, 4 ¼” depth, 4 ¾” height Certifications CE, UL, CSA, (planned for 1H 2022) RoHS © 2021 DigiVac Company®Allrights reserved. | 1020 Campus Drive, Morganville,NJ 07751 | (732) 765-0900... -
Page 16: Section 8. Understanding Torr
27 inches of mercury. Below that, it is much more useful to talk in terms of absolute pressure, starting from absolute zero © 2021 DigiVac Company®Allrights reserved. | 1020 Campus Drive, Morganville,NJ 07751 | (732) 765-0900... -
Page 17: Section 9. Terms Of Use
DIGIVAC to any third party, without the express written consent of DIGIVAC to do otherwise. Any violation of this provision shall give rise to an indemnification of DIGIVAC by you, for any third party claims arising out of such violation.THIRTY (30) DAY LIMITED Warranty: All DIGIVACproducts are warranted against any...
Need help?
Do you have a question about the SNAP and is the answer not in the manual?
Questions and answers