Advertisement
Available languages
Available languages
Quick Links
Advertisement

Related Manuals for Dripex Q201A-DL


Summary of Contents for Dripex Q201A-DL
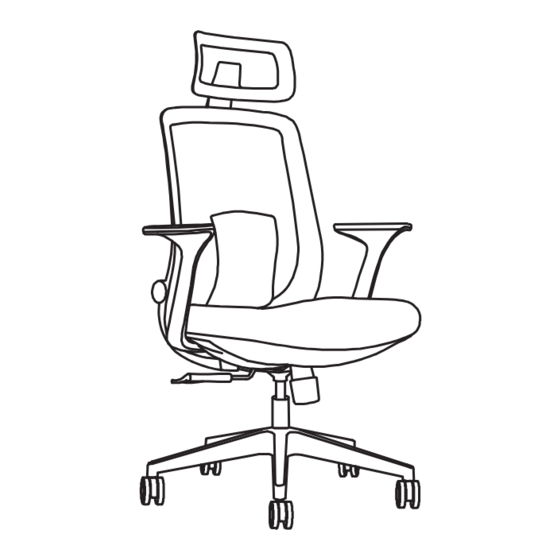
- Page 1 INSTALLATION MANUAL Q201A-DL support@dripex.co.uk support@dripex.co.uk...
- Page 2 Step 1 Step 2 Insert base legs into base joint, Keep the gap on the castor loop down screw together Base legs Base joint SGS cylinder (x 5 pcs) Castors Tilt/height contol ↓ Base joint Cap (x 5 pcs) Seat Arms Backrest screws M6*12MM*10pcs...
- Page 3 Step 4 Step 7 Step 8 Push castor into base leg hole with both of your thumbs Tilt control to seat Backrest to seat √ FACEDOWN The force of both thumbs focus (lay it on the corner on the upper arched area (blue of a desk or on the →...
- Page 4 Recline backward Press chair back to 130° with your back. support@dripex.co.uk Your back off the chair back. Your back off the chair back again (chair Push in lever to lock Then, pull out the lever to unlock...
- Page 5 INSTALLATIONSANLEITUNG Q201A-DL support@dripex.co.uk...
- Page 6 Schraube Tülle Fußkreuz Stuhlbein x 5 M6*40MM x 6 M6*15MM x 6 Schraube Tülle SGS Gasdruckfeder Fußkreuz Deckel M6*55MM x 4 M8*17MM x 7 Schraube Tülle Neigungs-/ Stuhlrollen x 5 M8*30MM x 3 M8*13MM x 3 Höhenregler Schraube Kopfstütze Sitz Armlehne x 2 M6*30MM x 2 Schraube...
- Page 7 Schritt 1 Schritt 2 Schritt 5 Schritt 6 Spleiß Fußkreuz und die Stuhlbeine Stell vor dem Einsetzen sicher, dass die Montier den Höhenregler mit Schraube Montier Rückenlehne mit Schraube zusammen und schraub sie mit Schraube Rolle genau mit dem Loch des Stuhlbeins Nr.
- Page 8 Wir werden innerhalb von 24 Stunden antworten. genannten Schritte. Zurücksetzen Drücken Sie die Stuhllehne mit dem Rücken auf 130°. support@dripex.co.uk Ihren Rücken wieder von der Stuhllehne lösen (Stuhllehne Legen Sie Ihren Rücken von der Stuhllehne ab. wird automatisch auf 95° zurückgestellt) Ziehen Sie dann den Hebel zum Entriegeln heraus.
- Page 9 INSTALLATION MANUEL Q201A-DL support@dripex.co.uk...
- Page 10 Pieds de la Base Rondelles Etoile à 5 branches x 5 pcs M6*40MM x 6 pcs M6*15MM x 6 pcs Joint de base Rondelles Vérin SGS Capuchon M6*55MM x 4 pcs M8*17MM x 7 pcs Rondelles Contrôle de Roulettes x 5 pcs M8*30MM x 3 pcs M8*13MM x 3 pcs l'Inclinaison/Hauteur...
- Page 11 Étape 1 Étape 2 Étape 5 Étape 6 Insérez les pieds de la base : Avant de l'insérer, assurez-vous que le Assemblez la contrôle d'inclinaison au siège Assemblez le dossier au siège vissez les pieds de la base et l'étoile à 5 rouleau est correctement aligné...
- Page 12 Annuler l'inclinaison Appuyez sur le dossier de la chaise à 130° avec votre dos. support@dripex.co.uk Enlevez de nouveau votre dos de la chaise Enlevez votre dos de la chaise. Ensuite, (le dossier de la chaise revient automatiquement à 95°).
Need help?
Do you have a question about the Q201A-DL and is the answer not in the manual?
Questions and answers