Midland XT-70 Walkie Talkie DUAL BAND (PMR446/LPD) Manual
- Instruction manual (18 pages) ,
- Instruction manual (20 pages)
Advertisement
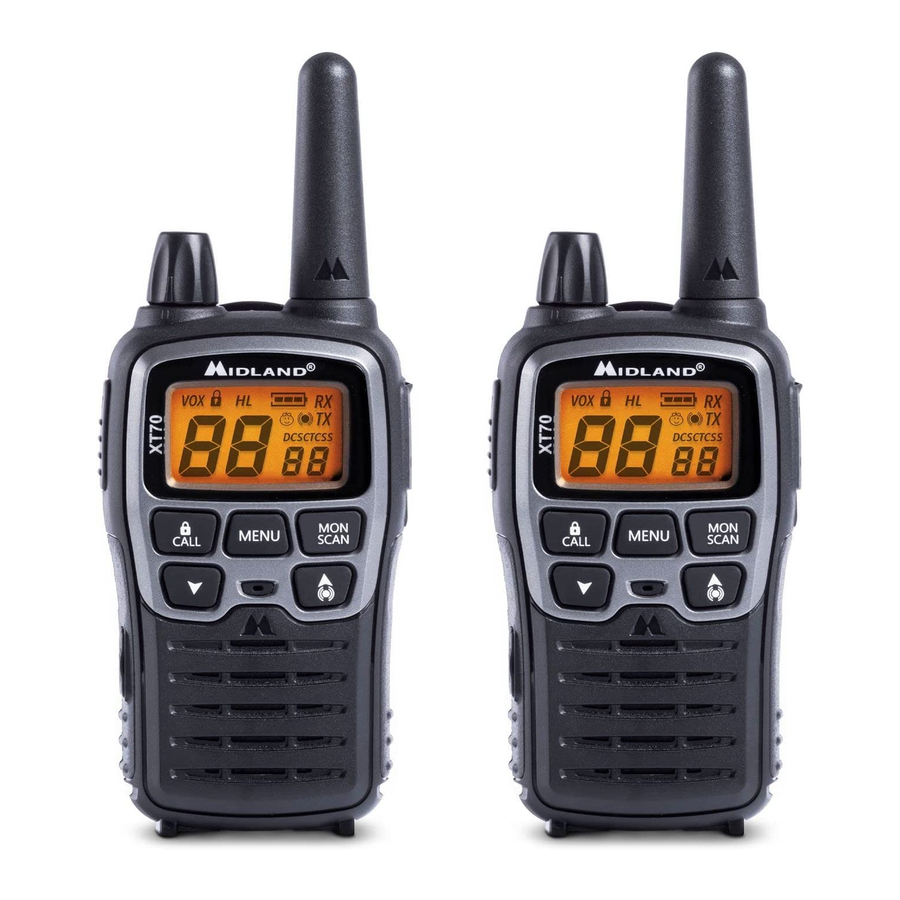
Identifying the parts

LCD Display
- Selected channel (P1-P8/9P-24P: PMR446 /1-69:LPD)
- VOX - Function activated
![]() - Keypad lock activated
- Keypad lock activated- H/L - Indicates the high / low power selection in transmission (only in PMR band)
-
![]() - Battery status indicator
- Battery status indicator - RX - Radio in rx mode (busy channel)
- TX - Radio in transmission (PTT pressed)
![]() - It appears when you are operating with the Out of range function
- It appears when you are operating with the Out of range function- DCS/CTCSS - Type of sub-audio tone selected
- Code of the selected CTCSS or DCS tone (CTCSS: 1-38; DCS: 1-83)
-
![]() - It is shown when the Baby Sitter function is active
- It is shown when the Baby Sitter function is active
 - Keypad lock activated
 - Battery status indicator
  - It appears when you are operating with the Out of range function
Transceiver
- Antenna
- OFF/VOLUME knob - To switch on/off the radio and to adjust the volume.
- MENU - Press this control to enter the radios menu
- CALL/
![]() – to send a call to the selected channel. If you keep it pressed for about 3 seconds, the keypad lock is activated.
– to send a call to the selected channel. If you keep it pressed for about 3 seconds, the keypad lock is activated. - ▲/
![]() -▼ controls - To change the settings in the menu. If you keep pressed ▲/
-▼ controls - To change the settings in the menu. If you keep pressed ▲/![]() you manually verify if there are some radios within the range (manual Out of range function).
you manually verify if there are some radios within the range (manual Out of range function). - MIC - Built-in microphone
- Built-in Speaker.
- MON/SCAN - Press this button once to activate SCAN. Keep it pressed for about 2 seconds to activate the Monitor function, that temporarily cuts off the squelch (for weak signals)
- PTT - Press to transmit.
- USB port for the recharge of the radio
- SPK | MIC (under the protective cover) - To connect to external audio devices such as microphones, headphones, etc
- Battery compartment: insert the rechargeable battery pack supplied in the package or 3 x AA batteries (alkaline or rechargeable).
 – to send a call to the selected channel. If you keep it pressed for about 3 seconds, the keypad lock is activated.
 -▼ controls - To change the settings in the menu. If you keep pressed ▲/
Preparing the transceiver
The radio can be recharged with different type of batteries: here below the possibilities.
Note: To optimize the recharge process, we suggest you switch off the radio to recharge it.
Recharging the NIMH batteries (3 x AA)
Place your transceiver into the cradle of the desktop charger or connect the USB cable to the proper jack of the radio.
This type of batteries is recharged with a constant current, either you use a desktop charger or a USB cable; therefore the recharge time depends from the recharge status and from the batteries capacity.
There's no evidence when the recharge is finished, therefore we suggest you detach the USB cable from the radio or remove XT70 from the desktop charger cradle once the recharge is complete.
Recharging the NIMH battery pack PB-X7 1000mAh
Place your transceiver into the cradle of the desktop charger or connect the USB cable to the proper jack of the radio.
This type of batteries is recharged with a constant current, therefore a complete recharge takes about 4 hours.
There's no evidence when the recharge is finished, therefore we suggest you detach the USB cable from the radio or remove XT70 from the desktop charger cradle after 4 hours.
Installing/removing the battery pack
- Remove the belt clip;
- Open the battery compartment as shown in picture 1;
- Remove or insert the battery pack;
- Close the battery cover and fix the belt clip.

Basic operations
Turning on/off
To turn on the transceiver, turn the VOLUME knob clockwise until you hear it clicks: the LCD display will light up and do an Auto-Test. Subsequently you will hear 2 beeps of different tones.
To turn off the transceiver, turn the knob counter-clockwise until you hear another click.
Volume control
Turn the knob VOLUME to about half way and adjust it to a comfortable level as soon as you receive a signal. If you do not receive a signal you can use the button MON/SCAN described in par. "MON button".
Displaying the channel/sub audio tone
To momentarily display the PMR446 channel and the subadio tone used in the pre-set channels, go to the desired channel (from 9p to 24p) and keep pressed the ▼ for 3 seconds.
Transmission and reception
When you press the PTT the transceiver transmits with high or low power (depending on the setting of the MENU: H or L).
To transmit:
- Make sure that no one else is currently talking on the selected channel;
- Keep button PTT firmly pressed: TX and To will appear on the display (if you have set a CTCSS tone, To wan't be displayed;
- Before you start talking wait for a fraction of a second then speak normally, in the direction of the microphone.
- When you have finished, release the PTT: TX and To will disappear from the display;
- When the radio is in reception mode (PTT not pressed) you will automatically receive any communication (RX displayed). During transmission and reception try, as far as possible, to keep the antenna in vertical position and to avoid obstacles towards the direction of the other party.
![]() During transmission and reception try, as far as possible, to keep the antenna in vertical position and to avoid obstacles towards the direction of the other party.
During transmission and reception try, as far as possible, to keep the antenna in vertical position and to avoid obstacles towards the direction of the other party.
Transmitting TOT Setting
The TOT function is used to prevent a too long transmission. This function temporarily blocks transmissions if the radio has been used beyond the maximum time permitted. Once reached the preset timer (1 minute), the radio will be forced in reception mode.
MON button (Monitor)
The Monitor button is for temporarily excluding (opening) the squelch, in order to listen to signals that are too weak to keep the squelch permanently opened. By excluding the squelch you will avoid listening the communication "chopped" by the squelch. In order to activate the Monitor function, so as to listen to all traffic on the selected channel, keep pressed the MON/SCAN button for about 3 seconds. Keep pressed the button MON/SCAN for about 3 seconds to disable this function.
Scanning all channels
XT70 can automatically search for signals throughout the PMR/LPD bands by scanning, i.e. selecting the channels in rapid sequence. Press briefly the button MON/SCAN to start scanning.
When a signal is detected, the scanning pauses on that channel and you can transmit by pushing PTT . The scroll buttons ▲/▼ allow you to change the direction of scanning (from lower channels to higher ones or vice versa) and therefore to skip communications which are of no interest.
If you want to stop it, press again MON/SCAN. Your transceiver will go back to the channel from which the scanning originally started.
Display backlight
If there is insufficient light to read the display you can press the MENU button to switch the display back light on for about 5 seconds.
![]() Switching the backlight on the display adds an additional drain on the batteries. Try to make a moderate use of this.
Switching the backlight on the display adds an additional drain on the batteries. Try to make a moderate use of this.
Keypad lock
Keep pressed CALL/![]() for about 3 seconds and
for about 3 seconds and ![]() will be displayed as confirmation. Only PTT and CALL/
will be displayed as confirmation. Only PTT and CALL/![]() remain active. To disable this function, keep pressed again CALL/
remain active. To disable this function, keep pressed again CALL/![]() for 3 seconds approx.
for 3 seconds approx.
Power Save
The battery power saving feature enables a reduction in the consumption of up to 50%; power saving comes on automatically when the transceiver does not receive any signal for more than 5 seconds. When the batteries are discharged, bt LO appears on the display: replace the batteries or recharge the battery pack.
MENU button
Channel selection
Press once the MENU button. The number of the channel will start flashing on the display. Press the scroll buttons ▲/▼ to scroll up or down the PMR and then LPD channels till you select the desired channel.
Press the PTT button to confirm, or wait for 5 seconds.
![]() Refer to the table of frequencies.
Refer to the table of frequencies.
CTCSS/DCS tones selection
XT70 can receive in two modes:
- Open traffic: in this case you will hear any communication transmitted on the selected channel;
- Group mode CTCSS/DCS: CTCSS/DCS tones are access keys that allow you to receive only messages coming from parties using the same channel and code. The speaker will remain muted until the correct tone is received.
To activate 1 of 38 different CTCSS/83 DCS tones in RX and TX
- Turn on the radio.
- Select the desired channel.
- Press twice MENU until the Display shows oF (blinking on the right side).
- By pushing the ▲/▼ controls the display will show CTCSS (ct blinking) or DCS (dc blinking); press MENU to enter the CTCSS or DCS tones. Now select the desired tone with the ▲/▼ keys.
- To confirm the setting, press the PTT key or wait for approximately 5 seconds.
Choosing high or low transmission power (PMR band)
Batteries are drained more quickly during transmission. In order to extend the battery life you can select the low power when transmitting over short distances.
Procedure:
- Press the MENU button for 3 times and Pr H will be displayed.
- Select L using the scroll buttons▲/▼.
- Press PTT to confirm, or wait for 5 seconds.
If you want to transmit a longer distance repeat the above procedure to select the high power. At step 2 select H. When the batteries are in good conditions, high power is 500mW, whereas low power is 10mW. A low battery level during transmission will reduce the performance of your device.
![]() A low battery level during transmission will reduce the performance of your device.
A low battery level during transmission will reduce the performance of your device.
VOX function
XT70 enables hands free conversations through VOX function. You can enable it with or without accessories. The VOX sensitivity can be set in 9 different levels :
- 1 = high sensitivity (normal voice with no background noise)
- 9 = low sensitivity (useful in very noisy areas or if you talk loudly)
All these options can be selected on two levels as follows:
- To activate VOX function press the MENU button till VOX will appear on the display.
- Use the scroll ▲/▼ buttons to select the desired setting: OFF: Disabled;
- 1,2,3,4,5,6,7,8,9
- Press PTT to confirm or wait for 5 seconds.
To disable the VOX function follow the instructions above and select option oF.
ROGER BEEP (End transmission tone)
When your transmission is finished (PTT released), XT70 gives out a sound that indicates to the other party that s/he can start talking. This function is enabled by default.
To deactivate it:
- Press the MENU button until the display shows "rb on";
- Using the scroll buttons ▲/▼ select "off" and "rb off" will be displayed;
- To confirm the roger beep deactivation, press PTT button or wait for 5 seconds.
CALL function
XT70 can send 5 different call tones. To send this audio signal to other users, press the CALL/![]() key.
key.
To select the call tones:
- Push the MENU button 6 times, until the display shows "CA 1".
- By pushing ▲/▼ you will hear the 5 pre-set melodies.
- Confirm by pressing the PTT key or wait for 5 seconds.
Now, each time your XT70 sends out a tone call, it will beep with the selected melody.
Keypad beep
To deactivate the keypad beep, follow these steps:
- Press MENU button, until "bP on" is displayed.
- Use the ▲/▼ buttons until the display shows "bP of".
- Confirm by pushing the PTT or wait for 5 seconds.
Now you won't hear any beep at the pressure of any button.
Automatic Out-of-Range
By setting this mode a pair of XT70 is transmitting every 30 seconds a data control code. As soon as the contact between both units is getting lost and one radio doesn't receive this data control code, the ![]() icon starts flashing in the display and you will hear a beep tone.
icon starts flashing in the display and you will hear a beep tone.
Automatic Out of range
Activation:
Press MENU till the display shows "Or of", select "Or on" (activated) with the ▲▼ buttons.
Confirm the setting by pushing the PTT or wait for 5 seconds. The display will show ![]() . A data control code will be sent every 30 seconds.
. A data control code will be sent every 30 seconds.
As soon as this connection is interrupted and the radio does not receive the control code, the ![]() icon will blink on the display and the radio will emit a tone. The
icon will blink on the display and the radio will emit a tone. The ![]() will be blinking till the radio goes back within the range.
will be blinking till the radio goes back within the range.
To disable this function:
Push MENU till "Or on" is displayed;
Select "Or of" (disabled) with the ▲▼ buttons.
Confirm your selection by pushing PTT or wait for 5 seconds.
Manual Out of range
The manual Out of range is always active.
To verify if there are some radios within the range keep pressed ▲/![]() for 3 seconds.
for 3 seconds.
If a radio is within your range you will hear a call tone, while if you don't hear any tone, no radio is within the range.
Note: a radio will always reply to the manual Out of Range control. No specific setting needs to be enabled.
Baby Sitter function
XT70 is equipped with the "Baby Sitter" function.
Press the MENU button till the display shows "Bs of".
Select with the scroll buttons ▲▼ the baby mode "b" or the sitter (parents) mode "p".
To confirm, press the PTT button or wait for 5 seconds.
The display will show the selected mode and the icon ![]() .
.
The baby channels "b" (from b1 to b9) have the VOX feature set on the highest sensitivity (1).
This unit set on one of these baby channels, should be placed near the baby; while the one used for listening to the baby should be set on the sitter channels "p" (from s1 to s9).
In the baby channels you can set with the MENU button the VOX sensitivity level from 1 (highest sensitivity) to 9 (lowest sensitivity). See par. "VOX function".
With the MENU button it is also possible to change the baby or sitter channel and select the high (H) or low (L) power.
In order to have the baby-sitter function properly operating, the 2 radios must be set on the same frequency band (same channel and same CTCSS tone).
For example: if the radio place near the baby is set on the channel b1, the other one used for listening to the baby should be set on channel s1.
To momentarily display the PMR446 channel and the sub-audio tone of the Baby sitter channel, go to the desired channel and keep pressed the ▲▼ buttons for 5 seconds.
Troubleshooting and radio reset
Your Midland XT70 is designed to provide you with years of optimal performance. If for some reason problems arise, refer to this chapter before contacting a service centre in your region.
Reset
If your transceiver experiences a logical malfunction (improper symbols on the display, blocking of functions, etc.), it may not be experiencing a true failure, but rather a problem caused by external factors. For example, it may have an incorrect setting brought on by a noise or spikes in the electrical system during battery recharging. In such cases, you can reset the transceiver to its factoryprogrammed settings, by resetting all parameters:
- Turn off the transceiver
- Keep pressed the ▲ button and turn on the radio at the same time. All the functions will be reset ex-factory.
![]() Before you go ahead with the reset, we recommend that you take note of all the setting you have carried out as they will be deleted.
Before you go ahead with the reset, we recommend that you take note of all the setting you have carried out as they will be deleted.
Technical specifications
Channels 24 PMR; 69 LPD
Frequency range 446.00625 ÷ 446.09375MHz (PMR)
433.075 - 434.775MHz (LPD)
Channel spacing 12.5 KHz (PMR); 25 KHz (LPD)
Power supply1000mAh battery pack
3x AA type 4.5V(Alkaline)
3.6V(Rechargeable) batteries +/- 10% VDC
Temperature -20° to +55°
Dimensions (w/o batteries) 58 (L)x 120 (H)x33 (D) mm
Weight (w/o batteries) 113gr
Duty cycle TX 5%, RX 5%, stand-by 90%
Category B
Transmitter
Output power 10 or 500 mW (Selectable)
Modulation FM
Spurious rejection within European legal terms
Receiver
Sensitivity @ 12dB Sinad 0,35µV
Adjacent channel rejection 70dB
Audio output power 300mW @ 10% THD
Receiver category 3 (referred to LPD only)
Jack for ext.mike stereo 2,5 mm
Jack for ext. speaker mono 3.5 mm
Maximum transmission time in an hour 6 minutes, equivalent to a duty cycle of 10%
Specifications are subject to change without notice.

Direct plug-in ac/dc power supply must be used for disconnecting the transceiver from the mains; the desktop charger must be positioned close to the unit and easily accessible.

Documents / ResourcesDownload manual
Here you can download full pdf version of manual, it may contain additional safety instructions, warranty information, FCC rules, etc.
Download Midland XT-70 Walkie Talkie DUAL BAND (PMR446/LPD) Manual
Advertisement


Need help?
Do you have a question about the XT-70 and is the answer not in the manual?
Questions and answers