Table of Contents
Advertisement
Advertisement
Table of Contents

Related Manuals for Belimo 22G14-5C


Summary of Contents for Belimo 22G14-5C
- Page 1 Version 6.3 Digital Gas Monitoring Operation Manual...
-
Page 2: Table Of Contents
TABLE OF CONTENTS General Description Applications Features Specifications User Interface Model Selection Guide Installation Monitor Placement Wiring Installation on round column Warm-up delay Installation Check List Operation Screen Display Default Settings Changing Settings List of Settings Sequence of Operation Network Configuration Using CAN Network, Central Communication module Using CAN Network No Central... -
Page 3: General Description
Important Information ! This manual provides information required to install, operate and maintain the Belimo gas monitoring system. Read and study before attempting to install or operate monitors. Installation and operation not in accordance with this manual can result in a hazardous situation or harm. -
Page 4: Applications
1.1 Applications: • Vehicle emissions in indoor parking garages • Municipal maintenance facilities • Bus terminals • Automobile dealerships • Hospital parking for ambulances and visitors • Volatile organic vapor control from soil contamination • Refrigerant Gas Leak Monitoring • CO2 demand control ventilation for meeting rooms •... -
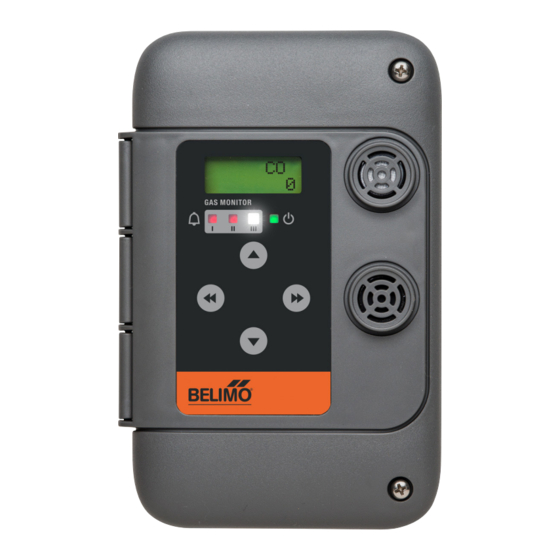
Page 5: User Interface
• 22G02-5A, 22G02-5B, 22G02-5C, 22G0214-5A, 22G0214-5B, 22G0214-5C, 22G14-5A, 22G14-5B, 22G14-5C: Certified according to UL 2075 and ULC-S588 • Analog 4-20 mA or 2-10V (variant dependent) • Pollution degree 2 • Installation catagory II • Altitude 2000 m (6560 ft)* •... -
Page 6: Model Selection Guide
2.0 Model Selection Guide C-22G-5B C-22G-5A C-22G-5C • 2 relais • 1 relays • Réseau CAN • 2 analogue • BACnet MS/TP outputs • Réseau CAN Communication module Only Sensor Replacement Complete Unit Modules R-Gxx 22Gxx-5A 2 2 G x x y y - 5 A 1 relays 2 2 G x x y y - 5 B Gas Type... - Page 7 Gas Type Range Ammonia 0-250 ppm Argon (O depletion) 0-50% O Carbon Dioxide (air quality) 15-xx3 0-2000 ppm Carbon Dioxide (compressed) 15-xx5 0-5000 ppm Carbon Dioxide 15-xx6 0-10000 ppm Carbon Monoxide 02-00L 0-100 ppm Carbon Monoxide 0-250 ppm CO nil H Carbon Monoxide nil H effect 0-250 ppm...
-
Page 8: Installation
3.0 Installation 3.1 Monitor Placement Coverage Guidelines for placement of diffusion type monitors are based on the reasonable delay for gas to get from the source to the sensor. All monitor sensors combinations are created equal in this regard. • For air quality control of exhaust emissions and accumulations of toxic gases the generally acceptable maximum radius of coverage is 50 feet (15 meters). - Page 9 3. Heavier than air: HFCs, HCFCs, Propane (C Chlorine (CL 2 ), Hydrogen sulfide (H 2 S), most organic vapors (consult Belimo): Install 1 to 2 feet (0.3 to 0.6 meters) from floor. For all types of monitors avoid drafts, obstacles, aerosols, silicones.
- Page 10 3.2.1 Wiring Model 22Gxx-5A & C-22G-5A End of line jumper CAN bus Down = off Up for first and last End of line Up postion 4...20 mA unit on chain jumper BACnet or Down position 2...10 Down = off 1 Dry contact Up for first and relay last unit on chain...
-
Page 11: Wiring
3.2.2 Wiring Model 22Gxx-5B & C-22G-5B End of line jumper CAN bus Down = off Up for first and last End of line jumper unit on chain BACnet Down = off 2 Dry contact Up for first and relays last unit on chain Binary Relay 2 BACnet... - Page 12 3.2.3 Wiring Model 22Gxx-5C & C-22G-5C Network end of line jumper Transformer To other 24 V AC/DC CAN bus units network 3 VA/W for each unit High (H) Independent circuit Low (L) 120 VAC Shield (on 1st unit only) Digital gas monitoring...
-
Page 13: Installation On Round Column
3.3 Installation on round column To install monitor on round column, use yellow feet provided with monitor for stability. They are not required if installed on flat wall. 3.4 Warm-up delay Most sensors needs warm-up delay to stabilize sensor reading. See table below: Gas type Warm-up time... -
Page 14: Installation Check List
3.5 Installation Check List Important. All wiring must conform to local building codes, regulations and laws. If the equipment is used in a manner not specified by the manufacturer, the protection provided by the equipment may be impaired. 1. Use ½ inch EMT conduit for all wiring. 2. - Page 15 To verify if monitors are communicating correctly, change setting no. 56 on one unit. Press → until you reach option 56. Press ↑ to switch from 0 to 1, to turn on the network display. Press ↑ and ← simultaneously to save, then press and hold ← for a few seconds to return home.
-
Page 16: Operation
4.0 OPERATION 4.1 Screen Display The LCD shows the type of gas and the current gas concentration. If two sensor modules are installed, the display will alternate between them. Address Type of gas (See setting 56) Concentration Alarm status 1 indicates alarm 1 on, per settings 0, 1, 2 or if activated by another sensor on the CAN network via setting 36. -
Page 17: Default Settings
network. The unit will return to automatic operation after the time runs down. To cancel manual mode press ↓ several times to reduce time left to run. It will take a few seconds to stop. “M” also displays when auto-cycle is on. See setting 73. T indicates alarm 1 on due to high ambient temperature (setting 51). -
Page 18: List Of Settings
4.4 List of Settings Sensor A (upper socket) settings Name Description Range Default Alarm 1 threshold, activates relay 1 by sensor A1Del Alarm 1 Delay on (seconds) 2-999 A1Off Alarm 1 Delay off (seconds) 0-999 Alarm 2 threshold, activates relay 2 by sensor AL2Del Alarm 2 Delay on (seconds) - Page 19 4.4 List of Settings Sensor B (lower socket) settings Name Description Range Default AL1-B Alarm 1 threshold, activates by sensor relay 1 A1Del Alarm 1 Delay on (seconds) 2-999 A1Off Alarm 1 Delay off (seconds) 0-999 AL2-B Alarm 2 threshold, activates by sensor relay 2 A2Del...
- Page 20 4.4 List of Settings Continued General settings Name Description Range Default R1Rx Receive message to activate relay 1, 0-255 CAN network R2Rx Receive message to activate relay 2, 0-255 CAN network R3Rx Receive message to activate sounder 0-255 and strobe CAN network Monitor identification address, CAN 0-31 network...
- Page 21 Name Description Range Default TMod Temperature modify/calibrate -9/+9 ºC ATHi High temperature alarm limit used 0-99 ºC for summer ventilation. Alarm 1 is 0-210 ºF activated when temperature exceeds option. Temp setting 72 deg C/ F will auto convert Warm up delay disables alarms, seconds 0-255 BACnet maximum MAC address when 0-127...
- Page 22 4.4 List of Settings Continued General settings Name Description Range Default Analogue drive transmit message, ADTxA 0-255 sensor A (top) CAN network Analogue drive. Minimum percent of AMinA 0-100 scale for zero output. Sensor A Analogue drive. Maximum percent of AMaxA 0-100 scale for full scale output.
-
Page 23: Sequence Of Operation
Name Description Range Default Variable Speed Drive logic Analogue output A Combines analogue outputs over CAN bus. See options 60-66 0= highest reading wins VSD A 1= sensor readings are averaged 0/1/2 2= auto ramping increases analogue output by one-minute intervals on alarm 1 and decreases when below alarm. - Page 24 5. If the gas level stays above the Alarm 1 Level for the set time the relay 1 on-board will energise, and remain energised as long as the gas remains above the alarm setting. The bottom left corner of the display will indicate a 1 and the alarm 1 LED will light up. In addition, the Alarm 1 Transmit Message (default is 1) will be sent to all monitors and Communication modules via the CAN network.
- Page 25 for more than the Alarm 3 Delay-On timer the audible alarm will sound, the LED strobe flasher will start (if enabled; setting 45), a 3 will appear in the bottom left corner of the display, and the Alarm 3 Transmit message (default 3) will be sent to other sensors or Communication modules.
-
Page 26: Network Configuration
5.0 Network Configuration 5.1 Using CAN Network with a Central Communication module A communication module serves as the central connection point for the ventilation system. Model 22Gxx-5y gas monitors transmit alarm commands to the central communication module. A communication module will display up to 32 monitors on the network. - Page 27 5.2 Using CAN Network with No Central Communication module (client/server) One of the 22Gxx-5A or 22Gxx-5B series monitors can be used as the communication module. It can activate the ventilation for all the sensors, or a group. The use of a dedicated communication module is optional;...
-
Page 28: Defaults Configuration
5.3 Default Configuration Monitors are shipped pre-loaded with default settings which can be changed in the field to suit the desired sequence with simple keypad input. When a monitor goes into alarm level 1, 2 or 3 it activates its relays and transmits a message to other sensors to activate their relays also. - Page 29 The communication device has no sensors on board so the relays will only activate if it sees it’s receive codes on the network. The Communication module could control two zones via its two relays. When no Communication module is used, the master monitor(s) needs to be a member of the group it is controlling.
-
Page 30: Maintenance Guide
6.0 Maintenance Guide All monitors are shipped from the factory pre-calibrated. To maintain accuracy and conformity with standards it is essential that they be calibrated by a qualified technician once or twice per year, depending on the application. 6.1 Calibration Procedure Use certified precision gas mixtures (with regulator tube and cap) to adjust the sensitivity of the sensor due to normal aging and guarantee that the designed alarm set points are respected. -
Page 31: Calibration Procedure For Refrigerant
8. Inject bottled span gas (using regulator, tube and cap) into first sensor and wait until the gas reading stops going up. The span gas used must be within the range of sensor’s scale. 9. Adjust the reading up or down to match the concentration in the bottle 10. -
Page 32: Sensor Replacement
6.4 Sensor Replacement • The monitor is to be powered down before opening and servicing the device • To remove sensor module, simply pull-out sensor module • Plug sensor module into top or bottom socket • If top socket, adjust alarm settings 0, 3, 6 to suit the gas (if the previous sensor board in the same slot is identical, the alarm level remains the same) •... -
Page 33: Fault Monitoring
6.5 Fault Monitoring Error cleared (no error) No sensor Low voltage High voltage Sensor A missing or not registered Sensor B missing or not registered Both sensors missing or not registered Sensor A end of life (need to replace sensor) Sensor B end of life (need to replace sensor) Both sensors end of life CAN error: Qty not matching option 77... -
Page 34: Bacnet Network Configuration
7.0 BACnet Network Configuration For instructions on changing settings see section 4.3 Setting 46 Bacnet Mode select 0, 1, 2 Default 0 0 = communication disabled 1 = communication enabled 2 = communication enabled and display all monitors on CAN network Setting 47 BMA MAC address 0-127... - Page 35 Object Table Type and Instance Object Name Object Property Parameter gas reading 1 Present value (R) Gas reading local sensor A gas reading 2 Present value (R) Gas reading local sensor B Ambient temperature Present value (R) Temperature in celsius BI 0 Input 1 Present value (R)
- Page 36 Installation Guide PDF www.belimo.com...
Need help?
Do you have a question about the 22G14-5C and is the answer not in the manual?
Questions and answers